Automatically sync posts (or WooCommerce Product) and media images as featured image and gallery.
Automatically sync posts and media images as featured image and gallery.
Images with names are given as `ID`:
* Automatic syncing as featured image to posts
* Automatic syncing as featured image to pages
* Automatic syncing as featured image to WooCommerce products
* Automatic syncing as gallery images to WooCommerce products
Images named as product `SKU` (Pro):
* Automatic syncing as featured image to WooCommerce products
* Automatic syncing as gallery images to WooCommerce products
Please comment 💬, rate ⭐ and share 👍
Creating an online store with WordPress has never been easier, thanks to the powerful WooCommerce plugin. Once you've set up your store, the next step is to add products for sale. Each product requires essential information like name, price, and description to entice potential customers. Additionally, incorporating images is crucial for showcasing your products effectively. WordPress allows you to upload images to the media library and seamlessly integrate them into your product listings, including setting featured images and creating galleries.
However, managing a large inventory of products can be time-consuming, especially when individually assigning images to each one. To streamline this process, a convenient plugin comes to the rescue. This plugin simplifies the task of collectively assigning featured and gallery images to multiple products, saving you valuable time and effort. By utilizing this tool, you can effortlessly associate products with images, ensuring your online store looks visually appealing and professional without the hassle of manual image assignments.
The “Automatic Gallery And Featured Image Sync” plugin allows for the automatic synchronization of posts and media images to be set as featured images and galleries. Images with specific names are assigned as IDs, enabling seamless syncing of featured images to posts, pages, and WooCommerce products. Additionally, images named after product SKUs can be automatically synced as featured images and gallery images for WooCommerce products.
Name Your Images
- Use the following file naming format: [ID]-[Sort].[file extension]
- Make sure the file names match the post or product IDs.
- Make sure images do not contain embedded EXIF metadata.
- Set the “Sort” value of the file you want to be the featured image to “1”. For example, if you have a post with ID 123 and want to set an image as the featured image, name the file
123-1.jpg. - Upload your images to the WordPress media library.
Example:
- Post ID: 123
- The image named
123-1.jpg will be automatically set as the featured image for the product with ID 123. - The image named
123-2.jpg will be included in the gallery for the product with ID 123. - The image named
123-3.jpg will be included in the gallery for the product with ID 123.
Assign Images to Posts, Pages, or Products
Warning: This plugin adds new rows to the database for matching. Backup your database before matching.
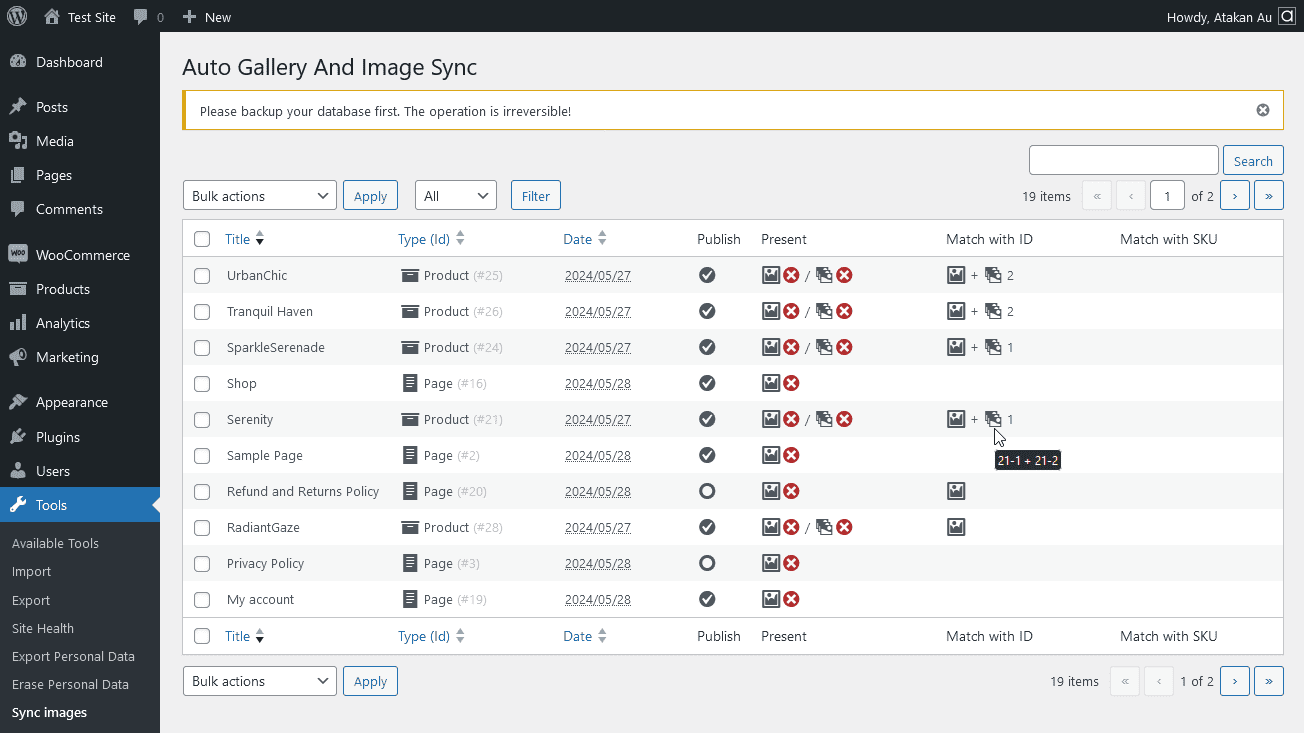
- Go to the "Tools" > "Image Sync" section in your WordPress dashboard.
- Optionally, filter the list for posts, pages and products.
- Check the checkboxes of the items to be synchronized.
- Select and apply the "Sync with Id" action.
- For posts, pages and WooCommerce products,the plugin will automatically detect and set it as the featured image if its name matches the post or page ID.
- For WooCommerce products, the plugin will automatically sync them as featured images and gallery images.
You can select and deselect all items with the checkbox in the header of the table. The “Match with ID” and “Match with SKU” columns contain information about the images in the media library that are matched with the item. The first icon indicates that the featured image matches. The second icon represents the image gallery. Next to it is the number of media matched for the image gallery. Next to this is the number of matching media for the image gallery. Hover the mouse over the icons and you will see the meta names of the matching medias.
Automatic Gallery And Featured Image Sync PRO version
The free version of the "Automatic Gallery And Featured Image Sync" plugin uses the ID of the post or product as the matching criterion. This means that the plugin will match images to posts or products based on their ID number.
The PRO version of the plugin adds the ability to match images to posts or products based on their SKU value. This is a more flexible matching criterion, as it allows you to match images to posts or products even if their ID numbers are different.
In addition, the PRO version of the plugin provides a number of additional settings that allow you to customize the way that the plugin works.
Benefits of using the PRO version:
- More flexible matching criterion (SKU)
- Additional settings to customize the plugin's behavior
If you need to match images to posts or products based on their SKU value, or if you want to customize the way that the plugin works, then the PRO version of the plugin is a good option.
PRO version settings:
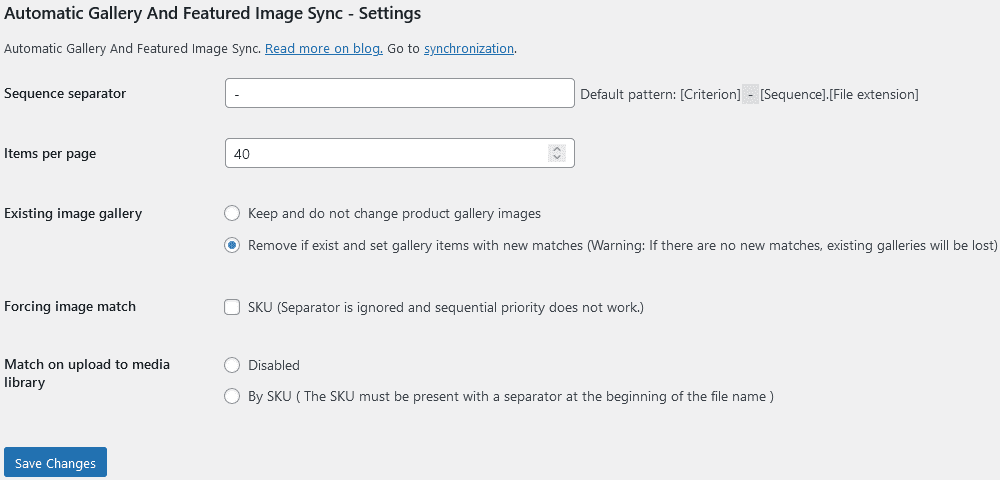
Go to the "Settings" > "Sync images" section in your WordPress dashboard.
Sequence Separator
The "Sequence separator" setting plugin allows you to specify a character or string to separate the sequence number from the rest of the file name.By default, the plugin uses a hyphen (-) as the sequence separator. This means that file names must follow the pattern:
[Criterion]-[Sequence].[File extension]
Example:
If you have a post with ID 123 and want to set an image as the featured image, you would name the file 123-1.jpg.
If you want to use an underscore (_) as the sequence separator instead, you would set the "Sequence separator" setting to _. This would allow you to use file names like the following:
123_1.jpg
123_2.jpg
123_3.jpg
Note: The sequence separator must be a character or string that is not used in the criterion part of the file name.
Items per page
The "Items per page" setting allows you to specify the number of items that will be displayed on each page of Sync page.
Note: It is important to note that increasing the number of items per page will also increase the number of database queries. This can slow down the page loading if you have a large number of items. Therefore, it is important to choose a number of items per page that is appropriate for your website and server. You may want to use a lower number of items per page to avoid slowing down the sync page.
Existing image gallery
The "Existing image gallery" setting allows you to specify how the plugin should handle existing image galleries. You have two options for this setting:
- Keep and do not change product gallery images: This option will keep your existing image galleries unchanged. The plugin will not add or remove any images from your existing galleries.
- Remove if exist and set gallery items with new matches: This option will remove your existing image galleries and replace them with new galleries that are generated by the plugin. If there are no new matches for an existing gallery, the gallery will be lost.
Example:
Let's say you have a product with the stock code "abc". You have manually added two images to the product gallery: "img-x.png" and "img-y.png".
You then upload two new images to the media library: "abc-1.png" and "abc-2.png". These new images match the product's stock code.
When you use the "Automatic Gallery And Featured Image Sync" plugin to create a new gallery for this product, if you choose the second option, the plugin will remove the existing gallery and create a new gallery with the following images:
The existing images ("img-x.png" and "img-y.png") will not be used in the new gallery.
Warning:
It is important to note that if you choose the second option and there are no new matches for an existing gallery, the gallery will be lost. This is because the plugin will remove the existing gallery and will not create a new gallery. Therefore, it is important to choose the "Existing image gallery" setting carefully. If you are not sure which option to choose, it is best to select the "Keep and do not change product gallery images" option.
Forcing image match: SKU
The "Forcing image match" setting allows you to force the plugin to match images to products .
When you enable "SKU" setting, the plugin will ignore the "Sequence" settings and will simply match images to products based on their SKU. The first image that matches the product's SKU will be set as the featured image.
Example:
Let's say you have a product with the SKU "abc". You have two images in your media library: "abc-front.png" "abc-side.png" and "abc-back.png".
If you enable the "Forcing image match: SKU" setting, the plugin will match both images to the product. The image "abc-back.png" will be set as the featured image because it is the first alphabetically matching image.
Match on upload to media library
By SKU
This setting only works for WooCommerce products. Allows you to automatically match images to products when they are uploaded to your media library. When you enable this setting, the plugin will automatically match images to products based on their file name. The plugin will look for the product's SKU in the file name of the image. If the SKU is found, the plugin will match the image to the product.
Ignore image prefix
Allows you to ignore the prefix of the image file name when matching files. This allows you to match files even if they have different prefixes. The setting is only available when using the SKU matching method. The plugin will match files based on the following format:[Prefix]-[SKU]-[Sequence].[file extension]
For example, if you have a product with the Sku "abc123" and an image file named "my-brand-abc123-1.jpg", the plugin will match the files and set the image as the featured image for the product.
Warning: The file name must not contain any other product SKUs. If the file name contains multiple SKUs, the plugin will not be able to match to the correct product. For example, if you have a file named "prefix-12345-67890-1.jpg" and two products with the SKUs "12345" and "67890", the plugin checks the following matches respectively: "prefix-12345-67890", "12345-67890", "prefix-12345", "67890", "12345", "prefix". The plugin matches the first SKU it finds, which is "67890". To avoid this problem, you should make sure that your file names only contain one SKU.
Other word delimiter
Allows you to specify an extra character used to separate the prefix parts of a file name. By default, the plugin uses the hyphen (-) character to separate filenames. However, if your filenames use a different character, you can use this setting to tell the plugin to use that character as well.
For example, if your file names also use the underscore character (_) as a separator; You would enter "_" into the "Other word delimiter" setting, such as "prefix_brand_67890-1.jpg". This tells the plugin to use underscore (_) and hyphen (-) characters to separate parts of your filenames.
== Changelog ==
= 1.0.0 =
* Initial version released
Auto Gallery And Image Sync
Automatically sync posts and media images as featured image and gallery.Keywords:
Auto featured image generator ,
Quick featured image ,
Bulk featured image ,
Auto featured image from title ,
Quick featured images


