For a simple product, the pricing is straightforward and typically involves a single price. Customers are chargedthe same amount regardless of any specific variations or options.

When it comes to a product with variations, the pricing model becomes more complex. This typically involves offering thesame base product with different options, such as size, color, or features.
Let's consider a simple example of pricing for variants of a product, such as T-shirts:
Variant Type: Color
- Red
- White
For this example, we can use the tiered pricing approach:
- Red color T-shirt: $10
- White color T-shirt: $12
WooCommerce provides a built-in way to add these options to a product page. This system consists of two basic features: 'attributes' and 'variations'.
Attributes in WooCommerce refer to the characteristics of a product that can be used for creating variations.
Variations are the specific combinations of attributes that create different versions of a product.
For this example:
Attribute: Color
Variations: Red, White
A second feature can be added to this product, for example:
Attribute: Size
Variations: Small, Medium, Large
To use variations in WooCommerce, you first need to set attributes.
How to setup variations and create variable product in WooCommerce?
Set up attributes for WooCommerce products
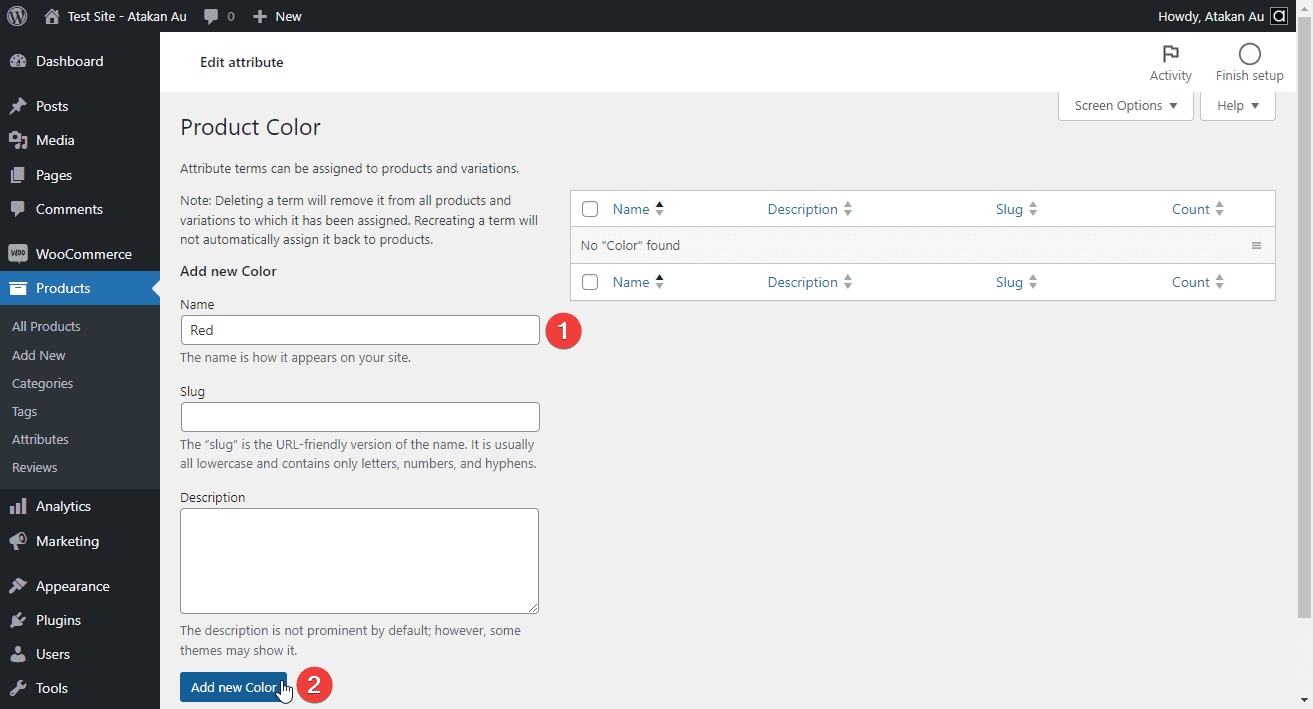
- In the WordPress dashboard, go to "Products" > "Attributes".Type the new "Attribute" name (Example: Color). Click the "Add attribute" button.

- Once you hit the Add attribute button, your new attribute will appear in the menu to the right.From there, click on the link that reads "Configure terms" next to the Attribute you’ve just created.

- Enter the name of the value that the "Attribute" can take (Example: Red).Add all possible values one by one (Example, other colors: White...)

- In this example we created a "Color" for the "Attribute". There are two options for "Color": "Red" and "White".

Create a variable WooCommerce product
Assign attributes to the product:
- Go to "Products" > "Add New". Enter data such as the name, category, etc. Scroll down to the "Product data" section.Change the "Simple product" drop-down menu value to "Variable product".Determine a unique stock code for this variable product and enter it in the "SKU" field.

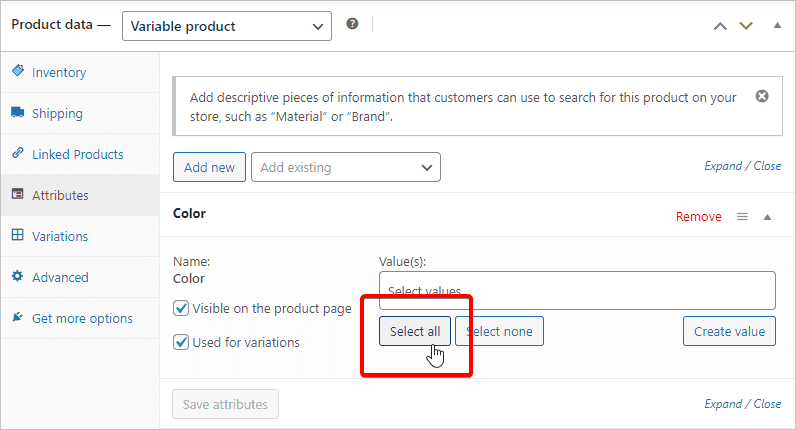
- Click on the "Attributes" tab and select the ones you will use for the product.You will see the names previously assigned for "Attributes".

- Select the values that "Attributes" can take.Add all at once with "Select All", or manually select one by one.

- Make sure that "Visible on the product page" and "Used for variations" are checked.Click the "Save attributes" button.

Add variations to the product
- Switch to the "Variations" tab."Generate variations" button adds all possible combinations of the added attributes.
Or add a new variation manually.Confirm this notification and continue: Do you want to generate all variations? This will create a new variation for each and every possible combination of variation attributes (max 50 per run).
- Show collapsed product editing areas.Use the "Expand / Close" and "Edit" buttons.

- Under each variant, be sure to enter the price and SKU number settings for that variant.When you have finished making all changes, click the "Save changes" button.

- Click the "Publish" button.Publish the product and see it in the store.


0 comments:
Post a Comment
ⓘ Comment is published after moderation.