Automated Import Products to Cart WooCommerce Plugin

WooCommerce, the popular e-commerce plugin for WordPress, empowers businesses to sell diverse products online. However, stores with an extensive inventory, such as manufacturers and distributors, often face challenges in managing a vast array of similar products. If you manage a WooCommerce store with a vast product catalog, handling large orders can be a daunting task. Adding each item to the cart one by one can be extremely time-consuming, especially when dealing with similar products with slight variations.


This is where the bulk add to cart feature comes into play. It allows you to easily add multiple products to your cart in a single step, saving you precious time and effort. This feature is particularly beneficial for businesses such as manufacturers, machine part suppliers, and distributors who often deal with bulk orders.


For instance, a distributor company may have dealer customers who regularly purchase similar products. Instead of manually adding each item to the cart, they can use the bulk add to cart feature to quickly add all the necessary products based on a previous order. This not only saves time but also minimizes errors and ensures accuracy.


By streamlining the order process, the bulk add to cart feature enhances efficiency and simplifies order management for businesses with large product catalogs. This feature allows you to upload a CSV (Comma Separated Values) file containing your product data, including SKU (stock code) and quantities.


Benefits of Importing Multiple Items to Cart

* Saves Time: Importing products in bulk can save you countless hours compared to manual entry.

* Reduces Errors: By automating the process, you minimize the risk of human error, ensuring accuracy and consistency.

* Improves Efficiency: Product import streamlines your workflow, allowing you to focus on other important tasks.


To add the file input field to your preferred WordPress page or post, follow these steps:

1. Log in to your WordPress dashboard.

2. Click on the "Pages" or "Posts" tab.

3. Click on the title of the page or post that you want to edit.

4. In the post editor, click on the "Text" tab.

5. Paste the following shortcode into the post editor:

[atakanau_woo_cart_dropfile]


Importing products in bulk to WooCommerce cart by uploading a file

1. Prepare Your CSV File: The first row must include the column headers: "SKU" and "quantity". In the following rows, write the "SKU" and "quantity" values of the products to be added to the cart.

2. Drag and drop the file from your computer onto the file input area. The file will start uploading automatically. Or, Click the file input area to open a file explorer window. Navigate to the file you want to upload and select it. Click the "Open" button to start uploading the file.


You can track the progress of the upload in the web page. Once the file is uploaded, import process will begin. Each row in your CSV file will be automatically added to your cart with the quantity you specify. Any rows that cannot be matched by the "SKU" value will be skipped. You will see the progress in the progress bar with the total number of rows, the number of completed rows, and the percentage of completed rows.

Share:

CSS chat button - free WhatsApp WP Plugin


CSS chat button - WhatsApp WordPress Plugin
Compact, Simple, Speedy chat button. It allows visitors to contact you via messaging app. Chat with your website visitors through online chat apps. Place a floating button on your site and let people contact you. Lightweight and fast loading for best SEO.
Add the clickable WhatsApp button for chat to your site.

Compact: Less than 5 KB file size, only CSS and HTML
Simple: Very basic settings
Speedy: No Sql query for fast loading

CSS chat button Pro

Coming soon.

CSS chat button Download

CSS chat button - WordPress Plugin

Usage

Add the plugin's folder in the WordPress' plugin directory, or install the plugin through the WordPress plugins screen directly.
Activate the plugin through the 'Plugins' screen in WordPress.

Go to Settings -> CSS chat button
Input your contact info
Save settings

Settings page of CSS chat button Settings page of CSS chat button
WhatsApp chat button at bottom right on Twenty Twenty-Three Version: 1.1 WhatsApp chat button floating Twenty Twenty-Three theme
Make it compatible with your theme. Adjust the position and size of the button as you wish.
WhatsApp chat button at bottom left on Woodmart theme version 7.1.4 WhatsApp chat button floating Woodmart theme
WhatsApp chat button at bottom right on Flatsome theme version 3.15.6 WhatsApp chat button floating Flatsome theme
== Changelog ==

= Version 1.0.0 =
* Initial version released

WhatsApp Contact Button, WhatsApp Business chat button
Share:

PHPMyAdmin Bootstrap Dark Theme 5.2

PHPMyAdmin Dark Theme 5.2 black download
Name: Bootstrap Dark theme for phpMyAdmin
Author: Atakan Au
Download Bootstrap Dark theme zip file for phpMyAdmin

Is there dark mode in phpMyAdmin?

Can I use phpMyAdmin in dark mode?
1

Yes! You can use this addition to change the PhpMyAdmin interface to a dark look with a predominance of black.

1
Theme has been tested on PhpMyAdmin version 5.2.0. The files were developed based on the original "Bootstrap" theme that came with PhpMyAdmin version 5.2.0. Bootstrap version was upgraded and v5.3.0-alpha1 was used.

How do I add a theme to phpMyAdmin?

How to install a theme in phpMyAdmin?
1

After downloading the zipped folder, unzip it into the \themes\ directory.

1
phpMyAdmin
├── templates
├── themes
│   └── bootstrap
│   └── bootstrap-dark
│       ├── css/
│       ├── img/
│       ├── jquery/
│       ├── scss/
│       ├── screen.png
│       └── theme.json

How do I change phpMyAdmin to dark mode?

How do I use phpMyAdmin in dark mode?
1

Go to the PhpMyAdmin home page with your browser. Select the "Theme" setting under "Appearance Settings" to "Bootstrap Dark".

1
✅ The original dark theme colors of Bootstrap has been applied.
✅ Delete / Empty / Drop icons are colored red.
✅ Insert / Copy icons are colored green.
✅ Select and Input elements adapted to Bootstrap.
✅ Console button made semi transparent.
✅ SQL query input field adapted to the dark theme.

Screenshots:

List tables
List tables PHPMyAdmin Dark Theme 5.2 black download
Browse table rows
Browse table rows PHPMyAdmin Dark Theme 5.2 black download
Edit row values
Edit row values PHPMyAdmin Dark Theme 5.2 black download
Table structure
Table structure PHPMyAdmin Dark Theme 5.2 black download
SQL query screen
SQL query screen PHPMyAdmin Dark Theme 5.2 black download
Search
Search PHPMyAdmin Dark Theme 5.2 black download
Exporting
Exporting PHPMyAdmin Dark Theme 5.2 black download
Share:

Batch download files keeping directory structure

You can bulk download all listed directories and files with PowerShell on Windows. Jump to online tool

How to batch download files and folders keeping directory structure?

You must do a two-step process to preserve the directory structure and filenames.
1

Create specific directory and file with PowerShell's "New-Item" command. Then save the file on the internet to your local disk with the "curl" command.

1
Download files keeping directory structure

How to download files keeping directory structure Windows 10?

Open PowerShell

Hit the "Start" icon.
Then choose "All Apps" Scroll down, press "Windows PowerShell" folder to open it. Click "Windows PowerShell" to run it.
Open PowerShell

Use PowerShell's commands

Create the directory on your disk
Create the necessary directory and subdirectories on your local disk with PowerShell's "New-Item" command:
New-Item -ItemType File -Force -Path C:\dir\sub_dir\file.zip

For example, you will download these two files:
https://cdnjs.cloudflare.com/ajax/libs/bootstrap/5.2.3/js/bootstrap.min.js
https://cdnjs.cloudflare.com/ajax/libs/bootstrap/5.2.3/css/bootstrap.min.css


Let's create these directories and files:
C:\local\htdocs\asset\bootstrap\5.2.3\js\bootstrap.min.js
C:\local\htdocs\asset\bootstrap\5.2.3\css\bootstrap.min.css


Run these commands:
New-Item -ItemType File -Force -Path C:\local\htdocs\asset\bootstrap\5.2.3\js\bootstrap.min.js
New-Item -ItemType File -Force -Path C:\local\htdocs\asset\bootstrap\5.2.3\css\bootstrap.min.css
Create the necessary directory and subdirectories on your local disk with PowerShell New-Item command

Download the file contents with the "curl" command:
Download the files with the "curl" command and overwrite their contents:
curl https://domain.tld/path/sub_path/file.zip -O C:\dir\sub_dir\file.zip
To save the two files in the example above to your disk, keeping the same directory structure, run these commands:
curl https://cdnjs.cloudflare.com/ajax/libs/bootstrap/5.2.3/js/bootstrap.min.js -O C:\local\htdocs\asset\bootstrap\5.2.3\js\bootstrap.min.js
curl https://cdnjs.cloudflare.com/ajax/libs/bootstrap/5.2.3/css/bootstrap.min.css -O C:\local\htdocs\asset\bootstrap\5.2.3\css\bootstrap.min.css


Alternatively, the "Invoke-WebRequest" command can be used in the following formats:
Invoke-WebRequest -Uri "Source-Uri" -OutFile "Save-File"
Download the files with curl command

Download the files with curl command


Automatically create the PowerShell script


Paste your url list. Set parameters. Generate your PowerShell. Copy the script. Paste it into the PowerShell command line. That is all.

Download url list:


Options

Combine all files in one zip file and download. It only works in modern and up to date browser. The total file size should not exceed ~5 MB.


PowerShell script:


Automatically create the PowerShell script onlie tool
Share:

Automatic Gallery And Featured Image Sync - WP Plugin

Automatically sync posts WooCommerce Product and media images as featured image and gallery
Automatically sync posts (or WooCommerce Product) and media images as featured image and gallery.

Automatically sync posts and media images as featured image and gallery.

Images with names are given as `ID`:

*   Automatic syncing as featured image to posts 
*   Automatic syncing as featured image to pages 
*   Automatic syncing as featured image to WooCommerce products 
*   Automatic syncing as gallery images to WooCommerce products 

Images named as product `SKU` (Pro):

*   Automatic syncing as featured image to WooCommerce products 
*   Automatic syncing as gallery images to WooCommerce products 

Please comment 💬, rate ⭐ and share 👍
Automatic Gallery And Featured Image Sync - WordPress Plugin

Creating an online store with WordPress has never been easier, thanks to the powerful WooCommerce plugin. Once you've set up your store, the next step is to add products for sale. Each product requires essential information like name, price, and description to entice potential customers. Additionally, incorporating images is crucial for showcasing your products effectively. WordPress allows you to upload images to the media library and seamlessly integrate them into your product listings, including setting featured images and creating galleries.

However, managing a large inventory of products can be time-consuming, especially when individually assigning images to each one. To streamline this process, a convenient plugin comes to the rescue. This plugin simplifies the task of collectively assigning featured and gallery images to multiple products, saving you valuable time and effort. By utilizing this tool, you can effortlessly associate products with images, ensuring your online store looks visually appealing and professional without the hassle of manual image assignments.

The “Automatic Gallery And Featured Image Sync” plugin allows for the automatic synchronization of posts and media images to be set as featured images and galleries. Images with specific names are assigned as IDs, enabling seamless syncing of featured images to posts, pages, and WooCommerce products. Additionally, images named after product SKUs can be automatically synced as featured images and gallery images for WooCommerce products.

Name Your Images

  • Use the following file naming format: [ID]-[Sort].[file extension]
  • Make sure the file names match the post or product IDs.
  • Make sure images do not contain embedded EXIF metadata.
  • Set the “Sort” value of the file you want to be the featured image to “1”. For example, if you have a post with ID 123 and want to set an image as the featured image, name the file 123-1.jpg.
  • Upload your images to the WordPress media library.


Example:

  • Post ID: 123
  • The image named 123-1.jpg will be automatically set as the featured image for the product with ID 123.
  • The image named 123-2.jpg will be included in the gallery for the product with ID 123.
  • The image named 123-3.jpg will be included in the gallery for the product with ID 123.


Assign Images to Posts, Pages, or Products

Warning: This plugin adds new rows to the database for matching. Backup your database before matching.

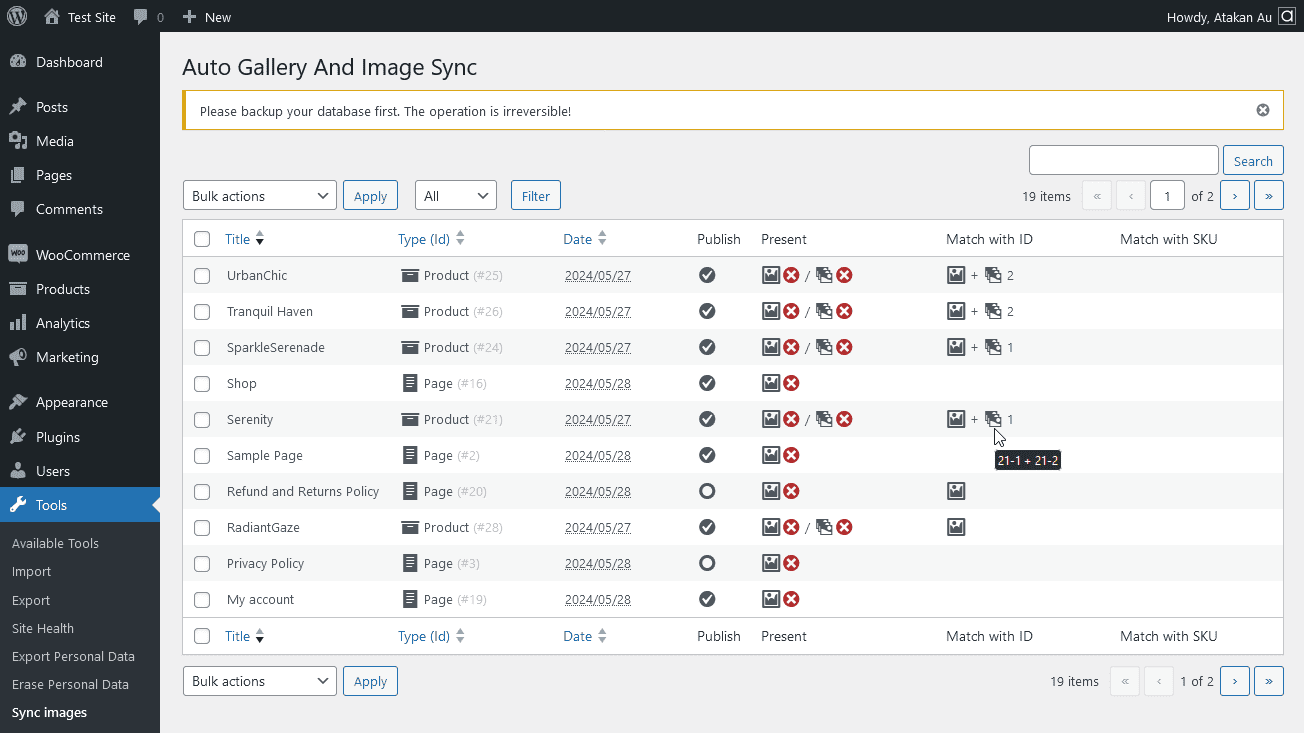
  • Go to the "Tools" > "Image Sync" section in your WordPress dashboard.
  • Optionally, filter the list for posts, pages and products.
  • Check the checkboxes of the items to be synchronized.
  • Select and apply the "Sync with Id" action.
  • For posts, pages and WooCommerce products,the plugin will automatically detect and set it as the featured image if its name matches the post or page ID.
  • For WooCommerce products, the plugin will automatically sync them as featured images and gallery images.

You can select and deselect all items with the checkbox in the header of the table. The “Match with ID” and “Match with SKU” columns contain information about the images in the media library that are matched with the item. The first icon indicates that the featured image matches. The second icon represents the image gallery. Next to it is the number of media matched for the image gallery. Next to this is the number of matching media for the image gallery. Hover the mouse over the icons and you will see the meta names of the matching medias.

Automatic Gallery And Featured Image Sync Tool Screenshot

Automatic Gallery And Featured Image Sync PRO version

The free version of the "Automatic Gallery And Featured Image Sync" plugin uses the ID of the post or product as the matching criterion. This means that the plugin will match images to posts or products based on their ID number.

The PRO version of the plugin adds the ability to match images to posts or products based on their SKU value. This is a more flexible matching criterion, as it allows you to match images to posts or products even if their ID numbers are different.

In addition, the PRO version of the plugin provides a number of additional settings that allow you to customize the way that the plugin works.

Benefits of using the PRO version:

  • More flexible matching criterion (SKU)
  • Additional settings to customize the plugin's behavior

If you need to match images to posts or products based on their SKU value, or if you want to customize the way that the plugin works, then the PRO version of the plugin is a good option.

PRO version settings:

Go to the "Settings" > "Sync images" section in your WordPress dashboard.

Automatic Gallery And Featured Image Sync Pro Settings

Sequence Separator

The "Sequence separator" setting plugin allows you to specify a character or string to separate the sequence number from the rest of the file name.By default, the plugin uses a hyphen (-) as the sequence separator. This means that file names must follow the pattern:

[Criterion]-[Sequence].[File extension]

Example:

If you have a post with ID 123 and want to set an image as the featured image, you would name the file 123-1.jpg.

If you want to use an underscore (_) as the sequence separator instead, you would set the "Sequence separator" setting to _. This would allow you to use file names like the following:

123_1.jpg
123_2.jpg
123_3.jpg

Note: The sequence separator must be a character or string that is not used in the criterion part of the file name.

Items per page

The "Items per page" setting allows you to specify the number of items that will be displayed on each page of Sync page.

Note: It is important to note that increasing the number of items per page will also increase the number of database queries. This can slow down the page loading if you have a large number of items. Therefore, it is important to choose a number of items per page that is appropriate for your website and server. You may want to use a lower number of items per page to avoid slowing down the sync page.

Existing image gallery

The "Existing image gallery" setting allows you to specify how the plugin should handle existing image galleries. You have two options for this setting:

  • Keep and do not change product gallery images: This option will keep your existing image galleries unchanged. The plugin will not add or remove any images from your existing galleries.
  • Remove if exist and set gallery items with new matches: This option will remove your existing image galleries and replace them with new galleries that are generated by the plugin. If there are no new matches for an existing gallery, the gallery will be lost.

Example:

Let's say you have a product with the stock code "abc". You have manually added two images to the product gallery: "img-x.png" and "img-y.png".

You then upload two new images to the media library: "abc-1.png" and "abc-2.png". These new images match the product's stock code.

When you use the "Automatic Gallery And Featured Image Sync" plugin to create a new gallery for this product, if you choose the second option, the plugin will remove the existing gallery and create a new gallery with the following images:

  • abc-1.png
  • abc-2.png

The existing images ("img-x.png" and "img-y.png") will not be used in the new gallery.

Warning:

It is important to note that if you choose the second option and there are no new matches for an existing gallery, the gallery will be lost. This is because the plugin will remove the existing gallery and will not create a new gallery. Therefore, it is important to choose the "Existing image gallery" setting carefully. If you are not sure which option to choose, it is best to select the "Keep and do not change product gallery images" option.

Forcing image match: SKU

The "Forcing image match" setting allows you to force the plugin to match images to products .

When you enable "SKU" setting, the plugin will ignore the "Sequence" settings and will simply match images to products based on their SKU. The first image that matches the product's SKU will be set as the featured image.

Example:

Let's say you have a product with the SKU "abc". You have two images in your media library: "abc-front.png" "abc-side.png" and "abc-back.png".

If you enable the "Forcing image match: SKU" setting, the plugin will match both images to the product. The image "abc-back.png" will be set as the featured image because it is the first alphabetically matching image.

Match on upload to media library

By SKU

This setting only works for WooCommerce products. Allows you to automatically match images to products when they are uploaded to your media library. When you enable this setting, the plugin will automatically match images to products based on their file name. The plugin will look for the product's SKU in the file name of the image. If the SKU is found, the plugin will match the image to the product.

Ignore image prefix

Allows you to ignore the prefix of the image file name when matching files. This allows you to match files even if they have different prefixes. The setting is only available when using the SKU matching method. The plugin will match files based on the following format:[Prefix]-[SKU]-[Sequence].[file extension]

For example, if you have a product with the Sku "abc123" and an image file named "my-brand-abc123-1.jpg", the plugin will match the files and set the image as the featured image for the product.

Warning: The file name must not contain any other product SKUs. If the file name contains multiple SKUs, the plugin will not be able to match to the correct product. For example, if you have a file named "prefix-12345-67890-1.jpg" and two products with the SKUs "12345" and "67890", the plugin checks the following matches respectively: "prefix-12345-67890", "12345-67890", "prefix-12345", "67890", "12345", "prefix". The plugin matches the first SKU it finds, which is "67890". To avoid this problem, you should make sure that your file names only contain one SKU.

Other word delimiter

Allows you to specify an extra character used to separate the prefix parts of a file name. By default, the plugin uses the hyphen (-) character to separate filenames. However, if your filenames use a different character, you can use this setting to tell the plugin to use that character as well.

For example, if your file names also use the underscore character (_) as a separator; You would enter "_" into the "Other word delimiter" setting, such as "prefix_brand_67890-1.jpg". This tells the plugin to use underscore (_) and hyphen (-) characters to separate parts of your filenames.

== Changelog ==

= 1.0.0 =
* Initial version released
Auto Gallery And Image Sync
Automatically sync posts and media images as featured image and gallery.
Share:

How to send original size picture on WhatsApp

How to send pictures via Whatsapp without losing quality?

About 1 minutes
WhatsApp send photo as document
Send pictures on whatsapp without losing quality. Keep images full size.

Choose who to send the file to.
Select the paper clip icon.
Select the document icon.
Select photos / images. Press and hold to select multiple.
Click the "Send" button in the top right.
Click the "Send" button again.
Voila! Pictures were sent without losing quality.
Share:

Download Official Full Standalone Offline Installer of Browsers

Download Official Full Standalone Offline Installer Chrome Canary Beta Dev Firefox Developer Edition Nightly Opera Crypto GX Developer  Browser
When we try to download the setup file of any web browser, the link on the website usually makes us download their online installer. At first, the online installers download quickly to your computer as they are very small in size, about 1 MB. However, this installation file does not contain all the files required to install the web browser. It downloads the required large files separately. When we run this file, an internet connection is required to download all the necessary files from the server. There may be a situation when you need to install the scanner on more than one computer. You will need an internet connection on each machine to be able to install it. Downloading installation files more than once would be a waste of time. Too many internet connections will waste your bandwidth.

Google Chrome Offline Installer

Chrome's development process is split into four different “release channels”: Stable, Beta, Dev, and Canary.
Windows 64 bit versions:
Chrome 64 bit official full standalone offline installer download Chrome Canary 64 bit official full standalone offline installer download Chrome Beta 64 bit official full standalone offline installer download Chrome Dev 64 bit official full standalone offline installer download
Windows 32 bit (i386 - x86) versions:
Chrome 32 bit official full standalone offline installer download Chrome Canary 32 bit official full standalone offline installer download Chrome Beta 32 bit official full standalone offline installer download Chrome Dev 32 bit official full standalone offline installer download

Opera Offline Installer

Windows 64 bit versions:
Opera 64 bit official full standalone offline installer download Opera Developer 64 bit official full standalone offline installer download Opera Crypto 64 bit official full standalone offline installer download Opera GX 64 bit official full standalone offline installer download
Windows 32 bit (i386 - x86) versions:
Opera 32 bit official full standalone offline installer download Opera Developer 32 bit official full standalone offline installer download Opera Crypto 32 bit official full standalone offline installer download Opera GX 32 bit official full standalone offline installer download

Mozilla Firefox Offline Installer

Windows 64 bit versions:
Firefox 64 bit official full standalone offline installer download Firefox Developer Edition 64 bit official full standalone offline installer download Firefox Nightly 64 bit official full standalone offline installer download
Windows 32 bit (i386 - x86) versions:
Firefox 32 bit official full standalone offline installer download Firefox Developer Edition 32 bit official full standalone offline installer download Firefox Nightly 32 bit official full standalone offline installer download

For example, if you wish to download the US English installer for Windows (32bit) the url is
https://download.mozilla.org/?product=firefox-latest&os=win&lang=en-US

This could be pasted into the location bar of a browser, or used with curl or wget, e.g.
wget -O FirefoxSetup.exe "https://download.mozilla.org/?product=firefox-latest&os=win&lang=en-US"

For other operating systems replace 'os=win' with:
   Windows 64bit              os=win64

OS X os=osx
Linux x86_64 os=linux64
Linux i686 os=linux
For other languages replace 'lang=en-US' with:
Official Firefox source.
Language NameLanguage Code
Acholiach
Afrikaansaf
Albaniansq
Arabicar
Aragonesean
Armenianhy-AM
Assameseas
Asturianast
Azerbaijaniaz
Basqueeu
Belarusianbe
Bengali (Bangladesh)bn-BD
Bengali (India)bn-IN
Bosnianbs
Bretonbr
Bulgarianbg
Catalanca
Chinese (Simplified)zh-CN
Chinese (Traditional)zh-TW
Croatianhr
Czechcs
Danishda
Dutchnl
English (British)en-GB
English (South African)en-ZA
Esperantoeo
Estonianet
Finnishfi
Frenchfr
Frisianfy-NL
Fulahff
Gaelic (Scotland)gd
Galiciangl
Germande
Greekel
Gujarati (India)gu-IN
Hebrewhe
Hindi (India)hi-IN
Hungarianhu
Icelandicis
Indonesianid
Irishga-IE
Italianit
Kannadakn
Kazakhkk
Khmerkm
Koreanko
Latvianlv
Ligurianlij
Lithuanianlt
Lower Sorbiandsb
Macedonianmk
Maithilimai
Malayms
Malayalamml
Marathimr
Norwegian (Bokmål)nb-NO
Norwegian (Nynorsk)nn-NO
Oriyaor
Persianfa
Polishpl
Portuguese (Brazilian)pt-BR
Portuguese (Portugal)pt-PT
Punjabi (India)pa-IN
Romanianro
Romanshrm
Russianru
Serbiansr
Sinhalasi
Slovaksk
Sloveniansl
Songhaison
Spanish (Argentina)es-AR
Spanish (Chile)es-CL
Spanish (Mexico)es-MX
Spanish (Spain)es-ES
Swedishsv-SE
Tamilta
Telugute
Thaith
Turkishtr
Ukrainianuk
Upper Sorbianhsb
Uzbekuz
Vietnamesevi
Welshcy
Xhosaxh
mikro yazılım destek
Share:

Subscribe to: Posts (Atom)