Auto Gallery And Image Sync - WP Plugin

Automatically sync posts WooCommerce Product and media images as featured image and gallery
Automatically sync posts (or WooCommerce Product) and media images as featured image and gallery.

Automatically sync posts and media images as featured image and gallery.

Images with names are given as `ID`:

*   Automatic syncing as featured image to posts 
*   Automatic syncing as featured image to pages 
*   Automatic syncing as featured image to WooCommerce products 
*   Automatic syncing as gallery images to WooCommerce products 

Images named as product `SKU` (Pro):

*   Automatic syncing as featured image to WooCommerce products 
*   Automatic syncing as gallery images to WooCommerce products 

Please comment 💬, rate ⭐ and share 👍
Auto Gallery And Image Sync - WordPress Plugin

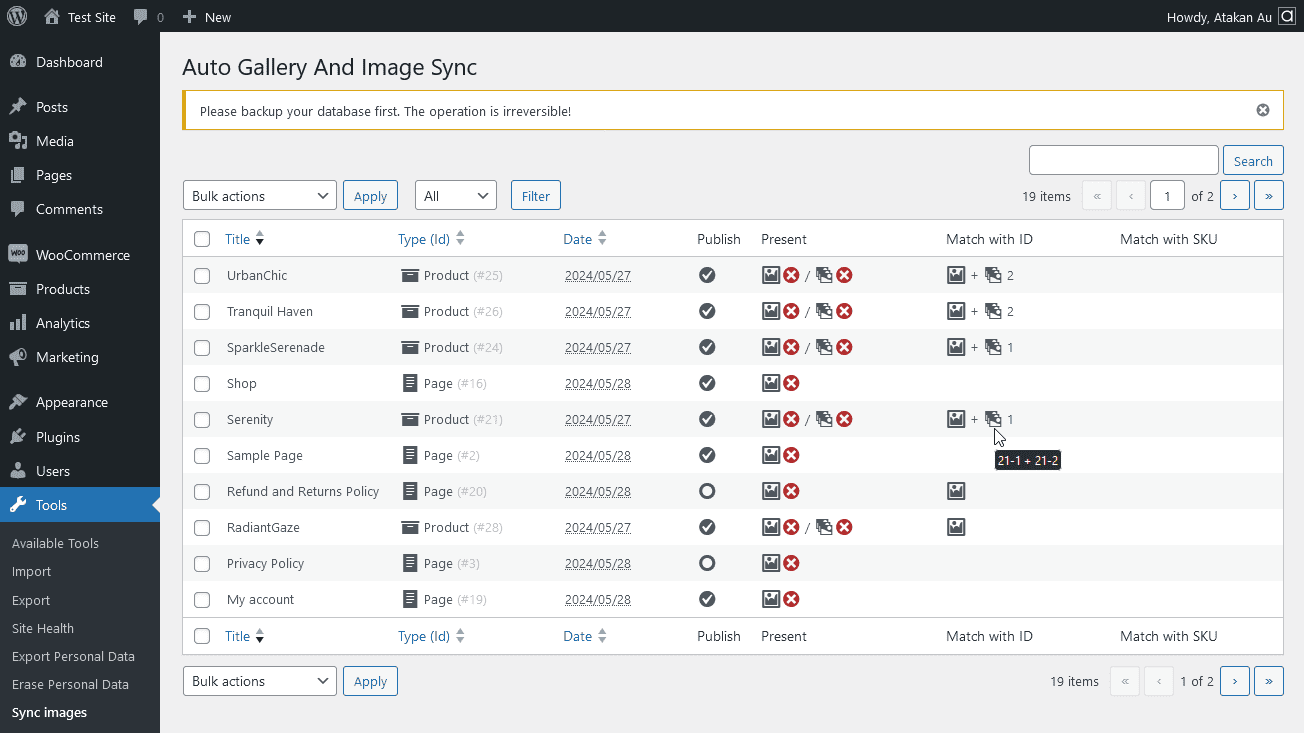
1. Go to Tools -> Sync image
2. Select the articles you want to process from the list
3. Select and apply the action.

== Changelog ==

= 1.0.0 =
* Initial version released

Auto Gallery And Image Sync
Automatically sync posts and media images as featured image and gallery.
Share:

How to send original size picture on WhatsApp

How to send pictures via Whatsapp without losing quality?

About 1 minutes
WhatsApp send photo as document
Send pictures on whatsapp without losing quality. Keep images full size.

Choose who to send the file to.
Select the paper clip icon.
Select the document icon.
Select photos / images. Press and hold to select multiple.
Click the "Send" button in the top right.
Click the "Send" button again.
Voila! Pictures were sent without losing quality.
Share:

Download Official Full Standalone Offline Installer of Browsers

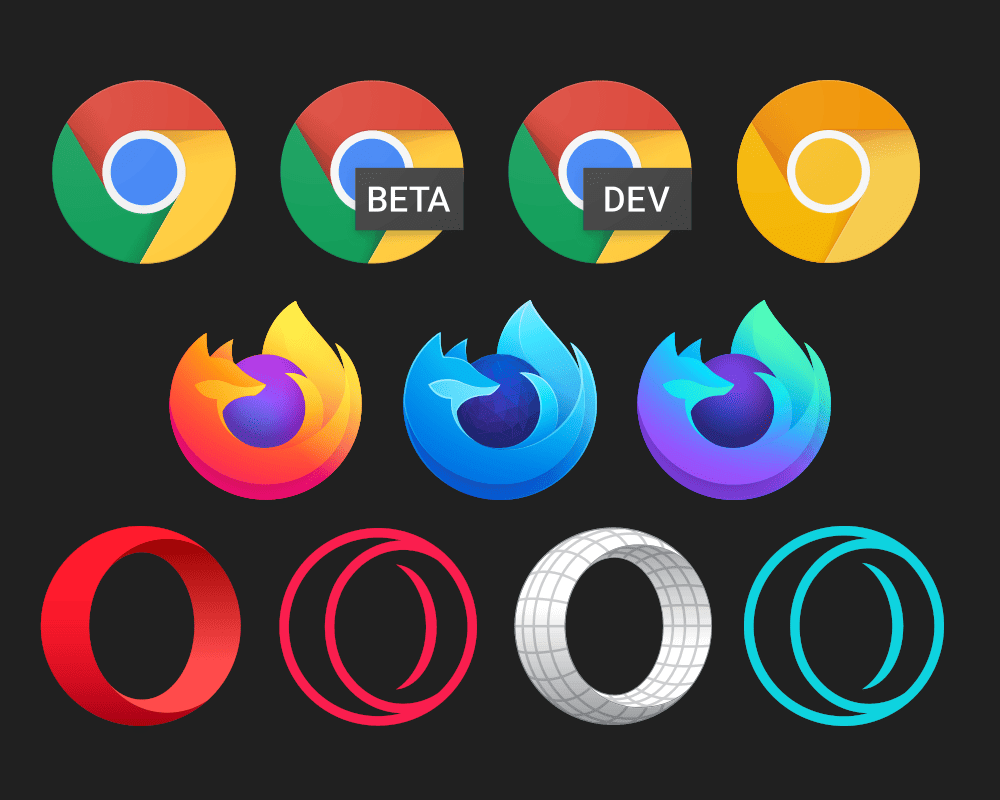
Download Official Full Standalone Offline Installer Chrome Canary Beta Dev Firefox Developer Edition Nightly Opera Crypto GX Developer  Browser
When we try to download the setup file of any web browser, the link on the website usually makes us download their online installer. At first, the online installers download quickly to your computer as they are very small in size, about 1 MB. However, this installation file does not contain all the files required to install the web browser. It downloads the required large files separately. When we run this file, an internet connection is required to download all the necessary files from the server. There may be a situation when you need to install the scanner on more than one computer. You will need an internet connection on each machine to be able to install it. Downloading installation files more than once would be a waste of time. Too many internet connections will waste your bandwidth.

Google Chrome Offline Installer

Chrome's development process is split into four different “release channels”: Stable, Beta, Dev, and Canary.
Windows 64 bit versions:
Chrome 64 bit official full standalone offline installer download Chrome Canary 64 bit official full standalone offline installer download Chrome Beta 64 bit official full standalone offline installer download Chrome Dev 64 bit official full standalone offline installer download
Windows 32 bit (i386 - x86) versions:
Chrome 32 bit official full standalone offline installer download Chrome Canary 32 bit official full standalone offline installer download Chrome Beta 32 bit official full standalone offline installer download Chrome Dev 32 bit official full standalone offline installer download

Opera Offline Installer

Windows 64 bit versions:
Opera 64 bit official full standalone offline installer download Opera Developer 64 bit official full standalone offline installer download Opera Crypto 64 bit official full standalone offline installer download Opera GX 64 bit official full standalone offline installer download
Windows 32 bit (i386 - x86) versions:
Opera 32 bit official full standalone offline installer download Opera Developer 32 bit official full standalone offline installer download Opera Crypto 32 bit official full standalone offline installer download Opera GX 32 bit official full standalone offline installer download

Mozilla Firefox Offline Installer

Windows 64 bit versions:
Firefox 64 bit official full standalone offline installer download Firefox Developer Edition 64 bit official full standalone offline installer download Firefox Nightly 64 bit official full standalone offline installer download
Windows 32 bit (i386 - x86) versions:
Firefox 32 bit official full standalone offline installer download Firefox Developer Edition 32 bit official full standalone offline installer download Firefox Nightly 32 bit official full standalone offline installer download

For example, if you wish to download the US English installer for Windows (32bit) the url is
https://download.mozilla.org/?product=firefox-latest&os=win&lang=en-US

This could be pasted into the location bar of a browser, or used with curl or wget, e.g.
wget -O FirefoxSetup.exe "https://download.mozilla.org/?product=firefox-latest&os=win&lang=en-US"

For other operating systems replace 'os=win' with:
   Windows 64bit              os=win64

OS X os=osx
Linux x86_64 os=linux64
Linux i686 os=linux
For other languages replace 'lang=en-US' with:
Official Firefox source.
Language NameLanguage Code
Acholiach
Afrikaansaf
Albaniansq
Arabicar
Aragonesean
Armenianhy-AM
Assameseas
Asturianast
Azerbaijaniaz
Basqueeu
Belarusianbe
Bengali (Bangladesh)bn-BD
Bengali (India)bn-IN
Bosnianbs
Bretonbr
Bulgarianbg
Catalanca
Chinese (Simplified)zh-CN
Chinese (Traditional)zh-TW
Croatianhr
Czechcs
Danishda
Dutchnl
English (British)en-GB
English (South African)en-ZA
Esperantoeo
Estonianet
Finnishfi
Frenchfr
Frisianfy-NL
Fulahff
Gaelic (Scotland)gd
Galiciangl
Germande
Greekel
Gujarati (India)gu-IN
Hebrewhe
Hindi (India)hi-IN
Hungarianhu
Icelandicis
Indonesianid
Irishga-IE
Italianit
Kannadakn
Kazakhkk
Khmerkm
Koreanko
Latvianlv
Ligurianlij
Lithuanianlt
Lower Sorbiandsb
Macedonianmk
Maithilimai
Malayms
Malayalamml
Marathimr
Norwegian (Bokmål)nb-NO
Norwegian (Nynorsk)nn-NO
Oriyaor
Persianfa
Polishpl
Portuguese (Brazilian)pt-BR
Portuguese (Portugal)pt-PT
Punjabi (India)pa-IN
Romanianro
Romanshrm
Russianru
Serbiansr
Sinhalasi
Slovaksk
Sloveniansl
Songhaison
Spanish (Argentina)es-AR
Spanish (Chile)es-CL
Spanish (Mexico)es-MX
Spanish (Spain)es-ES
Swedishsv-SE
Tamilta
Telugute
Thaith
Turkishtr
Ukrainianuk
Upper Sorbianhsb
Uzbekuz
Vietnamesevi
Welshcy
Xhosaxh
mikro yazılım destek
Share:

XAMPP Local Server Installation

Apache, PHP and MySQL software must be installed in order to set up and open a programming-based website, such as WordPress or OpenCart, on your personal computer. In this article, you will learn how to install these software on a computer with a Windows operating system. You can manually install each of these software separately. But there are different combined installation packages that we can use to make it faster and easier. With these package installations, a single installation is made. When you install it, these softwares we need are set to work in compatible with each other and they are ready to use.

How to Install XAMPP Local Server Pictorial Lecture

How to Install XAMPP Local Server?

To install a local web server on your computer, you can choose from two package installations:

A-) EasyPHP
B-) XAMPP

A-) How to Install XAMPP?


XAMPP is one of the leading local server installation packages. The scope of the software it includes is wide and its versions are kept up to date. It may be a good choice to choose XAMPP for this.

Now let's explain the steps of installing the XAMPP local server on our computer in detail.

» Estimated time: 5 minutes
» Prerequisites:
PC with Windows operating system (7, 8, 10 or newer)
Internet connection
700 MB of free disk space

1-) Download XAMPP

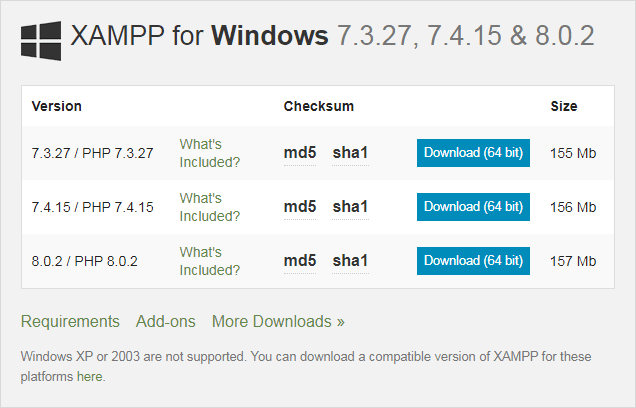
1-1-) Download the XAMPP setup file from the address below.
https://www.apachefriends.org/download.html
Download XAMPP Setup Setup File
The executable file named 'xampp-windows-x64-7.4.10-0-VC15-installer.exe' will be saved on your computer.

The current package of XAMPP includes the following software and versions:
• Apache 2.4.51
• MariaDB 10.4.21
• PHP 8.0.12
• OpenSSL 1.1.1

The latest PHP version usually only has the 'Secure' feature. You would have made a better choice instead by using the PHP version that is both 'Stable' and 'Secure'. For example, while the most recent version released is 8.0, this version only qualifies as 'Secure'. However, in the same time period, 7.4 is both 'Stable' and 'Secure' as its vulnerabilities were found and closed as a result of its more widespread use, and it is recommended to use this version.

2-) XAMPP Installation

2-1-) Run the downloaded file and start the installation.
Running XAMPP Setup Setup
Proceed with the "Next" button on each new installation screen.
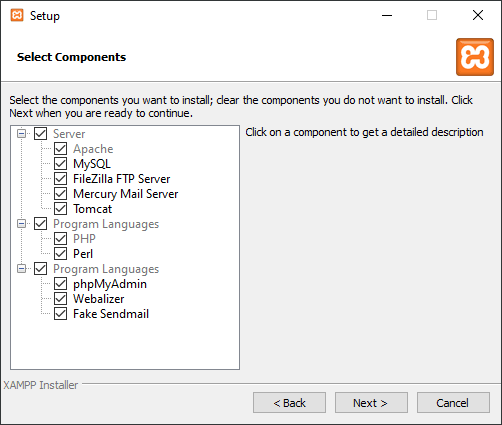
2-2-) Select which components to install while the components in the package. Apache, PHP, MySQL and options must be ticked. It is recommended to select all.
XAMPP Installation Screen
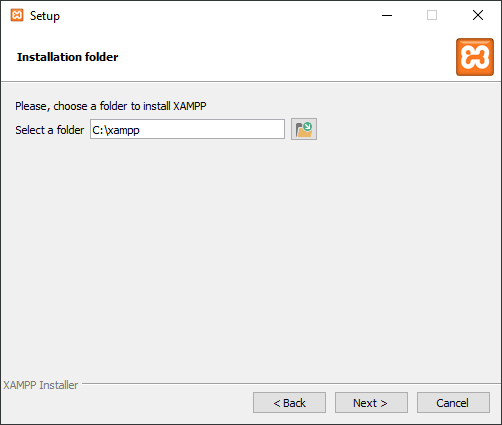
2-3-) Select the directory where the installation will be made.
Selecting XAMPP Installation Folder
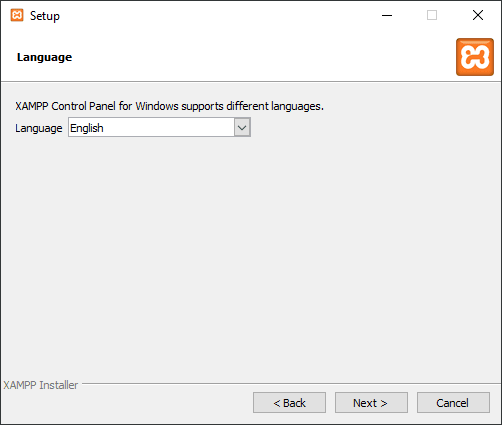
2-4-) Choose which language XAMPP's control panel will be in. This selection does not affect the site you will set up. You can select the language "English".
XAMPP Installation Choosing Language
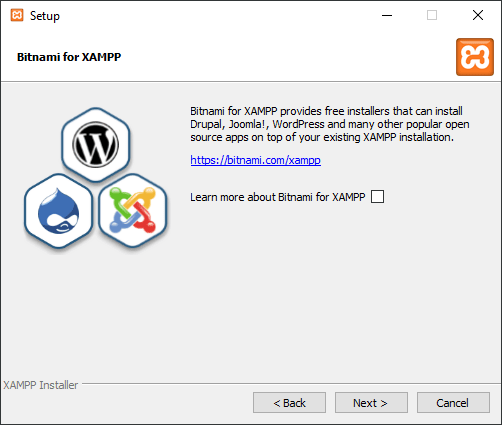
2-5-) Uncheck the checkbox to not open the information page.
XAMPP Installation Information Page
2-6-) The installation files will start to be copied. Wait until it completes.
XAMPP Installation File Copy
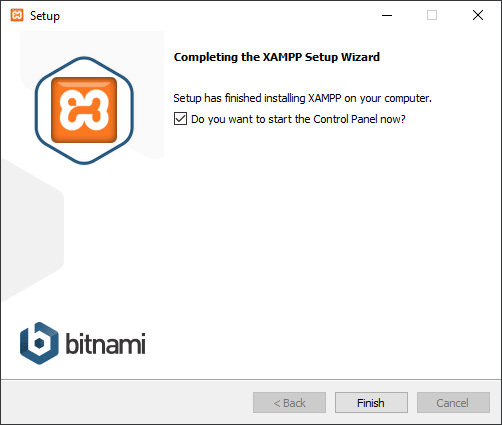
2-7-) Click the "Finish" button to finish the installation.
XAMPP Installation Completion

3-) Running XAMPP local server

3-1-) Run XAMPP. You will see the orange 'x' icon in the lower right system area. Open the XAMPP main window.
XAMPP Main Window
You can click the 'Quit' button in the main window to close the program at any time.
3-2-) Run the local web server and database server by clicking the 'Start' buttons shown in yellow frame to the right of 'Apache' and 'MySQL'.
XAMPP Setup Apache Php Autostart
When the servers start working, the background color of their names will be green. When you click the 'stop' buttons the server stops.
You can have the servers running automatically every time XAMPP starts. To do this, click the 'Config' button at the top right of the main window. Select the 'Apache' and 'MySQL' boxes under 'Auto start of modules' in the window that will open. Save the settings with the 'Save' button.
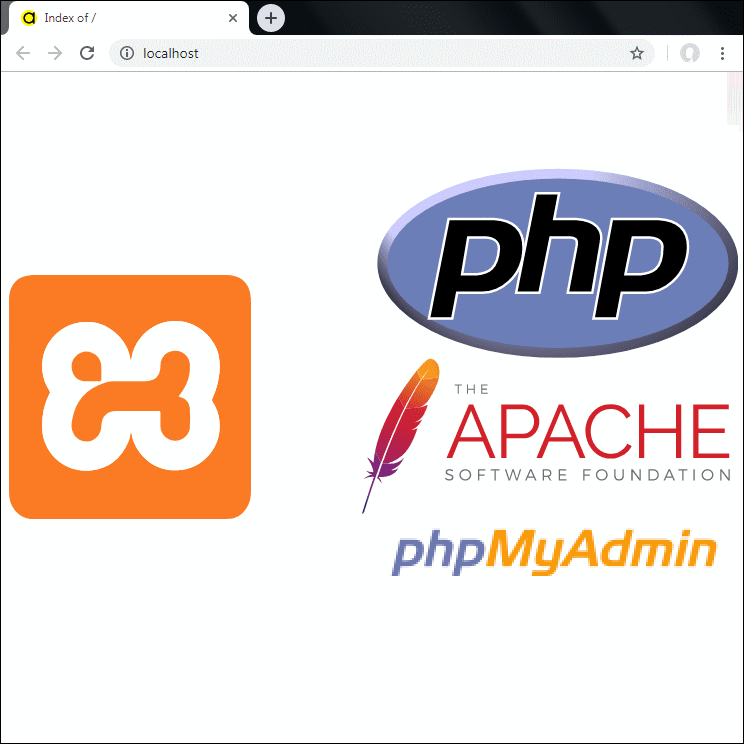
3-3-) Open 'http://127.0.0.1/' ( or 'http://localhost/' ) in your browser. You will see a welcome page prepared by XAMPP.
XAMPP Local Server Welcome Page
XAMPP Local Server Home Folder
Let's assume that the directory you selected while installing is 'C:\xampp'. The local web server interprets the files in the 'C:\xampp\htdocs' directory and displays them in the browser. You will save the files of the new sites you will create in this directory. When you open the local server in the browser, the file 'index.php' in the root directory will automatically run and point the browser to 'http://127.0.0.1/dashboard/' ( or 'http://localhost/dashboard/' ). The welcome message you see in the browser comes from the file 'index.html' in the 'C:\xampp\htdocs\dashboard' directory. You can then rename the 'index.php' file in the root directory with 'hello.php'. Thus, when you open the 'http://127.0.0.1/' (or 'http://localhost/' ) address, you can see the directories and files under the 'C:\xampp\htdocs' directory listed in your browser.
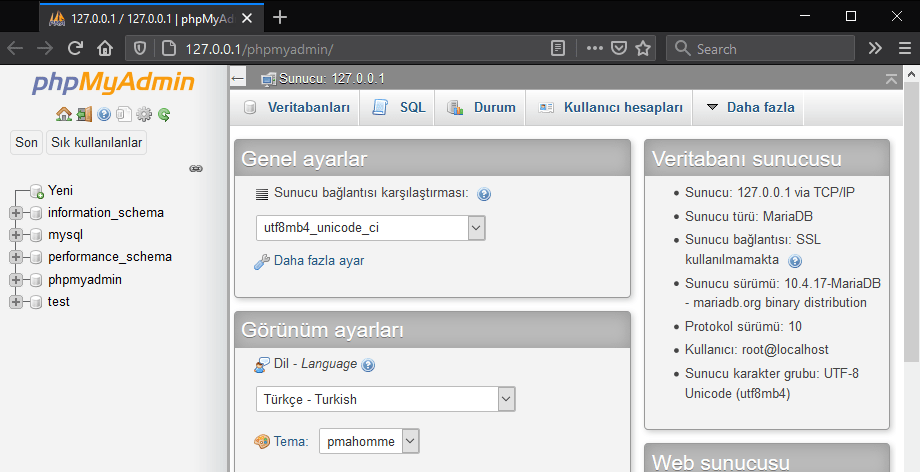
3-4-) Open the 'phpMyAdmin' link marked with a yellow arrow at the top right of the welcome page picture. The phpMyAdmin page will open. With phpMyAdmin, you can manage database through your browser. You can create, edit and delete database, table, tablespace, data record, run database query. If you want, add this address to your browser's shortcuts.
XAMPP phpMyAdmin MySQL

When you complete the step-by-step explanation of the above XAMPP installation, you can run the pages programmed with PHP language on your own computer and perform query operations by establishing a database connection.
Share:

EasyPHP Local Server Installation

For a software-based website such as WordPress or Joomla to run on your own computer, Apache, PHP and MySQL software must be installed first. This page will explain how to install these software on a computer with a Windows operating system. You can install each of these software one by one. But there are several combined installation packages that you can use to get things done easily with less time consuming. These package installations make all the necessary software work in harmony with each other at the end of a single installation process, they make their settings and present them to you ready to use.

How to Setup EasyPHP Local Server Pictorial Lecture

How to Setup a Local Server?

To install a local web server on your computer, you can choose from two package installations:

A-) EasyPHP
B-) XAMPP

A-) How to Install EasyPHP?


EasyPHP is a package local server installation with less installation size ( ~60 MB ) compared to its counterparts. The software it contains may be several versions earlier. It allows you to keep multiple PHP versions ready and choose one of them. If you are a power user, you can manually add the current PHP version if you want. After installation, missing Windows dll file may give errors. To solve this problem, you need to find and install Windows patches that complete the missing dll files.

EasyPHP Devserver 17 includes the following software and versions:
• Apache 2.4.25
• MySQL 5.7.17
• PHP 5.6.30
• PHP 7.1.3

» Estimated time: 5 minutes
» Prerequisites:
PC with Windows operating system (7, 8, 10 or newer)
Internet connection
600 MB of free disk space

1-) EasyPHP Download

1-1-) Download the setup file from the page below.
https://www.easyphp.org/download.php
Download EasyPHP Setup Setup File
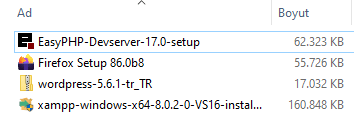
EasyPHP Installation Exe File
The executable file named 'EasyPHP-Devserver-17.0-setup.exe' will be saved on your computer.

2-) EasyPHP Installation

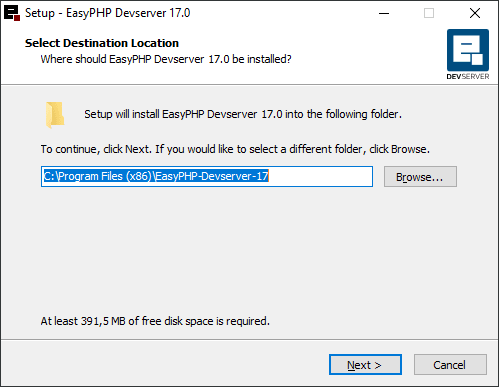
2-1-) Run the setup file. Choose which directory on your disk the installation will be made and proceed to the next step with the 'Next' button.
Choosing EasyPHP Installation Folder Location
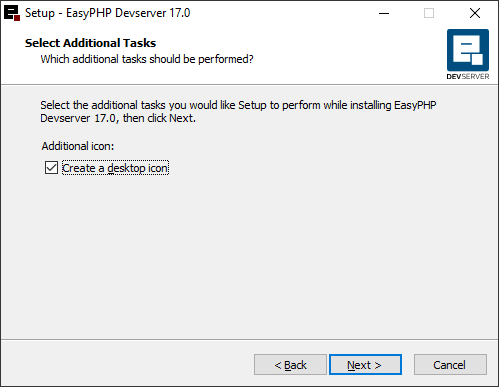
2-2-) If you wish, click the option to create a shortcut on the desktop and proceed.
EasyPHP Setup Screen
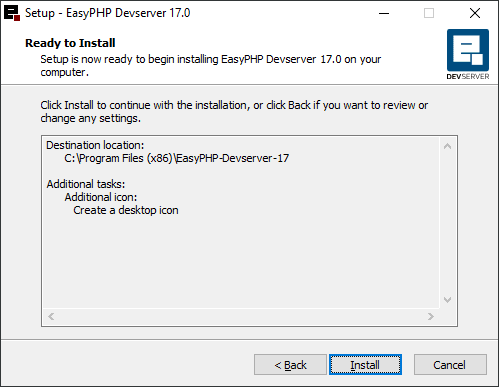
2-3-) Click the 'Install' button on the screen showing summary parameters.
Running EasyPHP Setup Setup
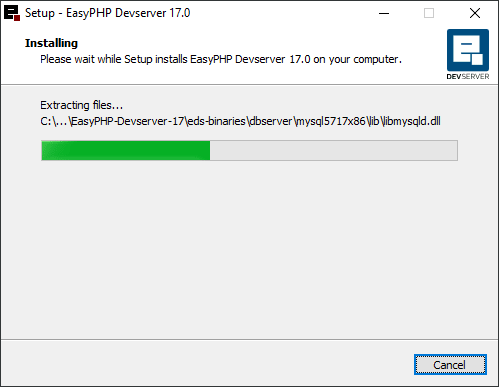
The copying of the installation files will begin.
EasyPHP Installation DLL copy
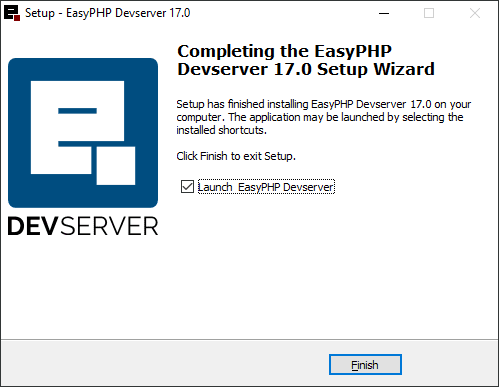
2-4-) After the process is completed, you will have completed the installation by clicking the 'Finish' button.
EasyPHP Installation

3-) Running EasyPHP local server

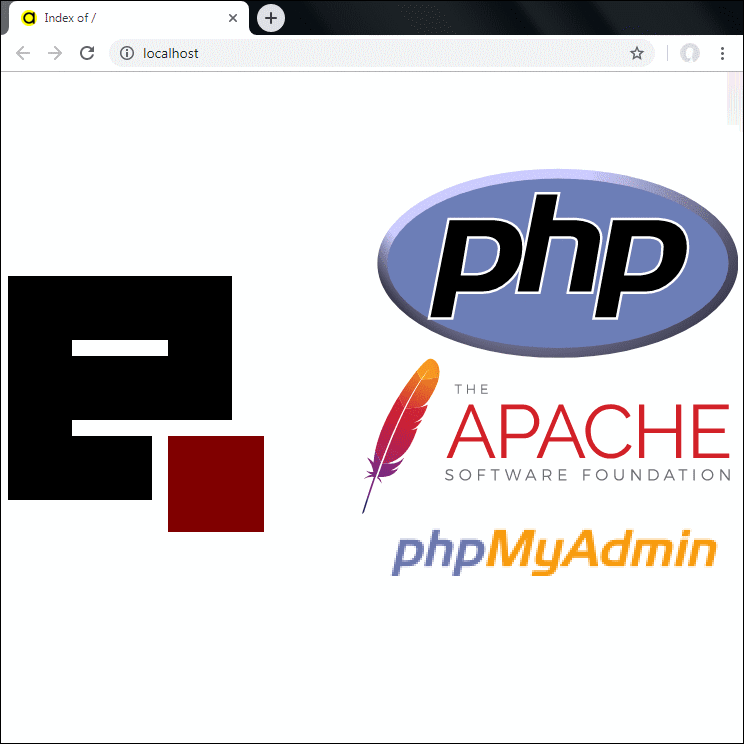
3-1-) Run EasyPHP. You will see the black 'e' icon in the lower right system area.
EasyPHP Installation start
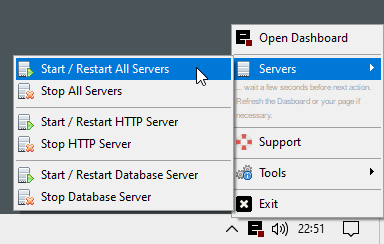
When you right-click the icon, the EasyPHP menu appears. You can select the 'Exit' item in this menu to close the program at any time.
3-2-) You can start and stop the Web server and database server with the options under 'Servers' in the EasyPHP menu. Run 'Start / Restart All Servers' to run both.
3-3-) Select 'Open Dashboard'. After clicking, your browser will start and the EasyPHP web interface will open.
EasyPHP Installation usage
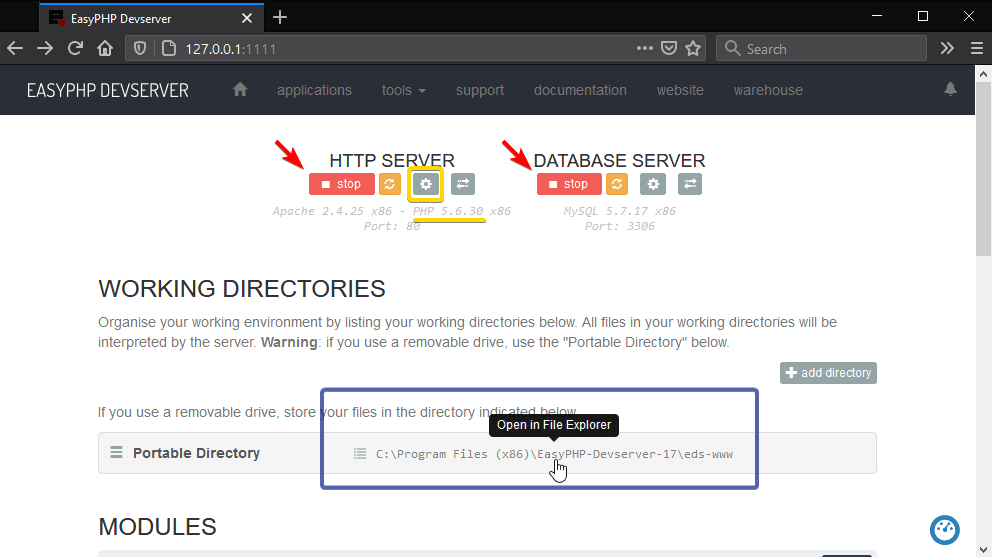
You can also start, stop and restart servers with the buttons marked with red arrows in the picture.
PHP 5.6.30 version is running as you can see in the picture below with a yellow line. We mentioned that you can optionally switch between different PHP versions with EasyPHP. If there is more than one version option, you can set the server to work with as follows:
3-4-) lick the gear wheel button shown in the yellow frame. In the 'PHP version' line in the window that opens, you will see the installed versions in the options that drop down. Choose the version you want. It is recommended to set the port number to 80. If the port number is 1111, the root address of the local web server will be 'http://127.0.0.1:1111/' ( or http://localhost:1111/ ). If you set the port number to 80, simply type 'http://127.0.0.1/' ( or http://localhost/ ) in the address bar of your browser to access your web server. After making the settings changes, restart the server with 'restart'.
EasyPHP Installation add php version
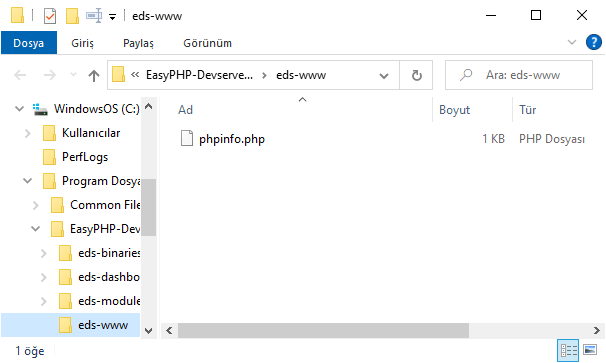
3-5-) In the list under the 'Working Directories' heading, there are directories determined on your disk. The web server interprets and executes the files in this directory. As can be seen in the 'Portable Directory' line marked with a blue frame in the picture, the 'C:\Program Files (x86)\EasyPHP-Devserver-17\eds-www' directory is selected. When you visit the 'http://127.0.0.1/' address in your browser, the local web server lists this directory and/or reads files such as html, php under this directory and displays it to you as a page.
EasyPHP Installation workspace
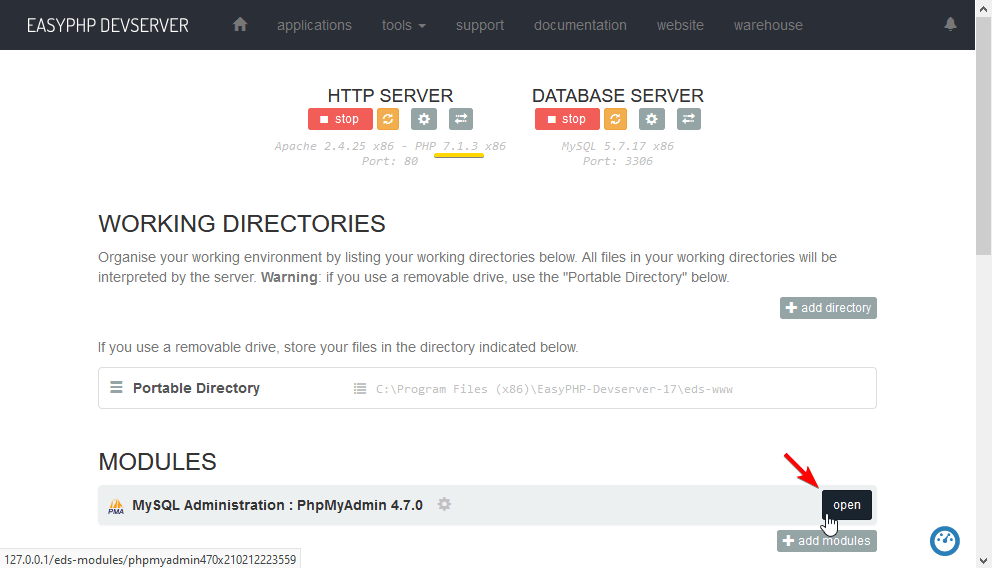
3-6-) When you click the 'open' button marked with a red arrow to the right of the 'MySQL Administration PhpMyAdmin 4.7.0' line under the 'Modules' heading, the PhpMyAdmin window opens.
EasyPHP Installation MySQL
EasyPHP Installation PhpMyAdmin
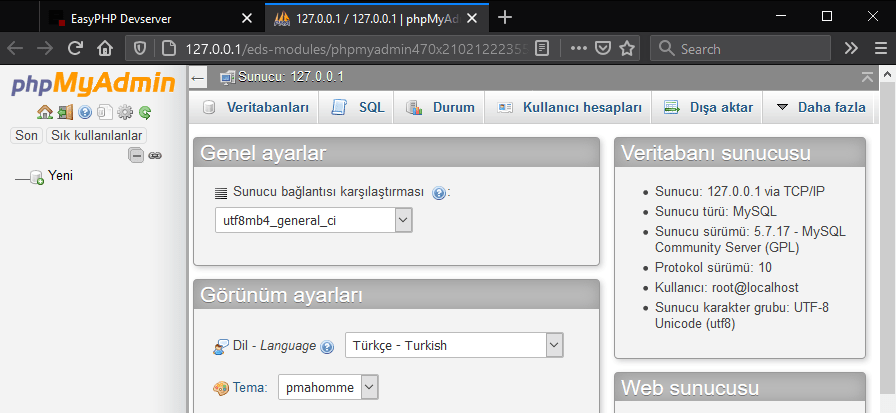
With phpMyAdmin, you can manage database through your browser. You can create and delete database, table, tablespace, data record, run database query.

When you complete the step-by-step explanation of the EasyPHP installation above, you can run pages programmed in PHP on your own computer and perform query operations by establishing a database connection.
Share:

XAMPP Yerel Sunucu Kurulumu

WordPress veya OpenCart gibi veritabanı kullanan ve programlama temelli olan bir web sitesinin kişissel bilgisayarınızda kurulup açılabilmesi için öncelikle Apache, PHP ve MySQL yazılımlarını kurulması gerekir. Bu yazıda işletim sistemi Windows olan bilgisayara bu yazılımların nasıl kurulacağını öğreneceksiniz. Bu yazılımların herbirini ayrı ayrı elle kurabilirsiniz. Ama daha hızlı ve kolayca yapmak için yararlanabileceğimiz farklı birleştirilmiş kurulum paketleri vardır. Bu paket kurulumlar ile tek bir kurulum yapılır. Kurulumu yapınca, ihtiyacımız olan bu yazılımlar, birbirleriyle uyumlu olarak çalışacak şekilde ayarları yapılmış ve kullanıma hazır halde olurlar.

XAMPP Yerel Sunucu Kurulumu Nasıl Yapılır Resimli Anlatım

Yerel Sunucu Nasıl Kurulur?

Bilgisayarınıza yerel web sunucusu kurmak için şu iki paket kurulumundan birini seçebilirsiniz:

A-) EasyPHP
B-) XAMPP

A-) XAMPP Nasıl Kurulur?


XAMPP önde gelen yerel sunucu kurulum paketlerinden biridir. İçerdiği yazılımların kapsamı geniştir ve sürümleri güncel tutulmaktadır. Bunun için XAMPP'ı seçmek iyi bir tercih olabilir.

Şimdi bilgisayarımıza XAMPP yerel sunucusunu kurma basamaklarını detaylarıyla anlatalım.

» Tahmini süre: 5 dakika
» Ön gereksinimler:
Windows işletim sistemli kişisel bilgisayar (7, 8, 10 veya daha yeni)
İnternet bağlantısı
700 MB boş disk alanı

1-) XAMPP İndirme

1-1-) XAMPP kurulum dosyasını aşağıdaki adresten indirin.
https://www.apachefriends.org/download.html
XAMPP Kurulum Setup Dosyası indir
Adı 'xampp-windows-x64-7.4.10-0-VC15-installer.exe' gibi olan çalıştırılabilir dosya bilgisayarınıza kaydedilecek.

XAMPP'in güncel paketinin içerisinde şu yazılımlar ve sürümleri bulunur:
• Apache 2.4.51
• MariaDB 10.4.21
• PHP 8.0.12
• OpenSSL 1.1.1

En son sürüm PHP genelde sadece 'Güvenli' özelliğine sahiptir. Bunun yerine hem 'Kararlı' hem de 'Güvenli' olan PHP sürümünü kullanarak daha iyi bir seçim yapmış olursunuz. Örneğin, yayımlanan en güncel sürüm 8.0 iken, bu sürüm sadece 'Güvenli' olarak nitelendirilir. Ancak aynı zaman diliminde 7.4 daha yaygın kullanımı sonucunda açıkları bulunup kapatıldığı için hem 'Kararlı' hem de 'Güvenli' olur ve bu sürümün kullanılması tavsiye edilir.

2-) XAMPP Kurulumu

2-1-) İndirdiğiniz dosyayı çalıştırıp kuruluma başlayın.
XAMPP Kurulum Setup Çalıştırma
Her yeni kurulum ekranında "Next" düğmesi ile ilerleyin.
2-2-) Paket içindeki bileşenlerken hangilerinin kurulacağını seçin. Apache, PHP, MySQL ve seçeneklerinin mutlaka tikli olması gerekir. Tümünün seçilmesi tavsiye edilir.
XAMPP Kurulum Ekranı
2-3-) Kurulumun yapılacağı dizini seçin.
XAMPP Kurulum Klasör Seçme
2-4-) XAMPP'in kontrol panelinin hangi dilde olacağını seçin. Bu seçim kuracağınız siteyi etkilemez. "English" dilini seçebilirsiniz.
XAMPP Kurulum Dil Seçme
2-5-) Bilgilendirme sayfasını açmamak için seçili tiki kaldırın.
XAMPP Kurulum Bilgi Sayfası
2-6-) Kurulum dosyaları kopyalanmaya başlayacak. Tamamlanana kadar bekleyin.
XAMPP Kurulum Dosya Kopyalama
2-7-) "Finish" düğmesini tıklayıp kurulum bitirin.
XAMPP Kurulum Tamamlama

3-) XAMPP yerel sunucusunu çalıştırma

3-1-) XAMPP'i çalıştırın. Sağ alttaki sistem alalında turuncu renkli 'x' simgesini göreceksiniz. XAMPP ana penceresini açın.
XAMPP Ana Pencere
Dilediğiniz zaman programı kapatmak için ana penceredeki 'Quit' düğmesini tıklayabilirsiniz.
3-2-) 'Apache' ve 'MySQL' yazılarının sağında sarı çerçeve içinde gösterilmiş 'Start' düğmelerini tıklayarak yerel web sunucusunu ve veritabanı sunucusunu çalıştırın.
XAMPP Kurulum Apache Php Otomatik Başlatma
Sunucular çalışmaya başladıklarında isimlerinin arka plan renkleri yeşil olur. 'Stop' düğmelerini tıkladığınızda sunucu durur.
XAMPP her başladığında sunucuların otomatik olarak çalışmasını sağlayabilirsiniz. Bunun için ana pencerede en sağ üstte bulunan 'Config' düğmesine tıklayın. Açılacak olan penceredeki 'Auto start of modules' altındaki 'Apache' ve 'MySQL' kutularını seçin. 'Save' düğmesi ile ayarları kaydedin.
3-3-) Tarayıcınızda 'http://127.0.0.1/' ( veya 'http://localhost/' ) adresini açın. XAMPP'ın hazırlamış olduğu bir hoşgeldiniz sayfasını göreceksiniz.
XAMPP Yerel Sunucu Karşılama Sayfası
XAMPP Yerel Sunucu Ana Klasörü
Kurulum yaparken seçtiğiniz dizinin 'C:\xampp' olduğunu varsayalım. Yerel web sunucusu 'C:\xampp\htdocs' dizinindeki dosyaları yorumlar ve tarayıcıda gösterir. Yeni yapacağınız sitelerin dosyalarını bu dizine kayıt edeceksiniz. Yerel sunucuyu tarayıcıda açtığınızda kök dizindeki 'index.php' dasyası otomatik olarak çalışır ve tarayıcıyı 'http://127.0.0.1/dashboard/' ( veya 'http://localhost/dashboard/' ) adresine yönlendirir. Tarayıcıda gördüğünüz hoşgeldin mesajı 'C:\xampp\htdocs\dashboard' dizinindeki 'index.html' dasyasından gelmektedir. Kök dizindeki 'index.php' dosyasının adını daha sonra 'merhaba.php' ile değiştirebilirsiniz. Böylece 'http://127.0.0.1/' ( veya 'http://localhost/' ) adresini açtığınızda 'C:\xampp\htdocs' dizini altında olan dizin ve dosyaları tarayıcınızda listelenmiş şekilde görebilirsiniz.
3-4-) Hoşgeldiniz sayfasının resminde sağ üste sarı ok ile işaretli 'phpMyAdmin' bağlantısını açın. PhpMyAdmin sayfası açılacaktır. PhpMyAdmin ile veritabanı yönetimini tarayıcınızın üzerinden yapabilirsiniz. Veritabanı, tablo, tablo alanı, veri kaydı yaratabilir, düzenleyebilir ve silebilir, veritabanı sorgusu çalıştırabilirsiniz. İsterseniz bu adresi tarayıcınızın kısayollarına ekleyin.
XAMPP phpMyAdmin MySQL

Yukarıdaki XAMPP kurulumunun resmili anlatımını adım adım tamamladığınızda kendi bilgisayarınızda PHP dili ile programlanmış sayfaları çalıştırabilir ve veritabanı bağlantısı kurarak sorgu işlemlerini yapabilirsiniz.
Share:

EasyPHP Yerel Sunucu Kurulumu

WordPress veya Joomla gibi yazılım temelli çalışan bir web sitesinin kendi bilgisayarınızda çalışması için öncelikle Apache, PHP ve MySQL yazılımlarını kurulması gerekir. Bu sayfada size işletim sistemi Windows olan bilgisayara bu yazılımların nasıl kurulacağını açıklanacak. Bu yazılımların herbirini teker teker kurabilirsiniz. Ama daha az zaman harcayarak işlemleri kolayca yapmak için kullanabileceğiniz çeşitli birleştirilmiş kurulum paketleri bulunur. Bu paket kurulumlar, gerekli olan tüm yazılımların tek bir kurulum işlemi sonunda birbirleriyle uyumlu olarak çalışacağı gibi ayarlarını yaparlar ve kullanıma hazır halde size sunarlar.

EasyPHP Yerel Sunucu Kurulumu Nasıl Yapılır Resimli Anlatım

Yerel Sunucu Nasıl Kurulur?

Bilgisayarınıza yerel web sunucusu kurmak için şu iki paket kurulumundan birini seçebilirsiniz:

A-) EasyPHP
B-) XAMPP

A-) EasyPHP Nasıl Kurulur?


EasyPHP, benzerlerine kıyasla daha az kurulum boyutu ( ~60 MB ) olan bir paket yerel sunucu kurulumudur. İçerdiği yazılımlar birkaç sürüm öncesine ait olabilir. Birden fazla PHP sürümünü hazırda tutup bunlardan birini seçmenize olanak sağlar. Uzman bir kullanıcı iseniz, isterseniz güncel PHP sürümünü elle ekleyebilirsiniz. Kurulum sonrasında eksik Windows dll dosyası hataları verebiliyor. Bu sorunu çözmek için eksik dll dosyalarını tamamlayan Windows yamalarını bulup kurmanız gerekmektedir.

EasyPHP Devserver 17 şu yazılım ve sürümlerini içerir:
• Apache 2.4.25
• MySQL 5.7.17
• PHP 5.6.30
• PHP 7.1.3

» Tahmini süre: 5 dakika
» Ön gereksinimler:
Windows işletim sistemli kişisel bilgisayar (7, 8, 10 veya daha yeni)
İnternet bağlantısı
600 MB boş disk alanı

1-) EasyPHP İndirme

1-1-) Aşağıdaki sayfadan kurulum dosyasını indirin.
https://www.easyphp.org/download.php
EasyPHP Kurulum Setup Dosyası indir
EasyPHP Kurulum Exe Dosyası
Adı 'EasyPHP-Devserver-17.0-setup.exe' gibi olan çalıştırılabilir dosya bilgisayarınıza kaydedilecek.

2-) EasyPHP Kurulumu

2-1-) Kurulum dosyasını çalıştırın. Kurulumun diskinizde hangi dizine yapılacağını seçin ve 'Next' düğmesi ile bir sonraki adıma geçin.
EasyPHP Kurulum Klasör Yeri Seçme
2-2-) Dilerseniz masaüstünde kısayol oluşturmak için seçeneği tıklayın ve ilerleyin.
EasyPHP Kurulum Ekranı
2-3-) Özet parametrelerin gösterildiği ekranda 'Install' düğmesini tıklayın.
EasyPHP Kurulum Setup Çalıştırma
Kurulum dosyalarının kopyalanması başlayacak.
EasyPHP Kurulum DLL kopyalama
2-4-) İşlem tamamlandıktan sonra 'Finish' düğmesini tıklayarak kurulumu tamamlamış olacaksınız.
EasyPHP Kurulum Yapma

3-) EasyPHP yerel sunucusunu çalıştırma

3-1-) EasyPHP'yi çalıştırın. Sağ alttaki sistem alalında siyah renkli 'e' simgesini göreceksiniz.
EasyPHP Kurulum başlatma
Simgeyi sağ tıkladığınızda EasyPHP menüsünü görülür. Dilediğiniz zaman programı kapatmak için bu menüdeki 'Exit' öğesini seçebilirsiniz.
3-2-) EasyPHP menüsündeki 'Servers' altındaki seçeneklerle Web sunucusu ile veritabanı sunucusunu çalıştırıp durdurabilirsiniz. İkisini de çalıştırmak için 'Start / Restart All Servers' komutunu çalıştırın.
3-3-) 'Open Dashboard' u seçin. Tıkladıktan sonra tarayıcınızın çalışır ve EasyPHP web arayüzü açılır.
EasyPHP Kurulum kullanım
Sunucuları başlatma, durdurma ve yeniden başlatma işlemlerini resimde kırmızı oklarla işaretli düğmelerle de yapabilirsiniz.
Resimde altında sarı çizgi ile işaretli yerde görüleceği gibi PHP 5.6.30 sürümü çalışmakta. İsteğe bağlı olarak, EasyPHP ile farklı PHP sürümleri arasında geçiş yapabileceğinizi söylemiştik. Birden fazla sürüm seçeneği varsa sunucunu hangisi ile çalışacağını şu şekilde ayarlayabilirsiniz:
3-4-) Sarı çerçeve içinde gösterilmiş dişli çark düğmesini tıklayın. Açılan penceredeki 'PHP version' satırında alta açılan seçeneklerde kurulu sürümleri görürsünüz. İstediğiniz sürümü seçin. Port numarasını 80 yapmanız önerilir. Port numarası 1111 olursa, yerel web sunucusunun kök adresi 'http://127.0.0.1:1111/' ( veya http://localhost:1111/ ) olur. Port numarasını 80 olarak ayarlarsanız, web sunucunuza erişmek için tarayıcınızda adres çubuğuna 'http://127.0.0.1/' ( veya http://localhost/ ) yazmanız yeterli olacaktır. Ayar değişikliklerini yaptıktan sonra 'restart' ile sunucuyu yeniden başlatın.
EasyPHP Kurulum php sürüm ekleme
3-5-) 'Working Directories' başlığı altındaki listede, diskinizde belirlenen dizinler vardır. Web sunucusu bu dizdeki dosyaları yorumlar ve çalıştırır. Resimde mavi çerçeve ile işaretli 'Portable Directory' satırında görüleceği gibi, 'C:\Program Files (x86)\EasyPHP-Devserver-17\eds-www' dizini seçili gelir. Tarayıcınızda 'http://127.0.0.1/' adresini ziyaret ettiğiniz zaman, yerel web sunucusu bu dizini listeler ve / veya bu dizin altındaki html, php gibi dosyaları okuyarak sayfa olarak size gösterir.
EasyPHP Kurulum çalışma yeri
3-6-) 'Modules' başlığı altında 'MySQL Administration PhpMyAdmin 4.7.0' satırının sağında kırmızı ok ile işaretli 'open' düğmesini tıkladığınızda PhpMyAdmin penceresi açılır.
EasyPHP Kurulum MySQL
EasyPHP Kurulum PhpMyAdmin
PhpMyAdmin ile veritabanı yönetimini tarayıcınızın üzerinden yapabilirsiniz. Veritabanı, tablo, tablo alanı, veri kaydı yaratabilir ve silebilir, veritabanı sorgusu çalıştırabilirsiniz.

Yukarıdaki EasyPHP kurulumunun resmili anlatımını adım adım tamamladığınızda kendi bilgisayarınızda PHP dili ile programlanmış sayfaları çalıştırabilir ve veritabanı bağlantısı kurarak sorgu işlemlerini yapabilirsiniz.
Share:

Subscribe to: Posts (Atom)