Showing posts with label how to. Show all posts

How to create variable product in WooCommerce

For a simple product, the pricing is straightforward and typically involves a single price. Customers are chargedthe same amount regardless of any specific variations or options.

WooCommerce'de Varyasyonlu Ürün Nasıl Oluşturulur
Pricing of a Product with Variations

When it comes to a product with variations, the pricing model becomes more complex. This typically involves offering thesame base product with different options, such as size, color, or features.

Let's consider a simple example of pricing for variants of a product, such as T-shirts:

  • Variant Type: Color

    • Red
    • White

For this example, we can use the tiered pricing approach:

  • Red color T-shirt: $10
  • White color T-shirt: $12

WooCommerce provides a built-in way to add these options to a product page. This system consists of two basic features: 'attributes' and 'variations'.
Attributes in WooCommerce refer to the characteristics of a product that can be used for creating variations.
Variations are the specific combinations of attributes that create different versions of a product.

For this example:
Attribute: Color
Variations: Red, White

A second feature can be added to this product, for example:
Attribute: Size
Variations: Small, Medium, Large

To use variations in WooCommerce, you first need to set attributes.

How to setup variations and create variable product in WooCommerce?

Set up attributes for WooCommerce products

  • In the WordPress dashboard, go to "Products" > "Attributes".
    Type the new "Attribute" name (Example: Color). Click the "Add attribute" button.
    Add WooCommerce product attribute
  • Once you hit the Add attribute button, your new attribute will appear in the menu to the right.
    From there, click on the link that reads "Configure terms" next to the Attribute you’ve just created.
    Configure WooCommerce attribute terms
  • Enter the name of the value that the "Attribute" can take (Example: Red).
    Add all possible values one by one (Example, other colors: White...)
    New WooCommerce Attribute value
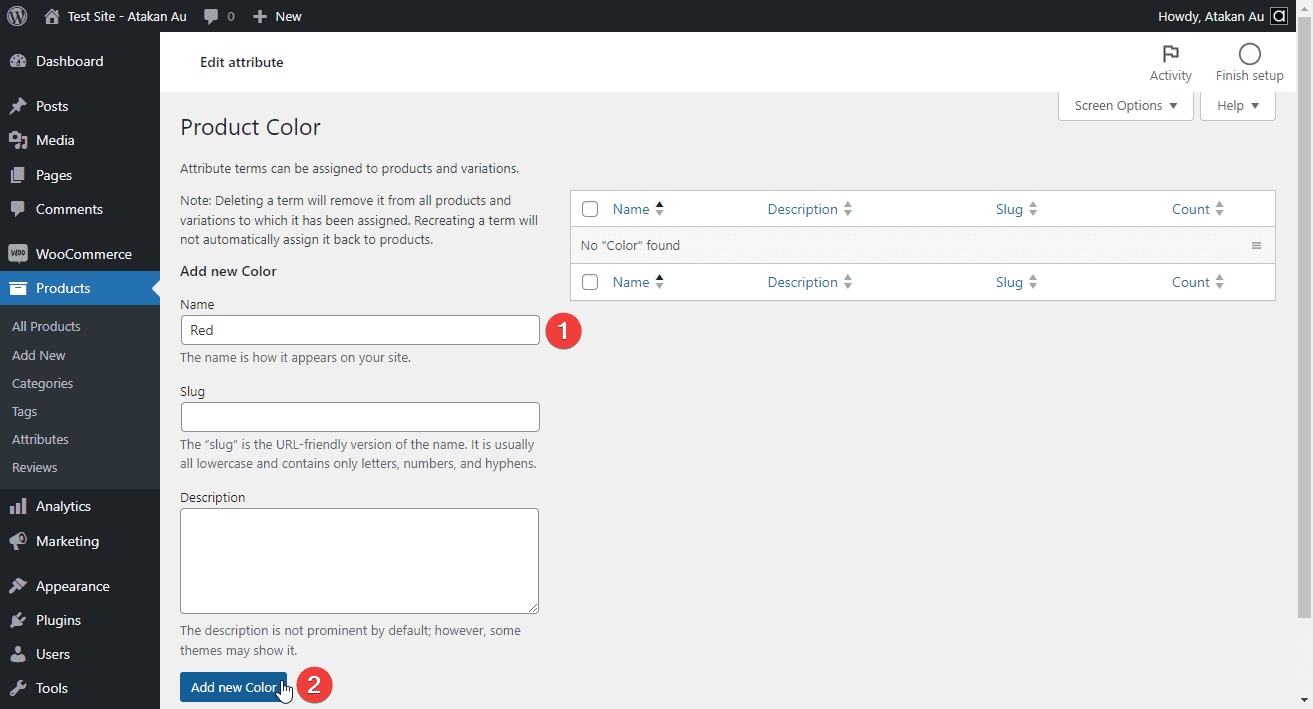
  • In this example we created a "Color" for the "Attribute". There are two options for "Color": "Red" and "White".WooCommerce Attribute names and values

Create a variable WooCommerce product

Assign attributes to the product:

  • Go to "Products" > "Add New". Enter data such as the name, category, etc. Scroll down to the "Product data" section.
    Change the "Simple product" drop-down menu value to "Variable product".
    Determine a unique stock code for this variable product and enter it in the "SKU" field.
    Create WooCommerce variable product
  • Click on the "Attributes" tab and select the ones you will use for the product.
    You will see the names previously assigned for "Attributes".
    Assign attributes to the product
  • Select the values that "Attributes" can take.
    Add all at once with "Select All", or manually select one by one.
    Assign attribute values to the product
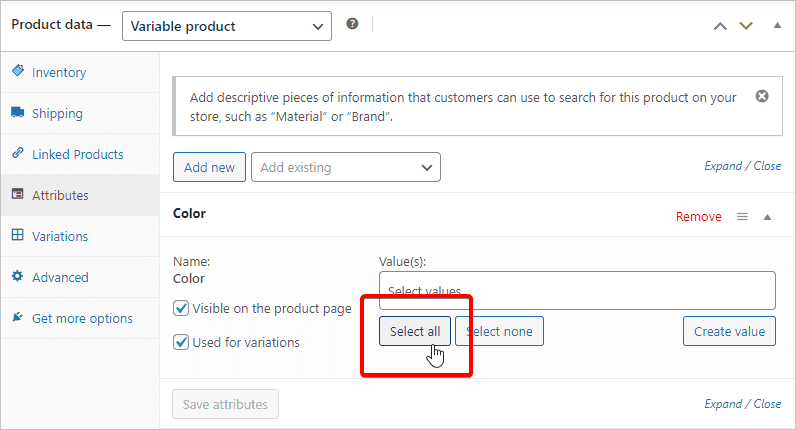
  • Make sure that "Visible on the product page" and "Used for variations" are checked.
    Click the "Save attributes" button.
    Add and Save product attributes

Add variations to the product

  • Switch to the "Variations" tab.
    "Generate variations" button adds all possible combinations of the added attributes.
    Or add a new variation manually.
    Confirm this notification and continue: Do you want to generate all variations? This will create a new variation for each and every possible combination of variation attributes (max 50 per run).
    Generate Woocommerce variations
  • Show collapsed product editing areas.
    Use the "Expand / Close" and "Edit" buttons.
    Show Woocommerce variable product
  • Under each variant, be sure to enter the price and SKU number settings for that variant.
    When you have finished making all changes, click the "Save changes" button.
    Edit Woocommerce variable product
  • Click the "Publish" button.
    Publish the product and see it in the store.
    Sample WooCommerce variable product
Share:

Batch download files keeping directory structure

You can bulk download all listed directories and files with PowerShell on Windows. Jump to online tool

How to batch download files and folders keeping directory structure?

You must do a two-step process to preserve the directory structure and filenames.
1

Create specific directory and file with PowerShell's "New-Item" command. Then save the file on the internet to your local disk with the "curl" command.

1
Download files keeping directory structure

How to download files keeping directory structure Windows 10?

Open PowerShell

Hit the "Start" icon.
Then choose "All Apps" Scroll down, press "Windows PowerShell" folder to open it. Click "Windows PowerShell" to run it.
Open PowerShell

Use PowerShell's commands

Create the directory on your disk
Create the necessary directory and subdirectories on your local disk with PowerShell's "New-Item" command:
New-Item -ItemType File -Force -Path C:\dir\sub_dir\file.zip

For example, you will download these two files:
https://cdnjs.cloudflare.com/ajax/libs/bootstrap/5.2.3/js/bootstrap.min.js
https://cdnjs.cloudflare.com/ajax/libs/bootstrap/5.2.3/css/bootstrap.min.css


Let's create these directories and files:
C:\local\htdocs\asset\bootstrap\5.2.3\js\bootstrap.min.js
C:\local\htdocs\asset\bootstrap\5.2.3\css\bootstrap.min.css


Run these commands:
New-Item -ItemType File -Force -Path C:\local\htdocs\asset\bootstrap\5.2.3\js\bootstrap.min.js
New-Item -ItemType File -Force -Path C:\local\htdocs\asset\bootstrap\5.2.3\css\bootstrap.min.css
Create the necessary directory and subdirectories on your local disk with PowerShell New-Item command

Download the file contents with the "curl" command:
Download the files with the "curl" command and overwrite their contents:
curl https://domain.tld/path/sub_path/file.zip -O C:\dir\sub_dir\file.zip
To save the two files in the example above to your disk, keeping the same directory structure, run these commands:
curl https://cdnjs.cloudflare.com/ajax/libs/bootstrap/5.2.3/js/bootstrap.min.js -O C:\local\htdocs\asset\bootstrap\5.2.3\js\bootstrap.min.js
curl https://cdnjs.cloudflare.com/ajax/libs/bootstrap/5.2.3/css/bootstrap.min.css -O C:\local\htdocs\asset\bootstrap\5.2.3\css\bootstrap.min.css


Alternatively, the "Invoke-WebRequest" command can be used in the following formats:
Invoke-WebRequest -Uri "Source-Uri" -OutFile "Save-File"
Download the files with curl command

Download the files with curl command


Automatically create the PowerShell script


Paste your url list. Set parameters. Generate your PowerShell. Copy the script. Paste it into the PowerShell command line. That is all.

Download url list:


Options

Combine all files in one zip file and download. It only works in modern and up to date browser. The total file size should not exceed ~5 MB.


PowerShell script:


Automatically create the PowerShell script onlie tool
Share:

How to send original size picture on WhatsApp

How to send pictures via Whatsapp without losing quality?

About 1 minutes
WhatsApp send photo as document
Send pictures on whatsapp without losing quality. Keep images full size.

Choose who to send the file to.
Select the paper clip icon.
Select the document icon.
Select photos / images. Press and hold to select multiple.
Click the "Send" button in the top right.
Click the "Send" button again.
Voila! Pictures were sent without losing quality.
Share:

Subscribe to: Posts (Atom)