How to create variable product in WooCommerce

For a simple product, the pricing is straightforward and typically involves a single price. Customers are chargedthe same amount regardless of any specific variations or options.

WooCommerce'de Varyasyonlu Ürün Nasıl Oluşturulur
Pricing of a Product with Variations

When it comes to a product with variations, the pricing model becomes more complex. This typically involves offering thesame base product with different options, such as size, color, or features.

Let's consider a simple example of pricing for variants of a product, such as T-shirts:

  • Variant Type: Color

    • Red
    • White

For this example, we can use the tiered pricing approach:

  • Red color T-shirt: $10
  • White color T-shirt: $12

WooCommerce provides a built-in way to add these options to a product page. This system consists of two basic features: 'attributes' and 'variations'.
Attributes in WooCommerce refer to the characteristics of a product that can be used for creating variations.
Variations are the specific combinations of attributes that create different versions of a product.

For this example:
Attribute: Color
Variations: Red, White

A second feature can be added to this product, for example:
Attribute: Size
Variations: Small, Medium, Large

To use variations in WooCommerce, you first need to set attributes.

How to setup variations and create variable product in WooCommerce?

Set up attributes for WooCommerce products

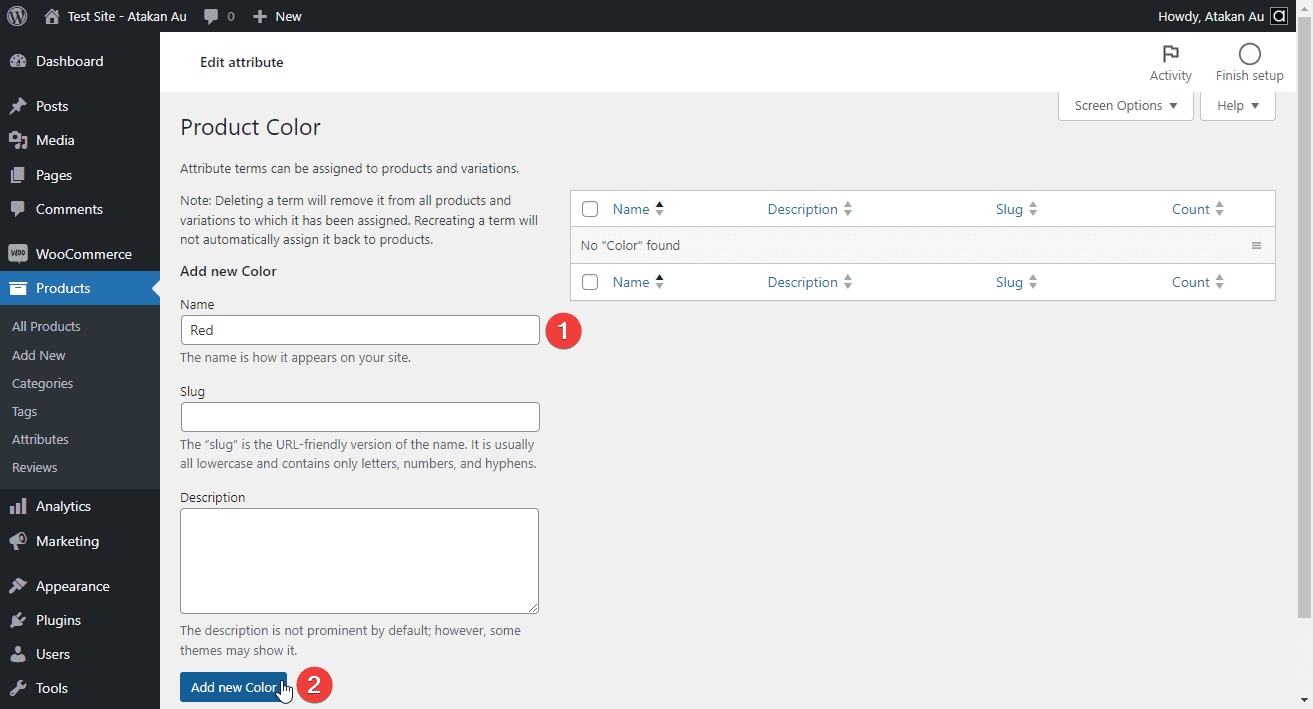
  • In the WordPress dashboard, go to "Products" > "Attributes".
    Type the new "Attribute" name (Example: Color). Click the "Add attribute" button.
    Add WooCommerce product attribute
  • Once you hit the Add attribute button, your new attribute will appear in the menu to the right.
    From there, click on the link that reads "Configure terms" next to the Attribute you’ve just created.
    Configure WooCommerce attribute terms
  • Enter the name of the value that the "Attribute" can take (Example: Red).
    Add all possible values one by one (Example, other colors: White...)
    New WooCommerce Attribute value
  • In this example we created a "Color" for the "Attribute". There are two options for "Color": "Red" and "White".WooCommerce Attribute names and values

Create a variable WooCommerce product

Assign attributes to the product:

  • Go to "Products" > "Add New". Enter data such as the name, category, etc. Scroll down to the "Product data" section.
    Change the "Simple product" drop-down menu value to "Variable product".
    Determine a unique stock code for this variable product and enter it in the "SKU" field.
    Create WooCommerce variable product
  • Click on the "Attributes" tab and select the ones you will use for the product.
    You will see the names previously assigned for "Attributes".
    Assign attributes to the product
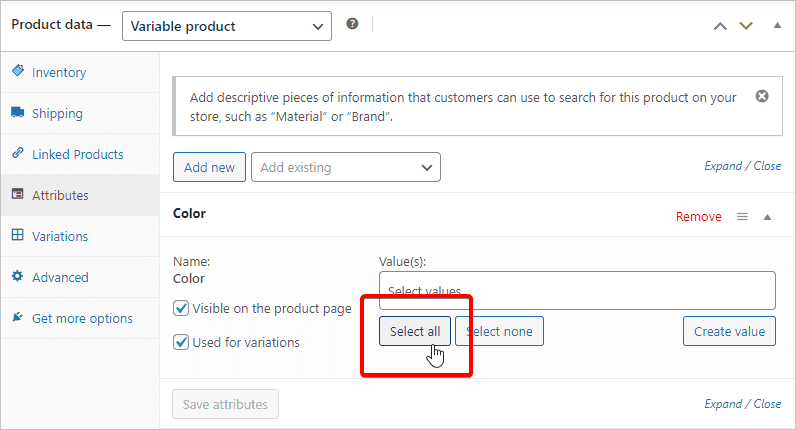
  • Select the values that "Attributes" can take.
    Add all at once with "Select All", or manually select one by one.
    Assign attribute values to the product
  • Make sure that "Visible on the product page" and "Used for variations" are checked.
    Click the "Save attributes" button.
    Add and Save product attributes

Add variations to the product

  • Switch to the "Variations" tab.
    "Generate variations" button adds all possible combinations of the added attributes.
    Or add a new variation manually.
    Confirm this notification and continue: Do you want to generate all variations? This will create a new variation for each and every possible combination of variation attributes (max 50 per run).
    Generate Woocommerce variations
  • Show collapsed product editing areas.
    Use the "Expand / Close" and "Edit" buttons.
    Show Woocommerce variable product
  • Under each variant, be sure to enter the price and SKU number settings for that variant.
    When you have finished making all changes, click the "Save changes" button.
    Edit Woocommerce variable product
  • Click the "Publish" button.
    Publish the product and see it in the store.
    Sample WooCommerce variable product
Share:

Random String, Number, SKU Generator - Free Online Tool

Online Bulk String Generator Password Number SKU Custom pattern
Random string generator with letter, number, symbol characters.
Free, online and fast - instant results.
How do I generate a batch random string?
Bulk random string generation online?
1
Choose which characters to use. Click the "Generate" button.
1

Password Generator

Generate strong and random passwords with one click.

Output results:

character long random string with unique characters cannot be generated using only characters!


Options
Length of each string:
Number of result strings:


Generate Random Number

Generate integer or decimal numbers within a specified range.

Output results:


Options
Minimum value:
Maximum value:
Decimal places:
Decimal separator:
How many number will be created:

Generate Random SKU

Stock codes are used in the company's inventory system to track the product's movement in and out of the warehouse, as well as to facilitate ordering and restocking of the item. The product stock code is determined according to internal company policies and procedures in order to keep track of inventory and facilitate easy identification of products. The format of the stock code may vary across companies, but it usually includes a combination of letters and numbers. You may determine the following format for your product stock code: the first two letters represent the product category (e.g. SH for shoes), followed by the model number (e.g. 023), and finally the size (e.g. 40). Using this format, a running shoe in size 40 would have a stock code of "SH02340". Click to create random stock codes by applying this format to the custom pattern.
Use sample pattern , and chech results.

Generate Random String Using Custom Pattern

Determine the code structure you want. First add as many parts as needed. Select the format of each part; "Fixed string", "Random string" or "Number". Set the rules. "Fill left"; Adds "0" to the left to complete the digit length of the maximum integer value. "Sequential"; Uses all integers between the minimum and maximum values sequentially.

PartValueParameters
1Length: chars.Min.:Max.:
+ Add new part ( Reload page )
How many stock codes will be generated:


You need to increase the number of possibilities. Check your parameters.
Reset all


Looking for a reliable and efficient tool to generate random strings? A random string generator is a valuable utility that can help you create unique alphanumeric sequences in just a few clicks. Whether you need random passwords, API keys, or encryption keys, this tool has got you covered. By using a random string generator, you can enhance the security of your online accounts, protect sensitive information, and ensure the uniqueness of your data. With this online tool it is very easy to create random strings with a user-friendly interface and customizable options.

Random string generation is needed in many areas. Some common use cases include:

1. Passwords: Randomly generated strings are often used as secure passwords to ensure they cannot be easily guessed or cracked.

2. User authentication: Random strings are used as session IDs, tokens, or one-time passwords (OTPs) to authenticate users and ensure secure access to websites, applications, or systems.

3. Encryption and cryptography: Randomness is a crucial component in generating encryption keys, initialization vectors, or random salts for hashing algorithms.

4. Testing and simulations: Random strings are useful in software testing, where they can be used to create randomized test data or simulate real-world scenarios.

5. Data obfuscation: Random strings can be used to anonymize data by replacing sensitive information with randomized identifiers or pseudonyms.

6. Games and entertainment: Random strings are employed in gaming applications to generate unique usernames, game codes, or other random elements within the game.

7. Data generation: Random strings can be used to generate sample data for research, analysis, or statistical modeling.

There are numerous unique string uses in various domains. Here are a few examples:

1. SKU (Stock Keeping Unit): SKU codes are unique identifiers used to track and manage inventory items. They help differentiate products and enable efficient stock management.

2. Stock codes: Similar to SKUs, stock codes are unique strings that specifically identify products or items within a company's inventory or stock system.

3. ID numbers: Unique string-based ID numbers are commonly used to identify individuals, such as employee IDs, customer IDs, student IDs, or social security numbers. These IDs help in record-keeping, identification, and data management.

4. Order numbers: Unique strings are often utilized as order numbers or invoice numbers to track and manage sales transactions in e-commerce, retail, or other business sectors.

5. Tracking codes: Unique strings can be used as tracking codes or tracking numbers for packages or shipments. These codes assist in monitoring the movement and delivery of goods.

6. Coupon codes: In marketing and e-commerce, unique strings are often used as coupon codes to provide discounts or promotional offers to customers.

7. Reservation codes: Hotels, airlines, and other service-based industries assign unique reservation codes to bookings or reservations. These codes help identify and manage specific reservations.

8. Vehicle identification numbers (VIN): Unique strings, such as VINs, are used to uniquely identify motor vehicles for registration, tracking, and legal purposes.

9. URL shorteners: Services like bit.ly or TinyURL use unique strings as shortened URLs. These strings redirect users to the original long URLs, providing convenience in sharing and accessing web content.

10. License keys: Software applications or digital products often require unique license keys or serial numbers to authorize usage or access to restricted features.

11. Barcode or QR code: Barcodes and QR codes are unique string-based codes that contain product or information details. They are widely used in retail, inventory management, ticketing, and other industries for scanning and quick data retrieval.

12. Tracking URLs: Unique strings can be embedded in tracking URLs to monitor and analyze the effectiveness of marketing campaigns, email newsletters, or social media posts.

13. Personal identification numbers (PIN): PIN codes are unique numeric strings used for personal verification, such as bank account access or mobile device unlocking.

14. Domain names: Each website has a unique domain name, which is a string-based address used to access the website on the internet.

15. ISBN (International Standard Book Number): Every published book is assigned a unique ISBN, which is a string-based identifier used for cataloging and identifying books globally.

16. API keys: Unique strings called API keys are used to authorize access to Application Programming Interfaces (APIs) and allow communication between software applications or platforms.

17. Ticket codes: Concerts, events, or travel bookings often assign unique ticket codes to each ticket for validation and entry purposes.

18. Email addresses: Every email address is a unique string-based identifier used for communication in the digital world.

These are just a few examples, but unique strings find application in various areas where distinct identification or tracking is necessary.

random list generator,no repeats,random letter generator
Share:

One click disable all plugins


Info

Disable all plugins with one click. With this plugin you can add a link to disable all plugins with one click. To deactivate all plugins in the normal way, you visit the "Plugins" page in the administration panel. You must select all plugins with the checkbox at the beginning of the table. Then select the "Deactive" option under "Bulk actions". Press the "Apply" button and all plugins are deactivated.

Installation

1. Add the plugin's folder in the WordPress' plugin directory, or install the plugin through the WordPress plugins screen directly.
2. Activate the plugin through the 'Plugins' screen in WordPress.

Usage

Go to left menu: Tolls -> Disable all plugins
Or
Go to Plugins page: 1 click disable all -> Deactivate all

Changelog

= 1.0.0 =
* Initial version released

Share:

CSS chat button - free WhatsApp WP Plugin


CSS chat button - WhatsApp WordPress Plugin
Compact, Simple, Speedy chat button. It allows visitors to contact you via messaging app. Chat with your website visitors through online chat apps. Place a floating button on your site and let people contact you. Lightweight and fast loading for best SEO.
Add the clickable WhatsApp button for chat to your site.

Compact: Less than 5 KB file size, only CSS and HTML
Simple: Very basic settings
Speedy: No Sql query for fast loading

CSS chat button Pro

Coming soon.

CSS chat button Download

CSS chat button - WordPress Plugin

Usage

Add the plugin's folder in the WordPress' plugin directory, or install the plugin through the WordPress plugins screen directly.
Activate the plugin through the 'Plugins' screen in WordPress.

Go to Settings -> CSS chat button
Input your contact info
Save settings

Settings page of CSS chat button Settings page of CSS chat button
WhatsApp chat button at bottom right on Twenty Twenty-Three Version: 1.1 WhatsApp chat button floating Twenty Twenty-Three theme
Make it compatible with your theme. Adjust the position and size of the button as you wish.
WhatsApp chat button at bottom left on Woodmart theme version 7.1.4 WhatsApp chat button floating Woodmart theme
WhatsApp chat button at bottom right on Flatsome theme version 3.15.6 WhatsApp chat button floating Flatsome theme
== Changelog ==

= Version 1.0.0 =
* Initial version released

WhatsApp Contact Button, WhatsApp Business chat button
Share:

PHPMyAdmin Bootstrap Dark Theme 5.2

PHPMyAdmin Dark Theme 5.2 black download
Name: Bootstrap Dark theme for phpMyAdmin
Author: Atakan Au
Download Bootstrap Dark theme zip file for phpMyAdmin

Is there dark mode in phpMyAdmin?

Can I use phpMyAdmin in dark mode?
1

Yes! You can use this addition to change the PhpMyAdmin interface to a dark look with a predominance of black.

1
Theme has been tested on PhpMyAdmin version 5.2.0. The files were developed based on the original "Bootstrap" theme that came with PhpMyAdmin version 5.2.0. Bootstrap version was upgraded and v5.3.0-alpha1 was used.

How do I add a theme to phpMyAdmin?

How to install a theme in phpMyAdmin?
1

After downloading the zipped folder, unzip it into the \themes\ directory.

1
phpMyAdmin
├── templates
├── themes
│   └── bootstrap
│   └── bootstrap-dark
│       ├── css/
│       ├── img/
│       ├── jquery/
│       ├── scss/
│       ├── screen.png
│       └── theme.json

How do I change phpMyAdmin to dark mode?

How do I use phpMyAdmin in dark mode?
1

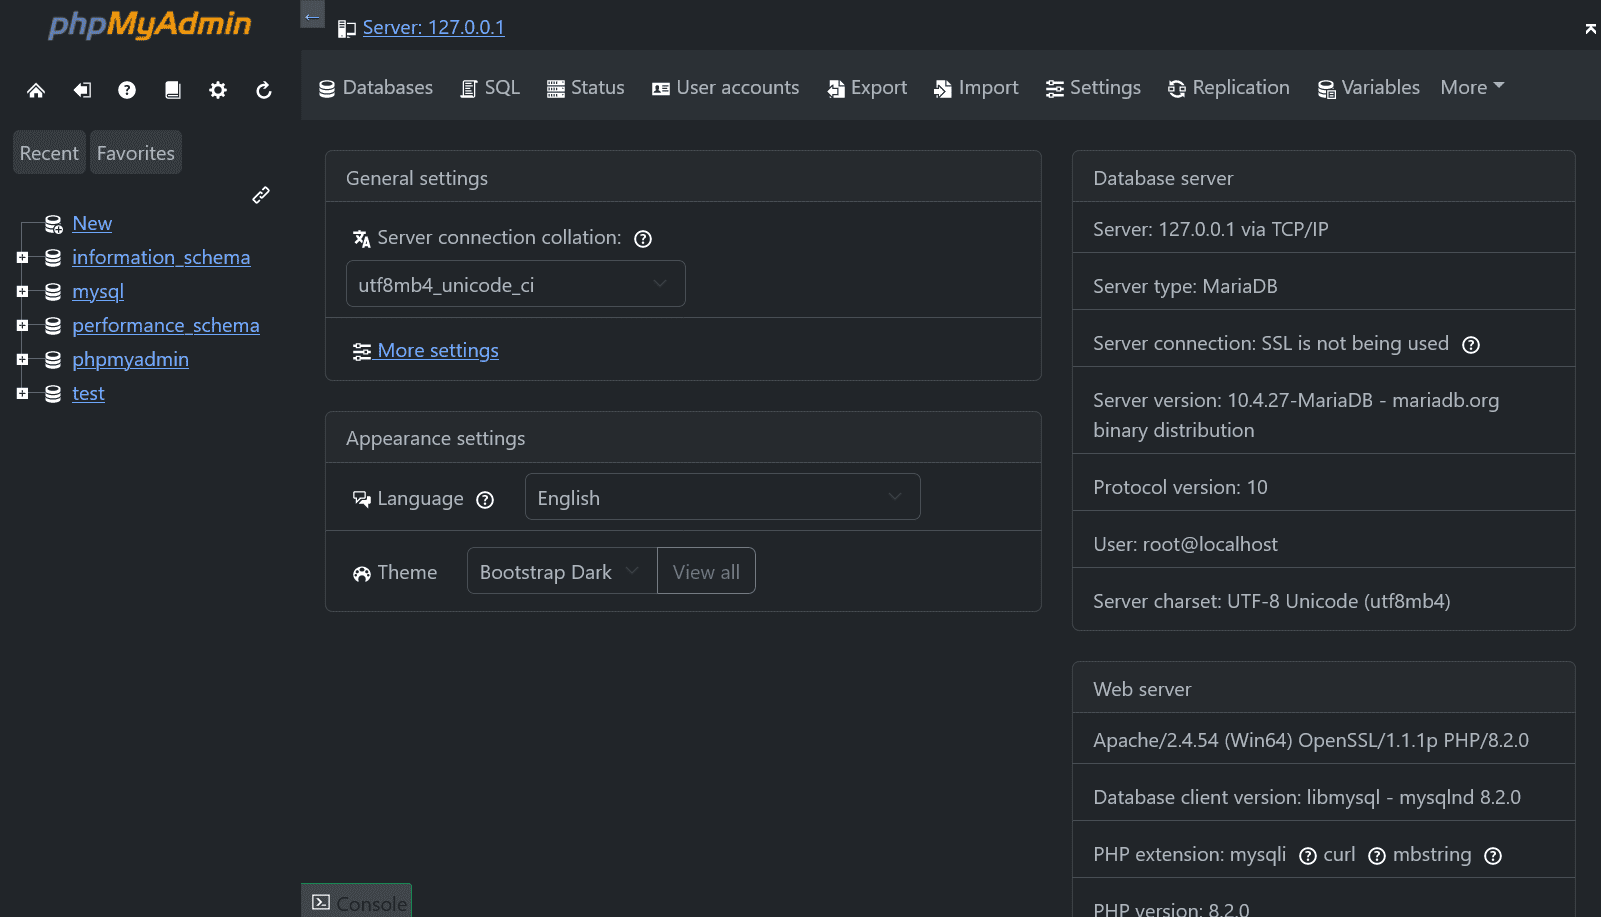
Go to the PhpMyAdmin home page with your browser. Select the "Theme" setting under "Appearance Settings" to "Bootstrap Dark".

1
✅ The original dark theme colors of Bootstrap has been applied.
✅ Delete / Empty / Drop icons are colored red.
✅ Insert / Copy icons are colored green.
✅ Select and Input elements adapted to Bootstrap.
✅ Console button made semi transparent.
✅ SQL query input field adapted to the dark theme.

Screenshots:

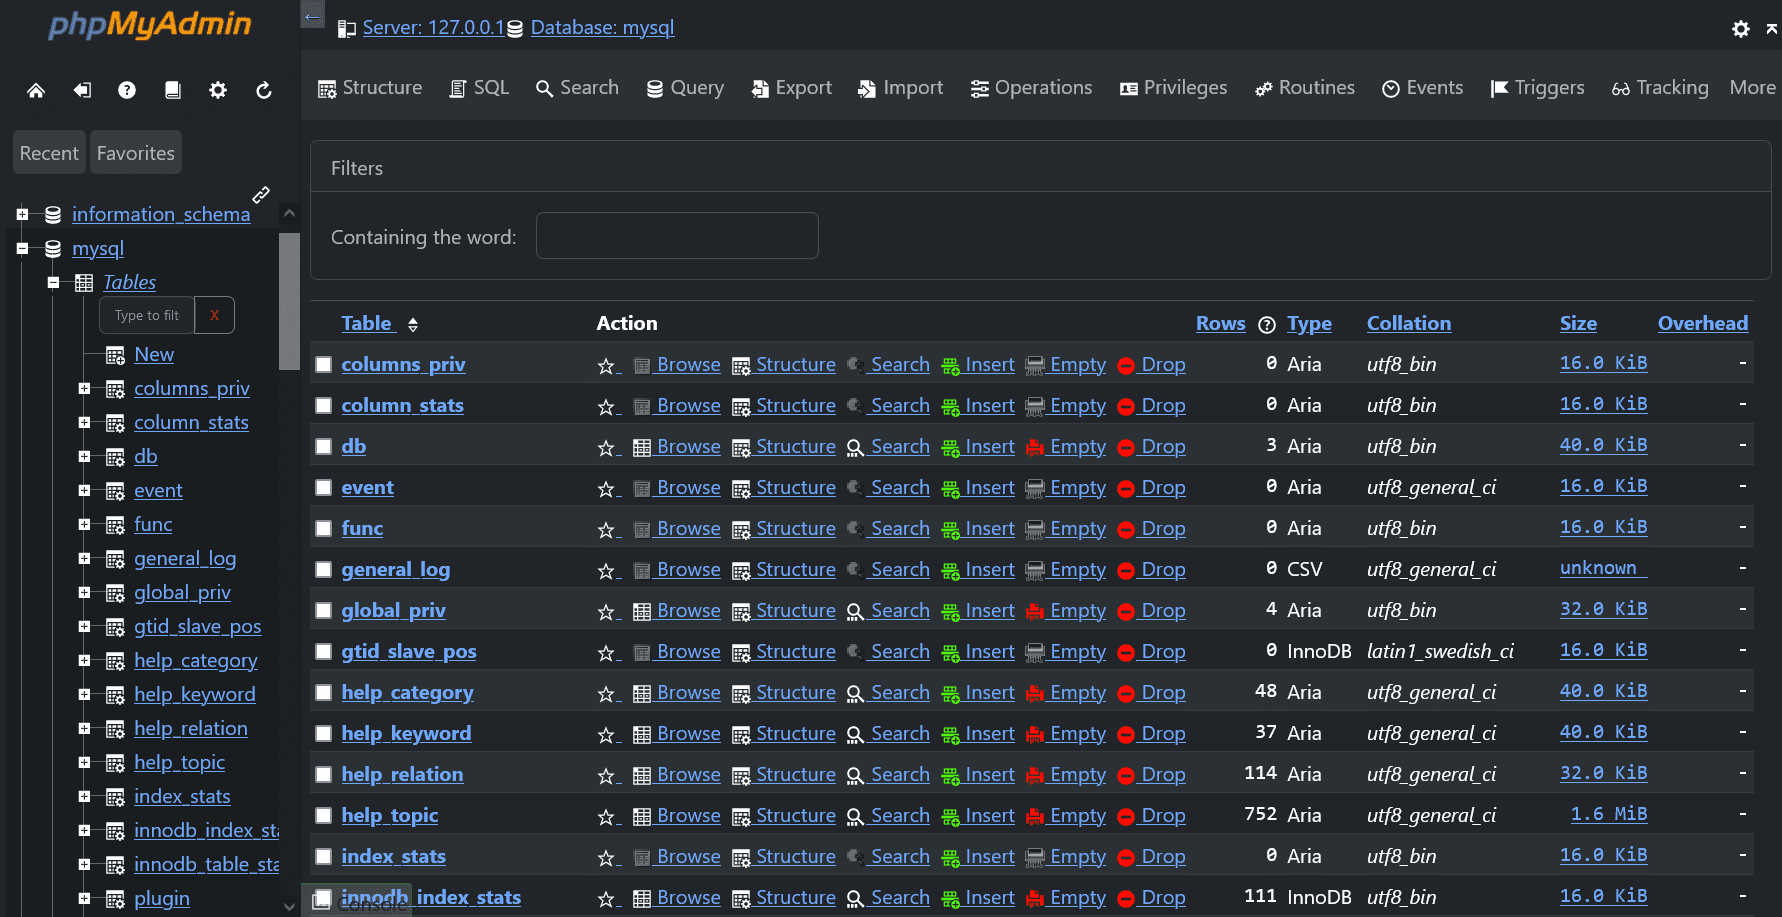
List tables
List tables PHPMyAdmin Dark Theme 5.2 black download
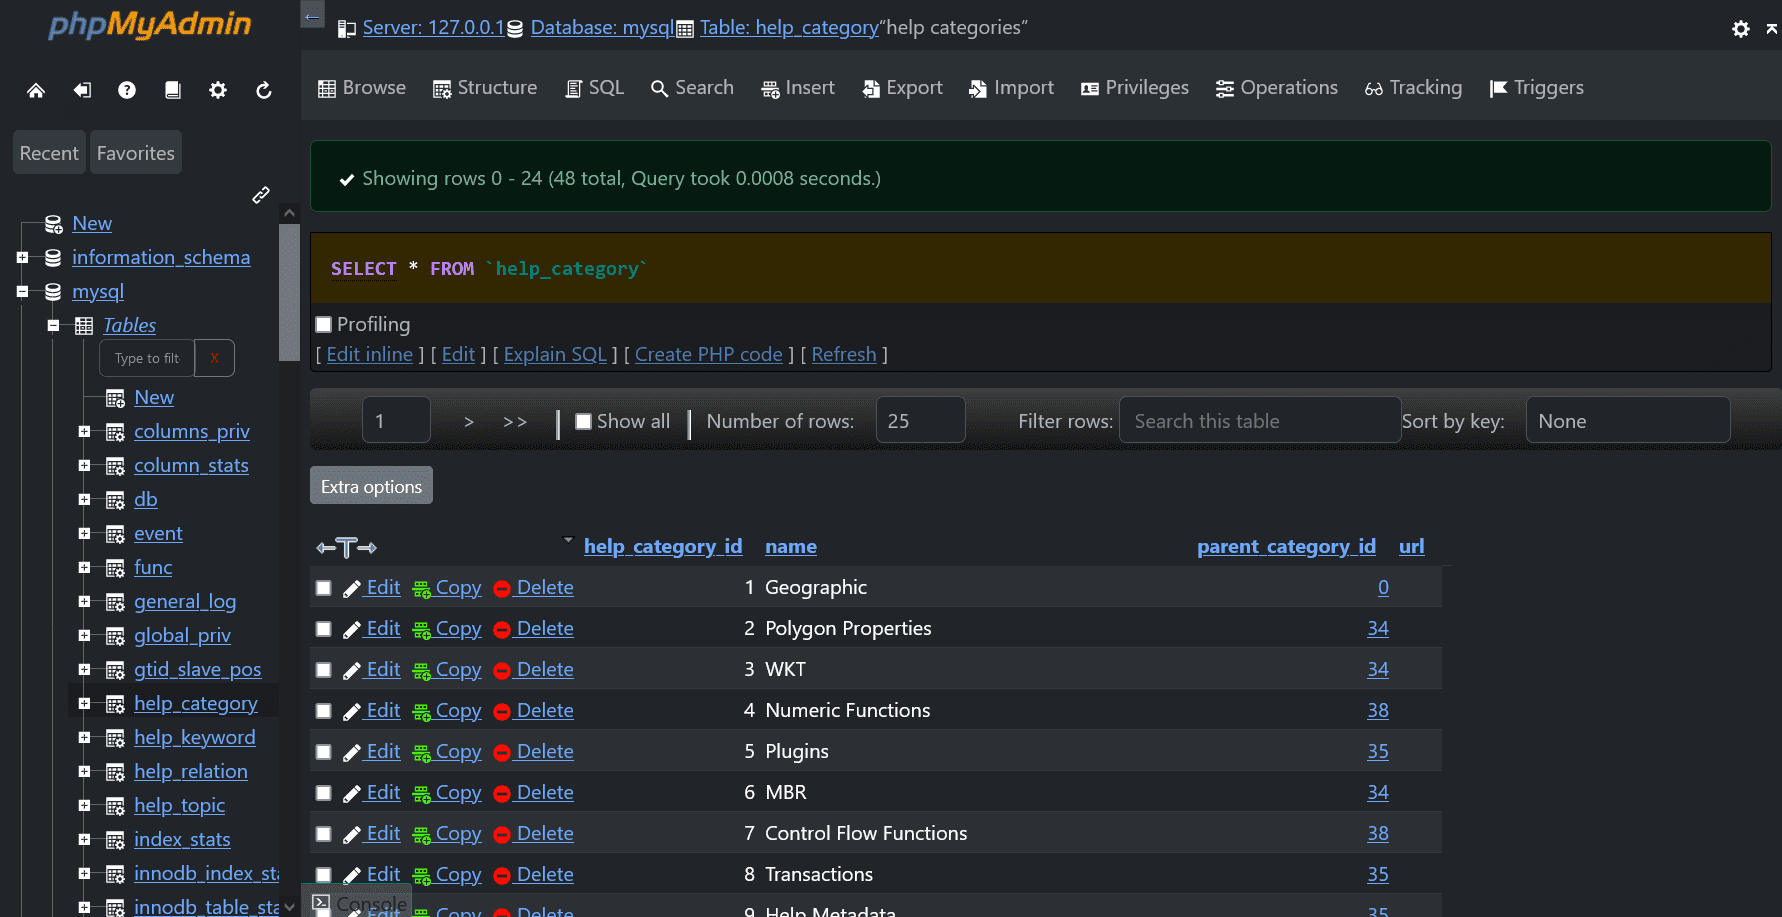
Browse table rows
Browse table rows PHPMyAdmin Dark Theme 5.2 black download
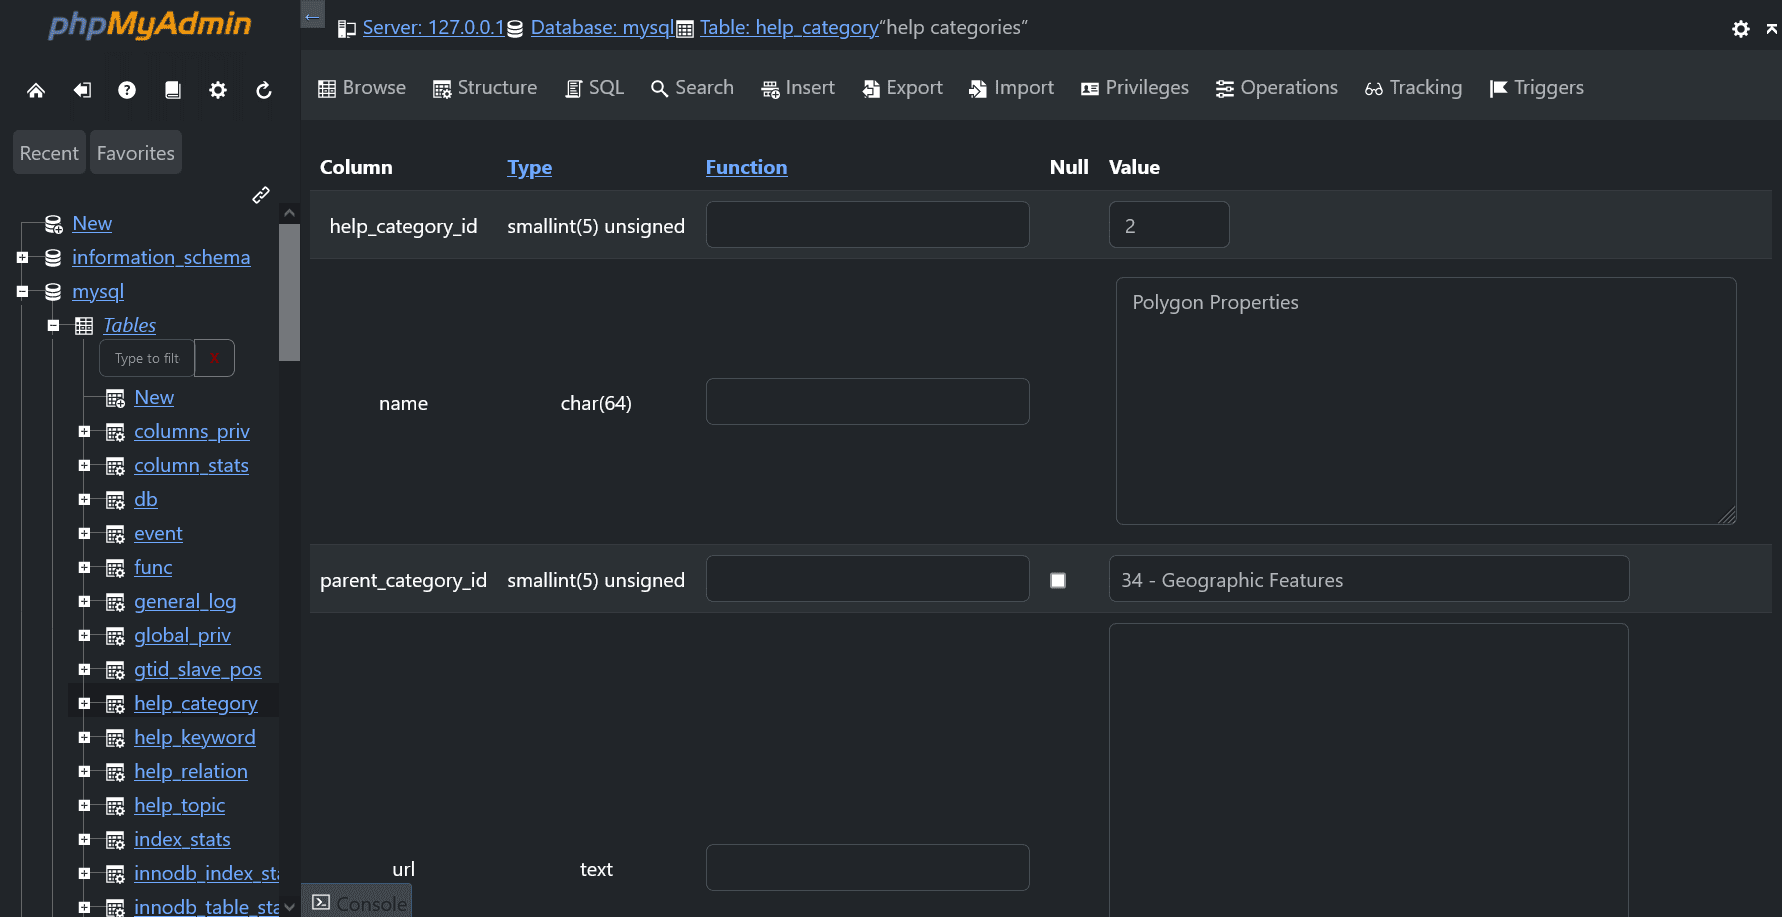
Edit row values
Edit row values PHPMyAdmin Dark Theme 5.2 black download
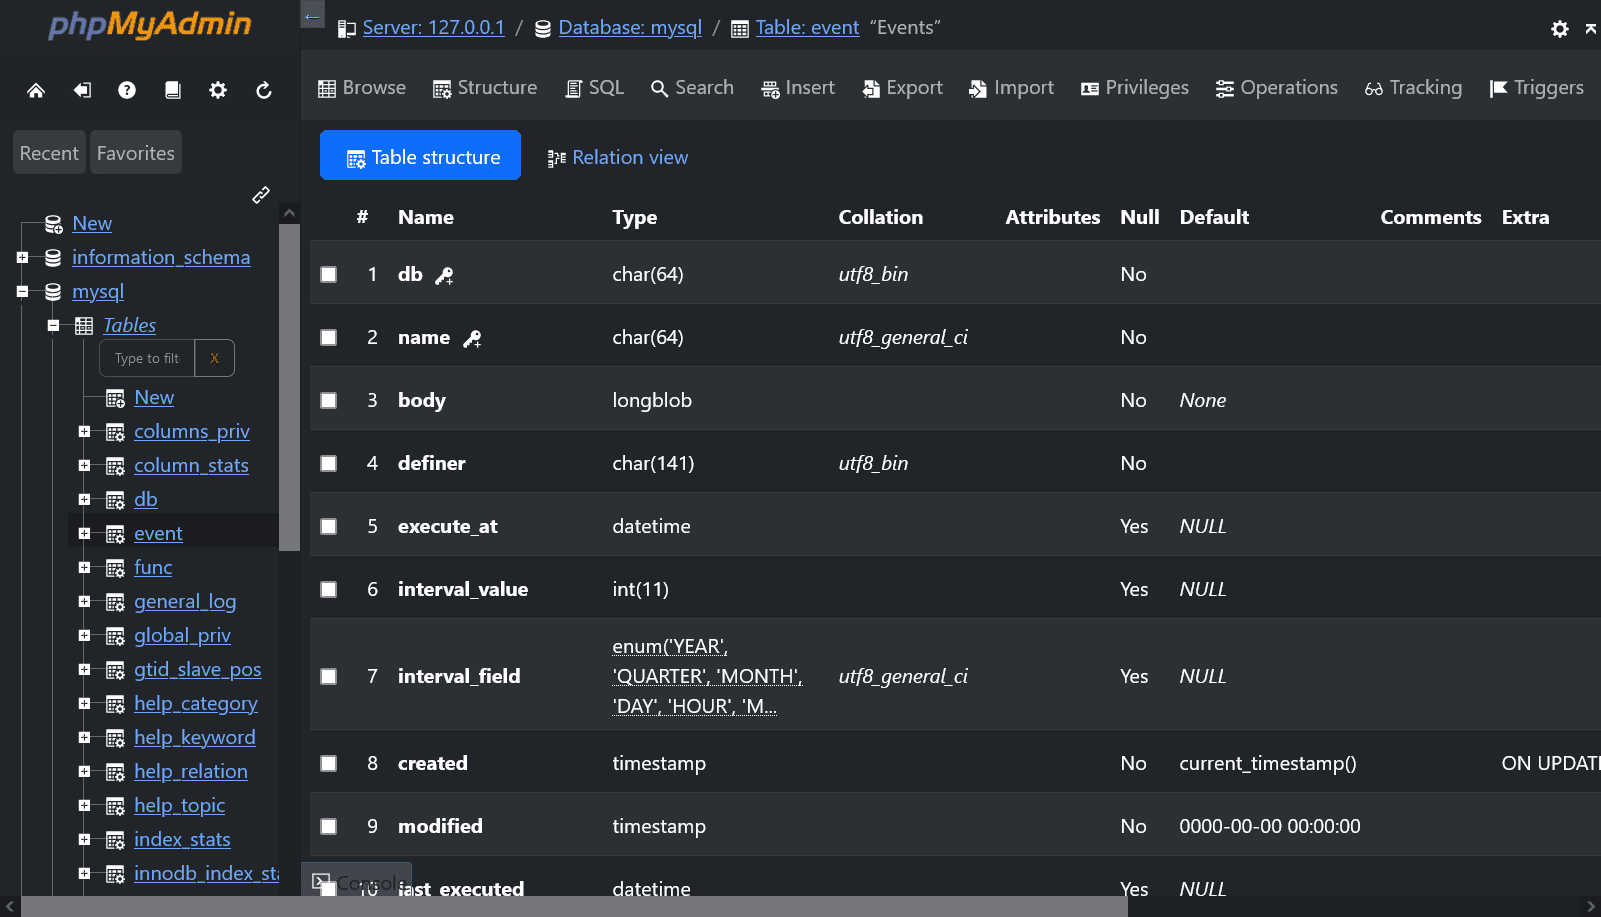
Table structure
Table structure PHPMyAdmin Dark Theme 5.2 black download
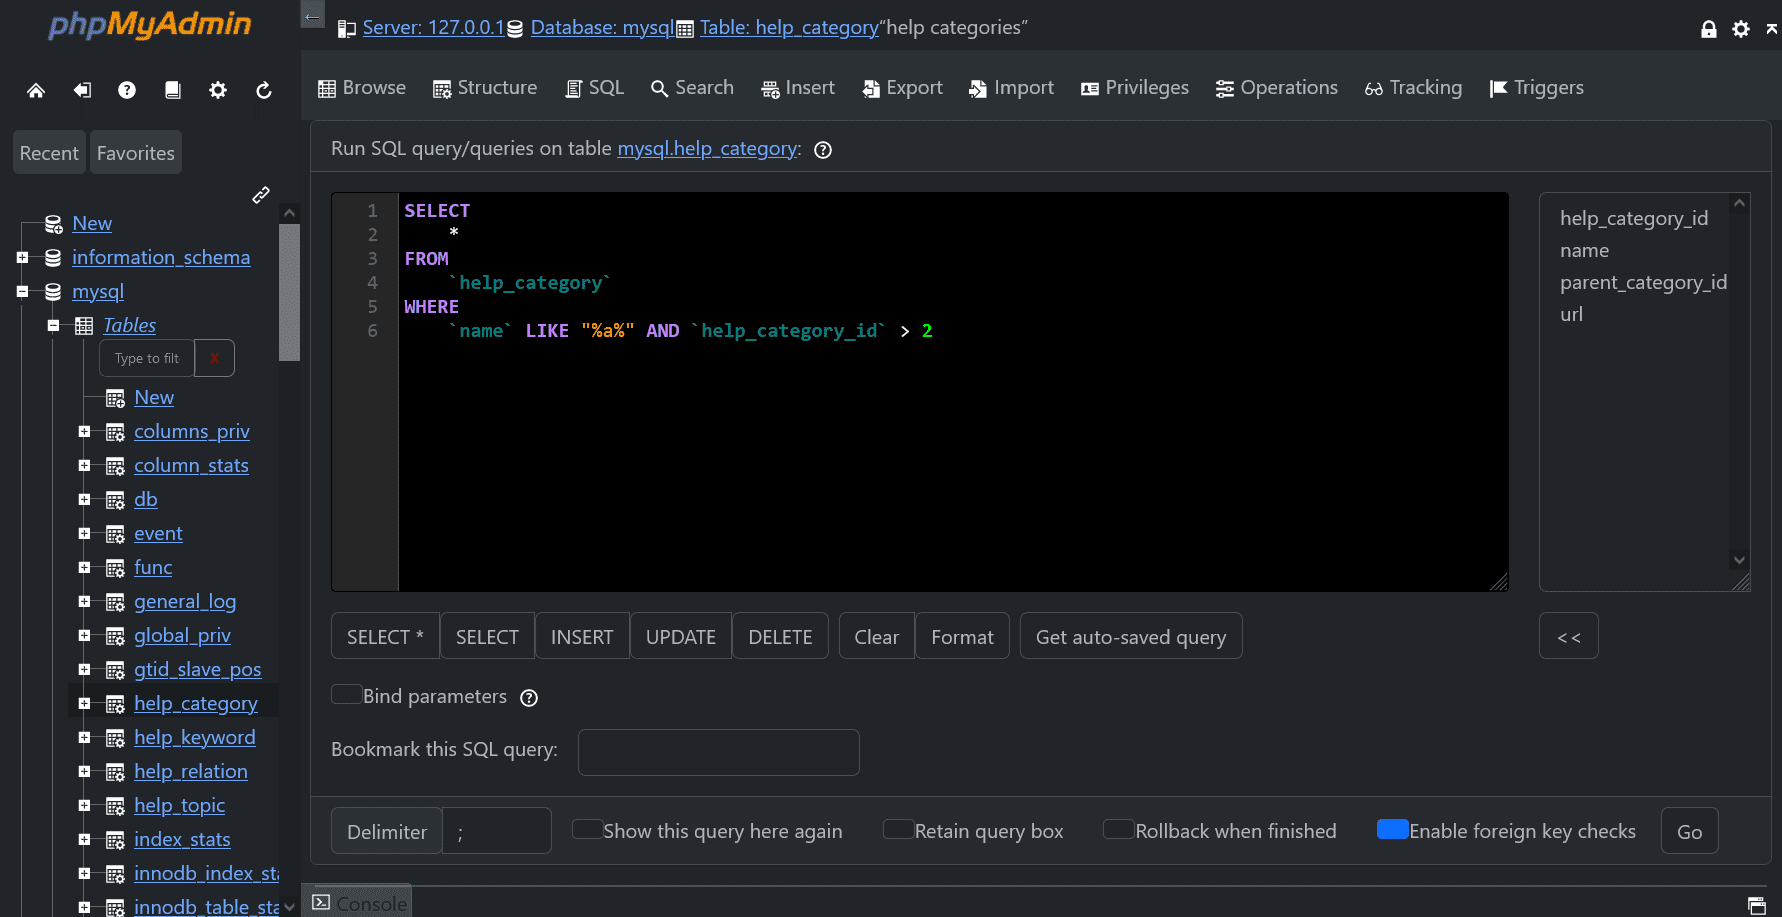
SQL query screen
SQL query screen PHPMyAdmin Dark Theme 5.2 black download
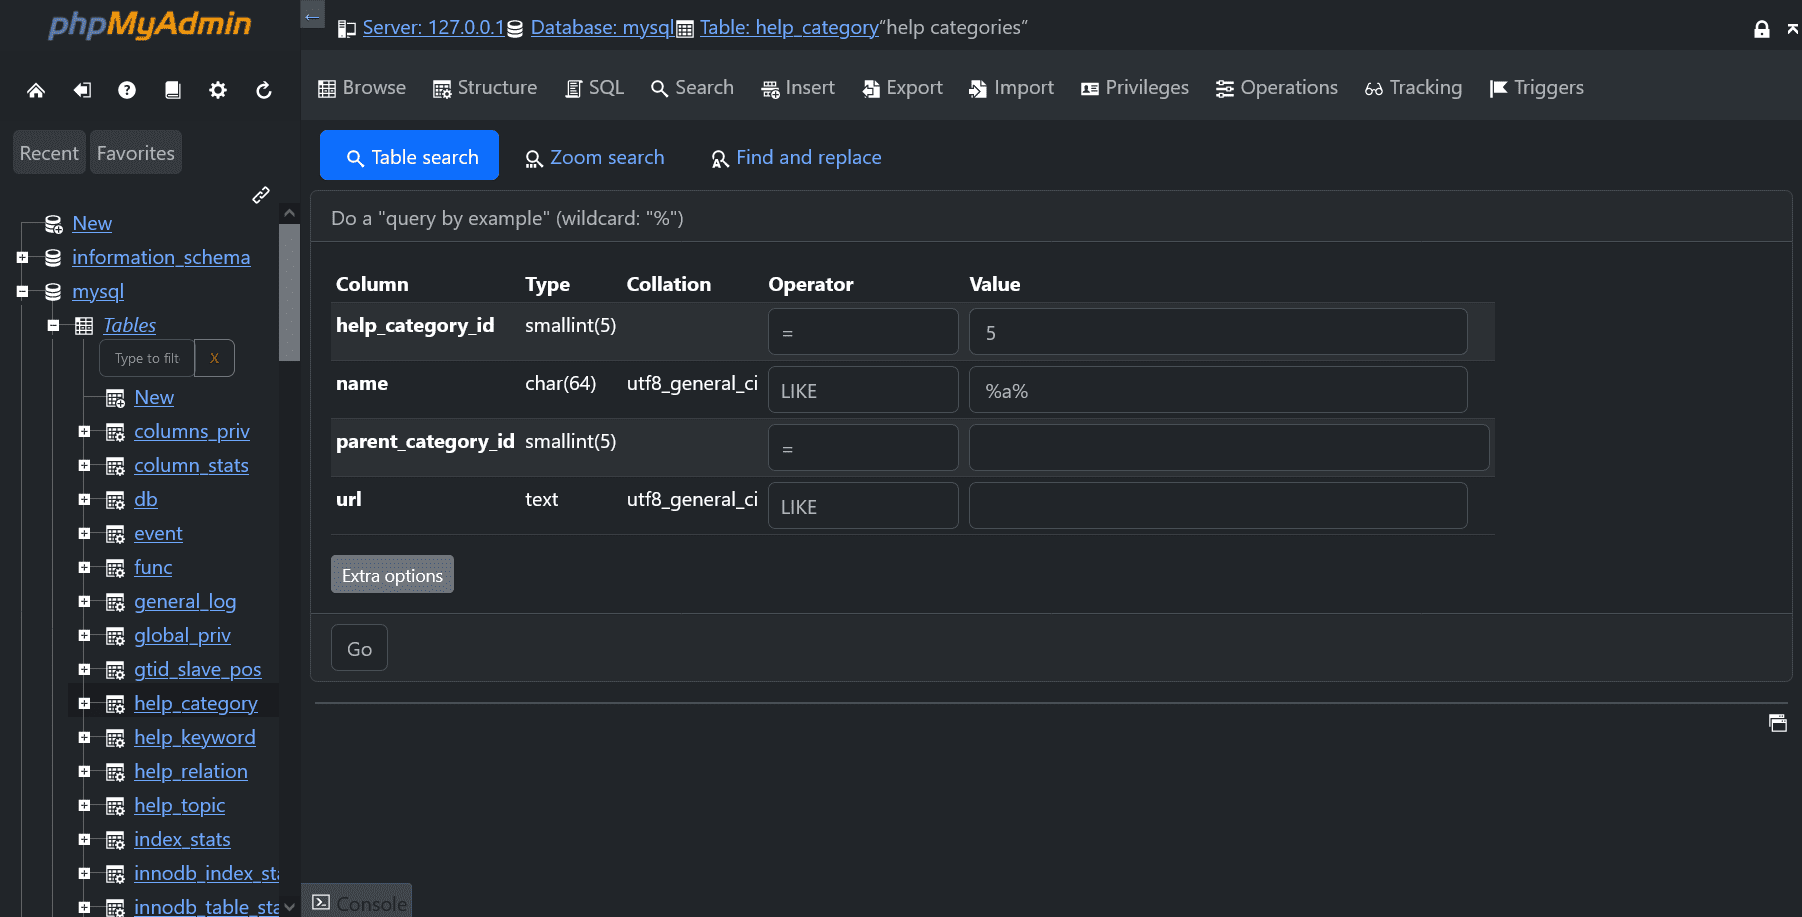
Search
Search PHPMyAdmin Dark Theme 5.2 black download
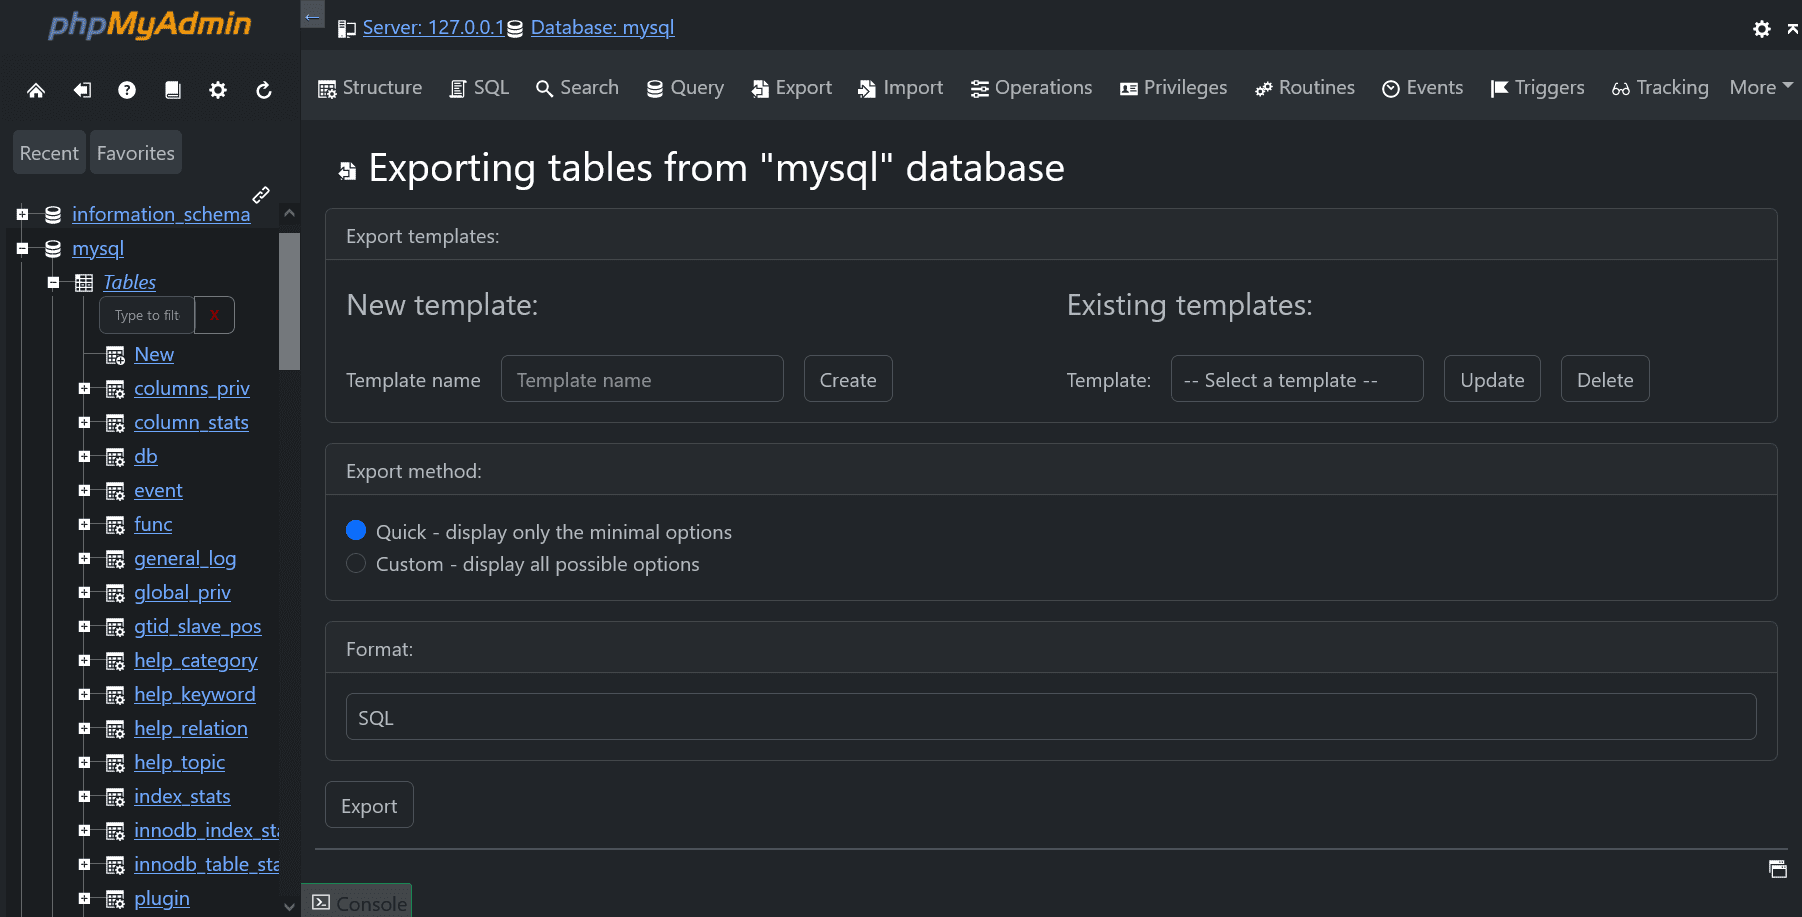
Exporting
Exporting PHPMyAdmin Dark Theme 5.2 black download
Share:

Batch download files keeping directory structure

You can bulk download all listed directories and files with PowerShell on Windows. Jump to online tool

How to batch download files and folders keeping directory structure?

You must do a two-step process to preserve the directory structure and filenames.
1

Create specific directory and file with PowerShell's "New-Item" command. Then save the file on the internet to your local disk with the "curl" command.

1
Download files keeping directory structure

How to download files keeping directory structure Windows 10?

Open PowerShell

Hit the "Start" icon.
Then choose "All Apps" Scroll down, press "Windows PowerShell" folder to open it. Click "Windows PowerShell" to run it.
Open PowerShell

Use PowerShell's commands

Create the directory on your disk
Create the necessary directory and subdirectories on your local disk with PowerShell's "New-Item" command:
New-Item -ItemType File -Force -Path C:\dir\sub_dir\file.zip

For example, you will download these two files:
https://cdnjs.cloudflare.com/ajax/libs/bootstrap/5.2.3/js/bootstrap.min.js
https://cdnjs.cloudflare.com/ajax/libs/bootstrap/5.2.3/css/bootstrap.min.css


Let's create these directories and files:
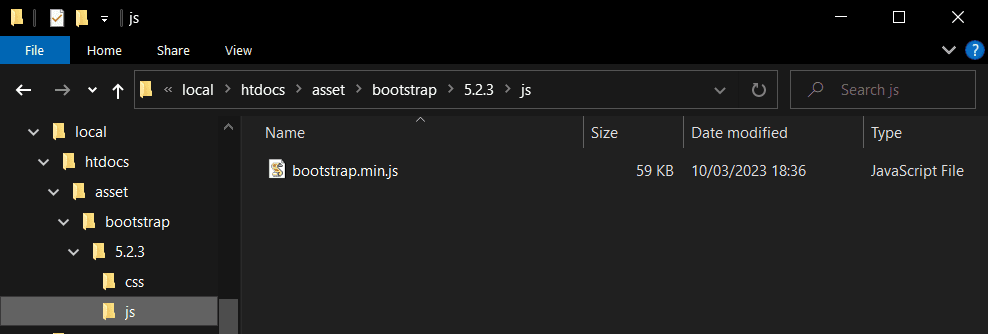
C:\local\htdocs\asset\bootstrap\5.2.3\js\bootstrap.min.js
C:\local\htdocs\asset\bootstrap\5.2.3\css\bootstrap.min.css


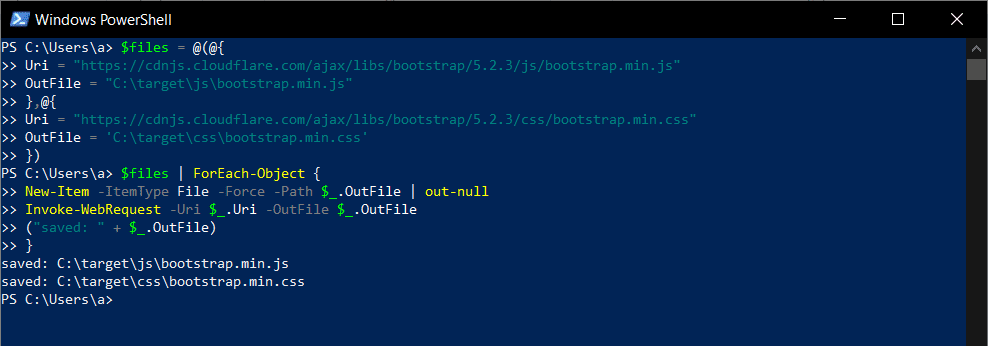
Run these commands:
New-Item -ItemType File -Force -Path C:\local\htdocs\asset\bootstrap\5.2.3\js\bootstrap.min.js
New-Item -ItemType File -Force -Path C:\local\htdocs\asset\bootstrap\5.2.3\css\bootstrap.min.css
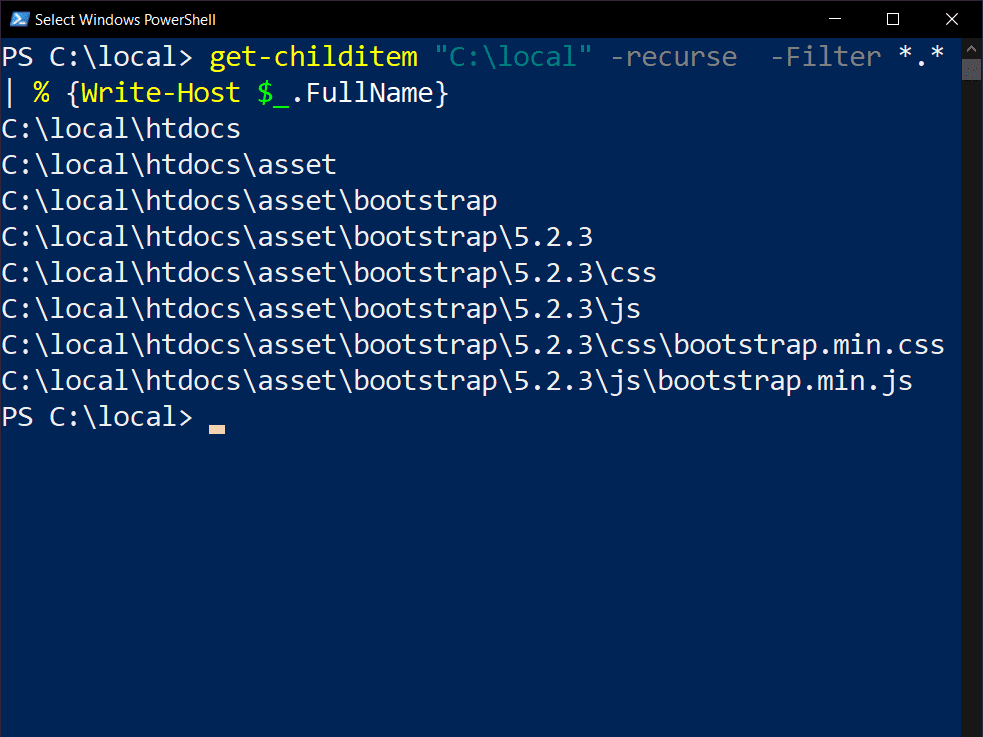
Create the necessary directory and subdirectories on your local disk with PowerShell New-Item command

Download the file contents with the "curl" command:
Download the files with the "curl" command and overwrite their contents:
curl https://domain.tld/path/sub_path/file.zip -O C:\dir\sub_dir\file.zip
To save the two files in the example above to your disk, keeping the same directory structure, run these commands:
curl https://cdnjs.cloudflare.com/ajax/libs/bootstrap/5.2.3/js/bootstrap.min.js -O C:\local\htdocs\asset\bootstrap\5.2.3\js\bootstrap.min.js
curl https://cdnjs.cloudflare.com/ajax/libs/bootstrap/5.2.3/css/bootstrap.min.css -O C:\local\htdocs\asset\bootstrap\5.2.3\css\bootstrap.min.css


Alternatively, the "Invoke-WebRequest" command can be used in the following formats:
Invoke-WebRequest -Uri "Source-Uri" -OutFile "Save-File"
Download the files with curl command

Download the files with curl command


Automatically create the PowerShell script


Paste your url list. Set parameters. Generate your PowerShell. Copy the script. Paste it into the PowerShell command line. That is all.

Download url list:


Options

Combine all files in one zip file and download. It only works in modern and up to date browser. The total file size should not exceed ~5 MB.


PowerShell script:


Automatically create the PowerShell script onlie tool
Share:

Automatic Gallery And Featured Image Sync - WP Plugin

Automatically sync posts WooCommerce Product and media images as featured image and gallery
Automatically sync posts (or WooCommerce Product) and media images as featured image and gallery.

Automatically sync posts and media images as featured image and gallery.

Images with names are given as `ID`:

*   Automatic syncing as featured image to posts 
*   Automatic syncing as featured image to pages 
*   Automatic syncing as featured image to WooCommerce products 
*   Automatic syncing as gallery images to WooCommerce products 

Images named as product `SKU` (Pro):

*   Automatic syncing as featured image to WooCommerce products 
*   Automatic syncing as gallery images to WooCommerce products 

Please comment 💬, rate ⭐ and share 👍
Automatic Gallery And Featured Image Sync - WordPress Plugin

Creating an online store with WordPress has never been easier, thanks to the powerful WooCommerce plugin. Once you've set up your store, the next step is to add products for sale. Each product requires essential information like name, price, and description to entice potential customers. Additionally, incorporating images is crucial for showcasing your products effectively. WordPress allows you to upload images to the media library and seamlessly integrate them into your product listings, including setting featured images and creating galleries.
However, managing a large inventory of products can be time-consuming, especially when individually assigning images to each one. To streamline this process, a convenient plugin comes to the rescue. This plugin simplifies the task of collectively assigning featured and gallery images to multiple products, saving you valuable time and effort. By utilizing this tool, you can effortlessly associate products with images, ensuring your online store looks visually appealing and professional without the hassle of manual image assignments.

The “Automatic Gallery And Featured Image Sync” plugin allows for the automatic synchronization of posts and media images to be set as featured images and galleries. Images with specific names are assigned as IDs, enabling seamless syncing of featured images to posts, pages, and WooCommerce products. Additionally, images named after product SKUs can be automatically synced as featured images and gallery images for WooCommerce products.
Name Your Images

  • Use the following file naming format: [ID]-[Sort].[file extension]
  • Make sure the file names match the post or product IDs.
  • Make sure images do not contain embedded EXIF metadata.
  • Set the “Sort” value of the file you want to be the featured image to “1”. For example, if you have a post with ID 123 and want to set an image as the featured image, name the file 123-1.jpg.
  • Upload your images to the WordPress media library.


Example:

  • Post ID: 123
  • The image named 123-1.jpg will be automatically set as the featured image for the product with ID 123.
  • The image named 123-2.jpg will be included in the gallery for the product with ID 123.
  • The image named 123-3.jpg will be included in the gallery for the product with ID 123.


Assign Images to Posts, Pages, or Products

Warning: This plugin adds new rows to the database for matching. Backup your database before matching.

  • Go to the "Tools" > "Image Sync" section in your WordPress dashboard.
  • Optionally, filter the list for posts, pages and products.
  • Check the checkboxes of the items to be synchronized.
  • Select and apply the "Sync with Id" action.
  • For posts, pages and WooCommerce products,the plugin will automatically detect and set it as the featured image if its name matches the post or page ID.
  • For WooCommerce products, the plugin will automatically sync them as featured images and gallery images.
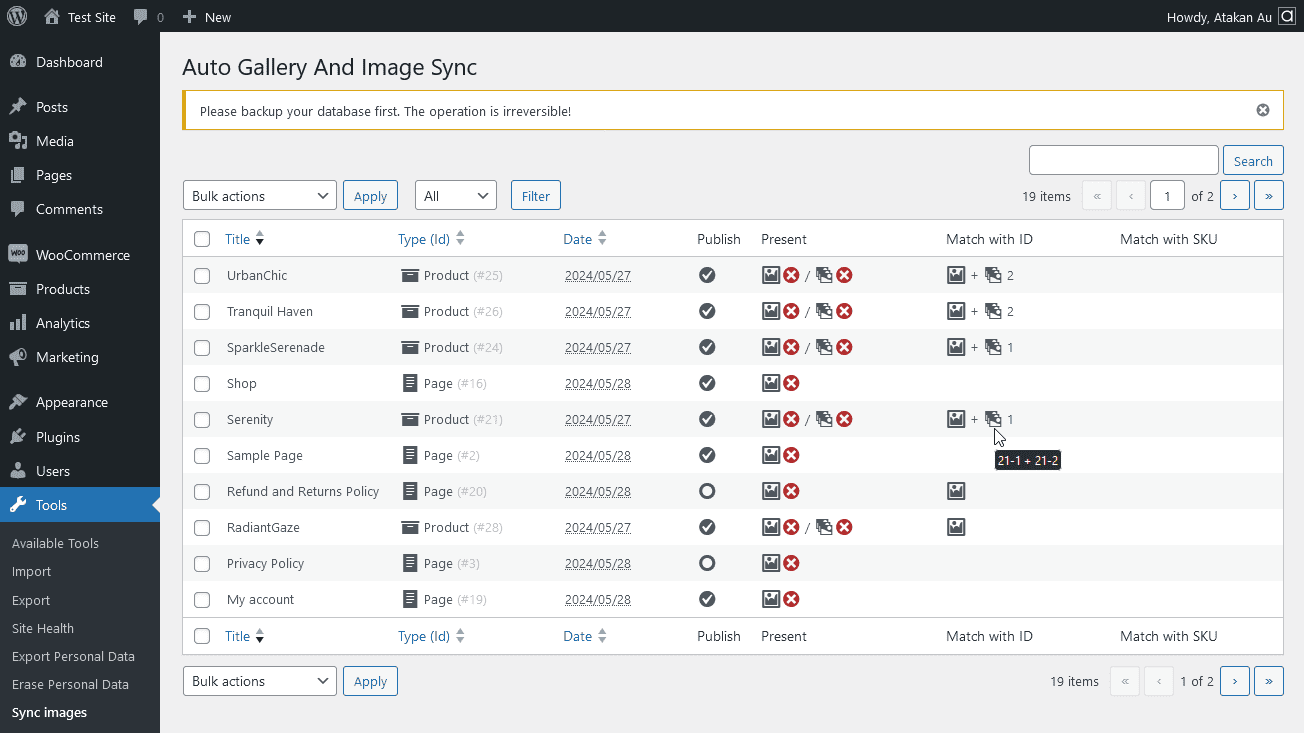
You can select and deselect all items with the checkbox in the header of the table. The “Match with ID” and “Match with SKU” columns contain information about the images in the media library that are matched with the item. The first icon indicates that the featured image matches. The second icon represents the image gallery. Next to it is the number of media matched for the image gallery. Next to this is the number of matching media for the image gallery. Hover the mouse over the icons and you will see the meta names of the matching medias.
Automatic Gallery And Featured Image Sync Tool Screenshot

Automatic Gallery And Featured Image Sync PRO version

The free version of the "Automatic Gallery And Featured Image Sync" plugin uses the ID of the post or product as the matching criterion. This means that the plugin will match images to posts or products based on their ID number.
The PRO version of the plugin adds the ability to match images to posts or products based on their SKU value. This is a more flexible matching criterion, as it allows you to match images to posts or products even if their ID numbers are different.
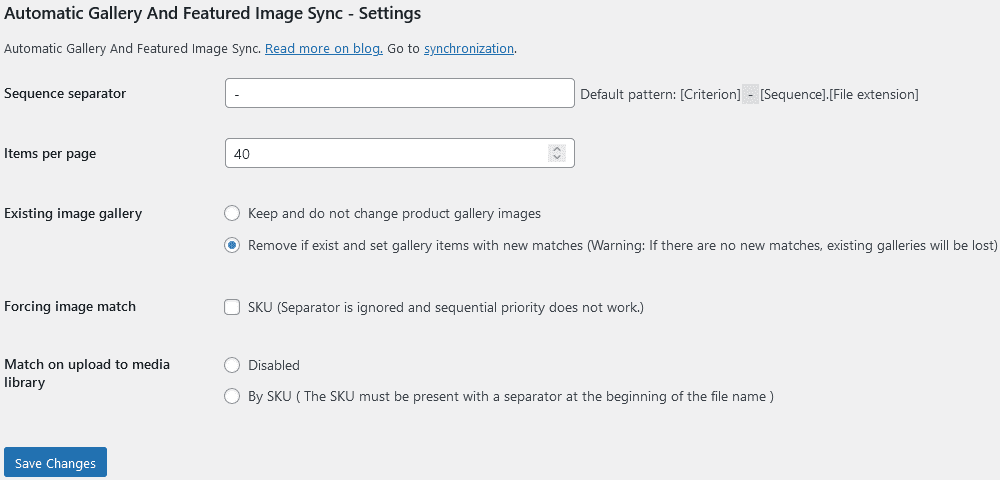
In addition, the PRO version of the plugin provides a number of additional settings that allow you to customize the way that the plugin works.

Benefits of using the PRO version:

  • More flexible matching criterion (SKU)
  • Additional settings to customize the plugin's behavior

If you need to match images to posts or products based on their SKU value, or if you want to customize the way that the plugin works, then the PRO version of the plugin is a good option.

PRO version settings:

Go to the "Settings" > "Sync images" section in your WordPress dashboard.

Automatic Gallery And Featured Image Sync Pro Settings

Sequence Separator

The "Sequence separator" setting plugin allows you to specify a character or string to separate the sequence number from the rest of the file name.By default, the plugin uses a hyphen (-) as the sequence separator. This means that file names must follow the pattern:

[Criterion]-[Sequence].[File extension]

Example:

If you have a post with ID 123 and want to set an image as the featured image, you would name the file 123-1.jpg.

If you want to use an underscore (_) as the sequence separator instead, you would set the "Sequence separator" setting to _. This would allow you to use file names like the following:

123_1.jpg
123_2.jpg
123_3.jpg

Note: The sequence separator must be a character or string that is not used in the criterion part of the file name.

Items per page

The "Items per page" setting allows you to specify the number of items that will be displayed on each page of Sync page.

Note: It is important to note that increasing the number of items per page will also increase the number of database queries. This can slow down the page loading if you have a large number of items. Therefore, it is important to choose a number of items per page that is appropriate for your website and server. You may want to use a lower number of items per page to avoid slowing down the sync page.

Existing image gallery

The "Existing image gallery" setting allows you to specify how the plugin should handle existing image galleries. You have two options for this setting:

  • Keep and do not change product gallery images: This option will keep your existing image galleries unchanged. The plugin will not add or remove any images from your existing galleries.
  • Remove if exist and set gallery items with new matches: This option will remove your existing image galleries and replace them with new galleries that are generated by the plugin. If there are no new matches for an existing gallery, the gallery will be lost.

Example:

Let's say you have a product with the stock code "abc". You have manually added two images to the product gallery: "img-x.png" and "img-y.png".

You then upload two new images to the media library: "abc-1.png" and "abc-2.png". These new images match the product's stock code.

When you use the "Automatic Gallery And Featured Image Sync" plugin to create a new gallery for this product, if you choose the second option, the plugin will remove the existing gallery and create a new gallery with the following images:

  • abc-1.png
  • abc-2.png

The existing images ("img-x.png" and "img-y.png") will not be used in the new gallery.

Warning:

It is important to note that if you choose the second option and there are no new matches for an existing gallery, the gallery will be lost. This is because the plugin will remove the existing gallery and will not create a new gallery. Therefore, it is important to choose the "Existing image gallery" setting carefully. If you are not sure which option to choose, it is best to select the "Keep and do not change product gallery images" option.

Forcing image match: SKU

The "Forcing image match" setting allows you to force the plugin to match images to products .

When you enable "SKU" setting, the plugin will ignore the "Sequence" settings and will simply match images to products based on their SKU. The first image that matches the product's SKU will be set as the featured image.

Example:

Let's say you have a product with the SKU "abc". You have two images in your media library: "abc-front.png" "abc-side.png" and "abc-back.png".

If you enable the "Forcing image match: SKU" setting, the plugin will match both images to the product. The image "abc-back.png" will be set as the featured image because it is the first alphabetically matching image.

Match on upload to media library

By SKU

This setting only works for WooCommerce products. Allows you to automatically match images to products when they are uploaded to your media library. When you enable this setting, the plugin will automatically match images to products based on their file name. The plugin will look for the product's SKU in the file name of the image. If the SKU is found, the plugin will match the image to the product.

Ignore image prefix

Allows you to ignore the prefix of the image file name when matching files. This allows you to match files even if they have different prefixes. The setting is only available when using the SKU matching method. The plugin will match files based on the following format:[Prefix]-[SKU]-[Sequence].[file extension]

For example, if you have a product with the Sku "abc123" and an image file named "my-brand-abc123-1.jpg", the plugin will match the files and set the image as the featured image for the product.

Warning: The file name must not contain any other product SKUs. If the file name contains multiple SKUs, the plugin will not be able to match to the correct product. For example, if you have a file named "prefix-12345-67890-1.jpg" and two products with the SKUs "12345" and "67890", the plugin checks the following matches respectively: "prefix-12345-67890", "12345-67890", "prefix-12345", "67890", "12345", "prefix". The plugin matches the first SKU it finds, which is "67890". To avoid this problem, you should make sure that your file names only contain one SKU.

Other word delimiter

Allows you to specify an extra character used to separate the prefix parts of a file name. By default, the plugin uses the hyphen (-) character to separate filenames. However, if your filenames use a different character, you can use this setting to tell the plugin to use that character as well.

For example, if your file names also use the underscore character (_) as a separator; You would enter "_" into the "Other word delimiter" setting, such as "prefix_brand_67890-1.jpg". This tells the plugin to use underscore (_) and hyphen (-) characters to separate parts of your filenames.

== Changelog ==

= 1.0.0 =
* Initial version released
Auto Gallery And Image Sync
Automatically sync posts and media images as featured image and gallery.
Share:

Subscribe to: Posts (Atom)