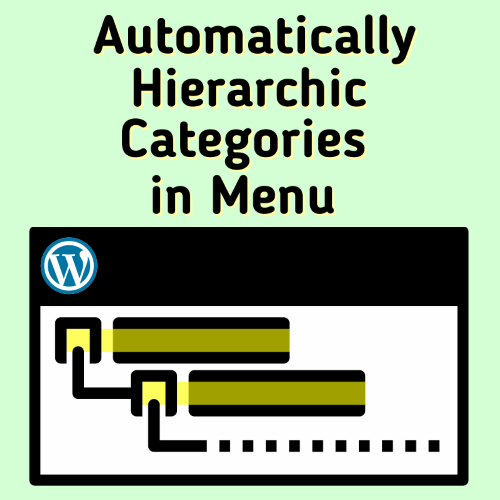
Automatically Hierarchic Categories in Menu Pro
You can see what the plugin does and how it works with the free version. Pro version works together with the free version, and extends it. More parameters become available with the Pro version.To get the Pro version by donating or to make the plugin compatible with your theme, you can contact me by filling out the form or write to me on Telegram. Each deal is for one domain. There is no time limit, it can be used for lifetime. You can send your donation to my crypto wallet very quickly. Also, you can transfer money using Binance Pay with zero commissions - fees - charges. If you are not a member, you can create an account by following this link (with reference).
Pro features:
⭐ Custom taxonomy compatibility (tag, custom post category)
⭐ Add sub item at the beginning / end of the link text
⭐ Trailing slash on url link
⭐ Removed credits link
⭐ Show the number of posts in a category
⭐ Selecting root items to be included in the menu by ID
⭐ Sorting menu items (Alphabetical ascending - descending)
⭐ Add active CSS class to current element
⭐ Using the category's image in the menu item (icon, flag etc.)
To-do list: Cleared!
Customization is required for themes that use a complex menu structure. I can offer you a professional solution for this. Set up a staging site that is an exact copy of your production website on a temporary domain or subdomain for customization and development. Create your goal menu with manually added items. I can ask you to give me access as an administrator. This will help me to check the structure of the menu and find the solution.
How to automatically add hierarchic categories in WordPress Navigation Menus ?
You can use this WordPress plugin:Automatically Hierarchic Categories in Menu - WordPress Plugin Download
If you like the plugin, please give 5 stars. Your positive feedback is important for me.
This plugin works well with many themes. If you are using a theme that uses a standard menu structure, the plugin generates the menu with zero configuration. However, some themes produce menus with a different structure. HTML elements and/or their CSS class names may differ. In this case the menu will not appear correctly on your website according to your theme. This is because of your theme, not the plugin. HTML and CSS knowledge may be required depending on the theme. If you have HTML and CSS knowledge, there is the possibility to adapt it to your theme using parameters. For themes that use complex menus, getting Pro version and customization would be the solution for you.
Usage
You can make some customizations for your theme by using parameters and values in the shortcode.Parameters
Parameter	Default			Description
taxonomy	category		taxonomy type
exclude		false			exclude taxonomy id(s)
level		2			hierarchy max level
prnt_tag	ul			parent tag, dom name
prnt_cls	sub-menu		parent tag, class
chld_tag	li			child tag, dom name
chld_cls	menu-item		child tag, class
chld_chc	menu-item-has-children	child tag, has children class
chld_cid	false			add id to class
a_cls		false			default link class
subi_bfr	false			sub item, before for has children item
subi_aft	false			sub item, after has children item
nline		"\n"			new line
linkget		false			extra get parameter after link
hide_empty	1			hide categories with empty items
- taxonomy:
- Type of 'taxonomy'. Do not ignore this parameter for post categories. To use WooCommerce product categories as menu items, give the value 'product_cat'. Example:
[autocategorymenu taxonomy="product_cat"] - exclude:
- Use this parameter for the categories that you want to exclude in the menu. Specify the category IDs that you want to exclude. Combine ID numbers with commas without spaces. Example:
exclude="123,124" - level:
- Maximum level limit value. If you give the value '
1', only the items at the top root level are included in the menu. No subcategories are added to the menu. if you set the value '2', the root categories and the subcategories of these categories are added to the menu. - prnt_tag:
- Parent tag's dom name. The HTML element that will enclose the menu items.
- prnt_cls:
- Parent tag's class. The class value of the HTML element that will contain the menu items.
- chld_tag:
- The HTML element in which the menu items are sorted.
- chld_cls:
- The class value of the HTML element that is a menu item.
- chld_chc:
- The class value of the menu item that has a subcategory.
- chld_cid:
- To add the ID of the menu item to the class of the menu HTML element, give the value '
1'. - a_cls:
- To assign the class value of the HTML address link element (a), set a value.
- subi_bfr:
- The content before the element (a) of the menu item, which is a subcategory.
- subi_aft:
- The content after the element (a) of the menu item, which is a subcategory.
- nline:
- Adds new lines after each HTML element. It ensures the readability of the source code. Give a null value to minimize the HTML code. Example:
nline="" - linkget:
- Get extra parameter after link. The link address domain.com/category instead of domain.com/category?reg=val to replace it with, give the value
reg=val. - hide_empty:
- By default, categories that do not have any posts in them are not added to the menu. To add categories that do not contain posts to the menu, give the value '
0'.
PRO version parameters
Parameter   Default Summary
subi_atb    false   Before subcategory name content
subi_ate    false   After subcategory name content
t_slash     true    Add trailing slash to link
txtcount    false   Show category post count
cntnr_1s    false   Before subcategory list container
cntnr_1e    false   After subcategory list container
prnt_co1    false   Overwrite parent class after level 1
prnt_ca1    false   Add parent class after level 1
startids    false   Select root categories by ID
sortname    false   Sort categories alphabetically
fn_custom   false   Custom menu function
cache       false   Enable menu caching
excl_woos   false   Hide empty WooCommerce categories
rplc_name   false   Rename categories in menu
act_c_li    false   Add class to active menu item
ext_c_li    false   Add category properties to li class
trim_child  false   Remove extra child tags
thumb_put   false   Thumbnail enable and placement
thumb_size  'thumbnail' Thumbnail image size
thumb_clss  false   CSS class for thumbnail
thumb_frmt  false   Custom thumbnail HTML template
- subi_atb
- Content before the name of the menu item that has the subcategory.
- subi_ate
- Content after the name of the menu item that has the subcategory.
- t_slash
- Add trailing slash end of the link.
- txtcount
- Add total post count to category name. Sample value: "
(%s)", Sample result: "Travel (5)" - cntnr_1s
- Content before the HTML element enclosing (default ul) the subcategory list.
- cntnr_1e
- Content after the HTML element enclosing (default ul) the subcategory list.
- prnt_co1
- CSS selector value to overwrite after level 1 of the class of the HTML element (default ul) containing the subcategory list.
- prnt_ca1
- CSS selector value to be added after level 1 to the class of the HTML element (default ul) containing the subcategory list.
- startids
- Selection of root items to be included in the menu by ID. Type the ID(s) of the categories. To exclude the category itself and include all its subcategories, type the negative of the ID value. Combine multiple IDs with commas without spaces. For example: "
101,102,-103". If you set this parameter to "auto_subs", the menu will automatically include all subcategories of the currently visited category, but only the first level subcategories will be included. If you are on other pages, the menu will include all top categories. Note: When using "auto_subs", caching is disabled. - sortname
- Sort the category items alphabetically. Available values: "
ASC", "DESC" - fn_custom
- It is used for special functions written for a fee for theme menus whose structure is not standard.
- cache
- Enable caching of the menu. If you set it to "
1", the menu will be cached if it is not chached yet. If anything changes in the menu, you need to clear the cache manually on the plugin settings page. It is recommended to set a unique 'shortcode_id' value, it will be used as the file name to save the cache. Sample usage: "cache="1" shortcode_id="desktop_menu"". - excl_woos
- Enhances the "hide_empty" feature for WooCommerce categories. When enabled, it ensures that categories containing only out-of-stock products are excluded from the menu, even if they technically have products assigned. This addresses the issue where "
hide_empty=1" still shows categories with out-of-stock items, providing a cleaner menu by hiding categories with no available products. - rplc_name
- Allows renaming WooCommerce categories in the menu by specifying pairs of old and new category names, separated by underscores and pipes. Format:
OldName_NewName, orOldName1_NewName1|OldName2_NewName2|OldNameN_NewNameNfor multiple pairs. It replaces category names in the menu without changing the actual category names in the database. Examplerplc_name="Shirts_Tops|Jeans_Pantsrenames the "Shirts" category to "Tops" and "Jeans" to "Pants" in the menu. - act_c_li
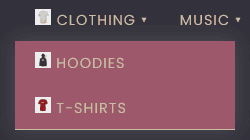
- Adds a custom class neme to the menu item if it matches the current page. Set to a string value, like "
active". This class is added to the menu item if it matches the current page URL. For example, if the current page is a category archive for "Hoodies", and you setact_c_li="current-active", the menu item for "Hoodies" will have the classcurrent-active. This is useful for highlighting the active category in the menu. - ext_c_li
- Adds category properties to the li element's class. Options: slug (category slug), taxonomy (category taxonomy name). Multiple values can be space-separated. Using
ext_c_li="slug taxonomy", the li element includes classes category-hoodies (slug) and product_cat (taxonomy), resulting in<li class="menu-item category-hoodies product_cat">. - trim_child
- Removes extra "child tag" DOM elements generated at the start and end of the menu's HTML content. Set
trim_child="true"to clean up these tags for a streamlined menu structure. If the menu HTML includes<ul><li>Category</li></ul>with unwanted wrapping tags, trim_child="true" removes them, leaving only<li>Category</li>. - thumb_put
- Controls if and where the category thumbnail appears relative to the link or text. Options:
- before_text: Thumbnail before the category name, inside the link.
- after_text: Thumbnail after the category name, inside the link.
- before_link: Thumbnail before the entire link element.
- after_link: Thumbnail after the entire link element.
- false: No thumbnail (default).
<li class="menu-item">
 <!-- before_link -->
 <a href=".">
  <!-- before_text --> Hoodies <!-- after_text -->
 </a>
 <!-- after_link -->
</li>
- thumb_size
- Defines the thumbnail image size. Uses WordPress predefined sizes:
thumbnail(150x150),medium(300x300),large(1024x1024), orfull(original size). These require additional database queries, increasing load time. Custom sizes (e.g.,300x200,100x100) are more efficient, reducing queries and computation, but the media library must already contain images in those dimensions. - thumb_clss
- Assigns a CSS class name to the thumbnail image for custom styling. Default:
false(no class name). - thumb_frmt
- Customizes the HTML template for the thumbnail image. Uses placeholders:
%1$s(image URL),%2$d(width),%3$d(height),%4$s(CSS class),%5$s(alt text). Default:<img src="%1$s" width="%2$d" height="%3$d" class="%4$s" alt="%5$s" />, produces an image tag like<img src="path/icon.svg" width="100" height="100" class="" alt="Category name" />. Check the examples below for more details.
| Sample shortcode (⭐= Pro ) | Menu tree | Sample screen |
|---|---|---|
Show all categories, even if there is no post in them:
[autocategorymenu level="4" hide_empty="0"]
|
┌───● Cat Id 1
├───■ Cat Id 2
│   ├───● Cat Id 21
│   └───● Cat Id 22
├───■ Cat Id 3
│   ├───● Cat Id 31
│   ├───■ Cat Id 32
│   │   ├───● Cat Id 321
│   │   ├───● Cat Id 322
│   │   └───● Cat Id 323
│   └───● Cat Id 33
└───■ Cat Id 4
    └───■ Cat Id 41
        └───■ Cat Id 411
            └───● Cat Id 4111
|
![Show all categories, even if there is no post in them: [autocategorymenu level='4' hide_empty='0']](https://res.cloudinary.com/atakan/image/upload/b/p/21/wp-plugin-ahcim-startids-01.png) |
Include only the category with ID number 2 and all categories in its sub-hierarchy:
⭐[autocategorymenu startids="2"]
|
────■ Cat Id 2
    ├───● Cat Id 21
    └───● Cat Id 22
|
![Include only the category with ID number 2 and all categories in its sub-hierarchy: [autocategorymenu startids='2']](https://res.cloudinary.com/atakan/image/upload/b/p/21/wp-plugin-ahcim-startids-02.png) |
Include only the category with ID number 32 and all categories in its sub-hierarchy, move 2rd level target category to root level:
⭐[autocategorymenu startids="32"]
|
────■ Cat Id 32
    ├───● Cat Id 321
    ├───● Cat Id 322
    └───● Cat Id 323
|
![Include only the category with ID number 32 and all categories in its sub-hierarchy, move 3rd level target category to root level: [autocategorymenu startids='32']](https://res.cloudinary.com/atakan/image/upload/b/p/21/wp-plugin-ahcim-startids-03.png) |
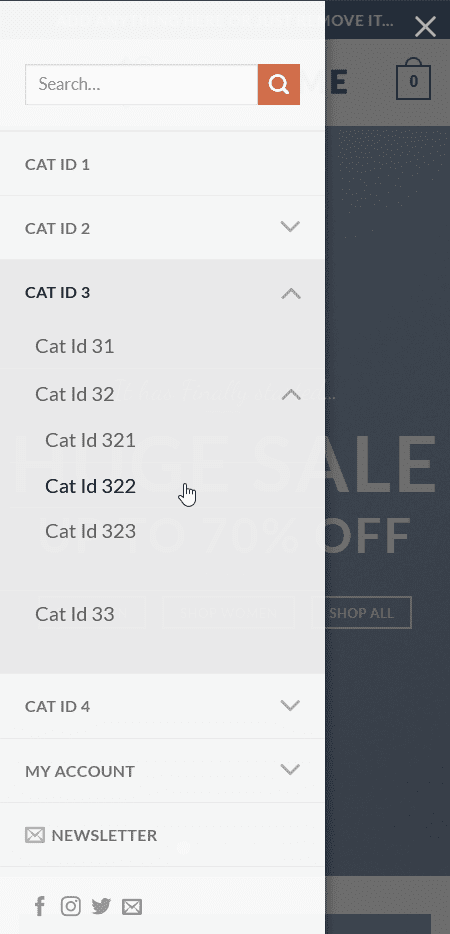
Include all subcategories of the category with ID number 3 without including itself:
⭐[autocategorymenu startids="-3"]
|
┌───● Cat Id 31 ├───■ Cat Id 32 │ ├───● Cat Id 321 │ ├───● Cat Id 322 │ └───● Cat Id 323 └───● Cat Id 33 |
![Include all subcategories of the category with ID number 3 without including itself: [autocategorymenu startids='-3']](https://res.cloudinary.com/atakan/image/upload/b/p/21/wp-plugin-ahcim-startids-04.png) |
Include multiple items at once:
⭐[autocategorymenu startids="1,2,-411"]
|
┌───● Cat Id 1 ├───■ Cat Id 2 │ ├───● Cat Id 21 │ └───● Cat Id 22 └───● Cat Id 4111 |
![Include multiple items at once: [autocategorymenu startids='1,2,-411']](https://res.cloudinary.com/atakan/image/upload/b/p/21/wp-plugin-ahcim-startids-05.png) |
Sort the menu items in descending order:
⭐[autocategorymenu level="4" sortname="DESC"]
|
┌───■ Cat Id 4 │ └───■ Cat Id 41 │ └───■ Cat Id 411 │ └───● Cat Id 4111 ├───■ Cat Id 3 │ ├───● Cat Id 33 │ ├───■ Cat Id 32 │ │ ├───● Cat Id 323 │ │ ├───● Cat Id 322 │ │ └───● Cat Id 321 │ └───● Cat Id 31 ├───■ Cat Id 2 │ ├───● Cat Id 22 │ └───● Cat Id 21 └───● Cat Id 1 |
![Sort the menu items in descending order. [autocategorymenu level='4' sortname='DESC']](https://res.cloudinary.com/atakan/image/upload/b/p/21/wp-plugin-ahcim-sortname-01.png) |
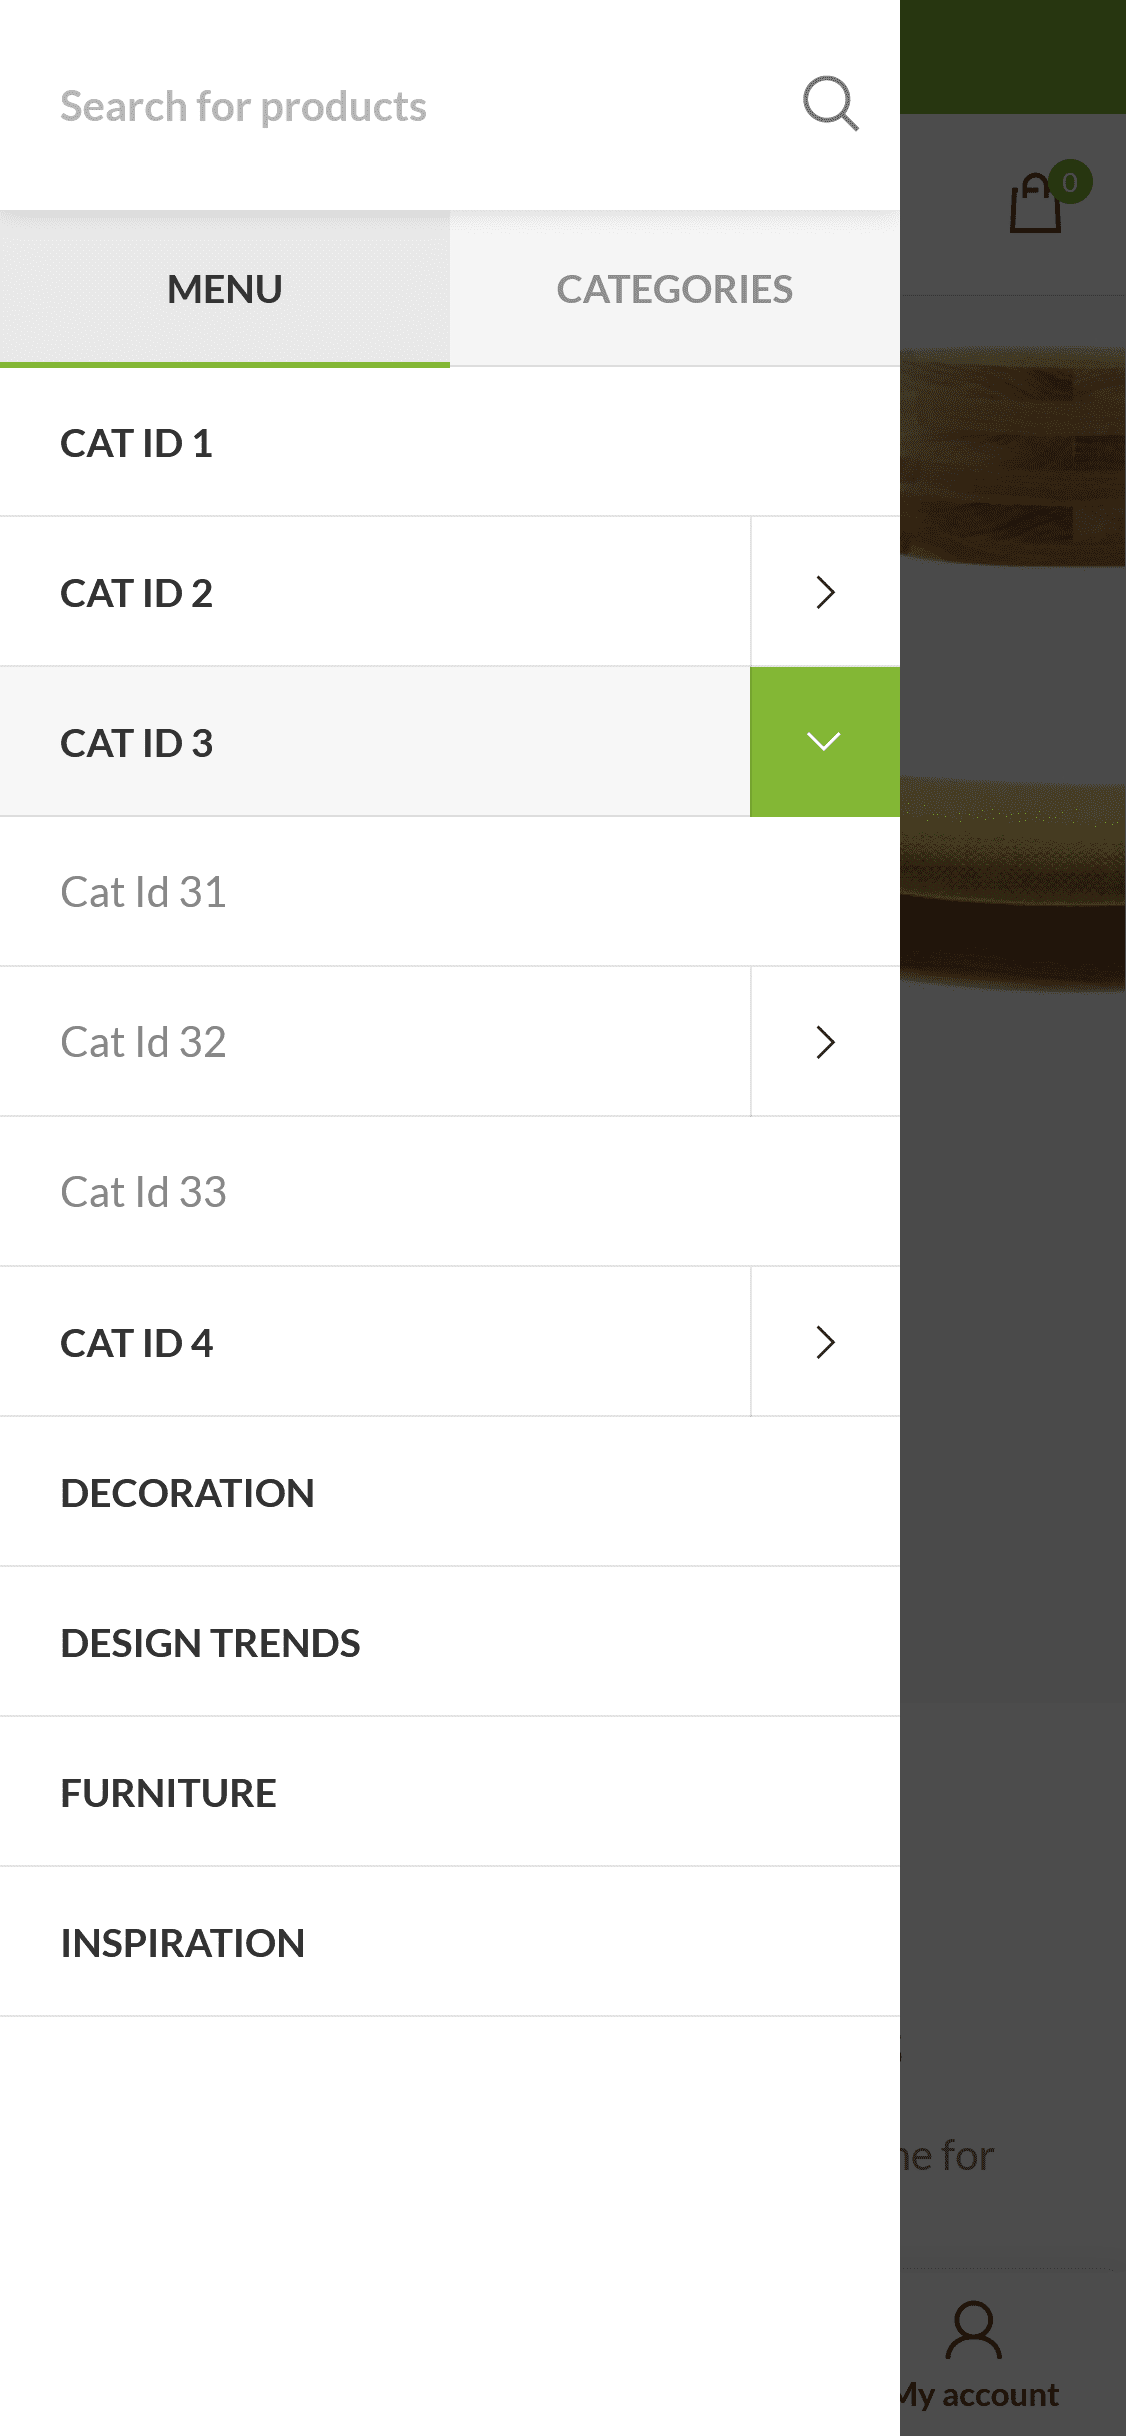
WoodMart Theme Mobile navigation auto menu:
⭐[autocategorymenu level="4" chld_cls="menu-item menu-simple-dropdown wd-event-hover" a_cls="woodmart-nav-link" prnt_cls="wd-sub-menu" prnt_co1="sub-sub-menu"]
Setup: Appearance > Menus > Manage Locations > Main Menu > [Menu Name] |
┌───● Cat Id 1
├───■ Cat Id 2
│   ├───● Cat Id 21
│   └───● Cat Id 22
├───■ Cat Id 3
│   ├───● Cat Id 31
│   ├───■ Cat Id 32
│   │   ├───● Cat Id 321
│   │   ├───● Cat Id 322
│   │   └───● Cat Id 323
│   └───● Cat Id 33
└───■ Cat Id 4
    └───■ Cat Id 41
        └───■ Cat Id 411
            └───● Cat Id 4111
|
 |
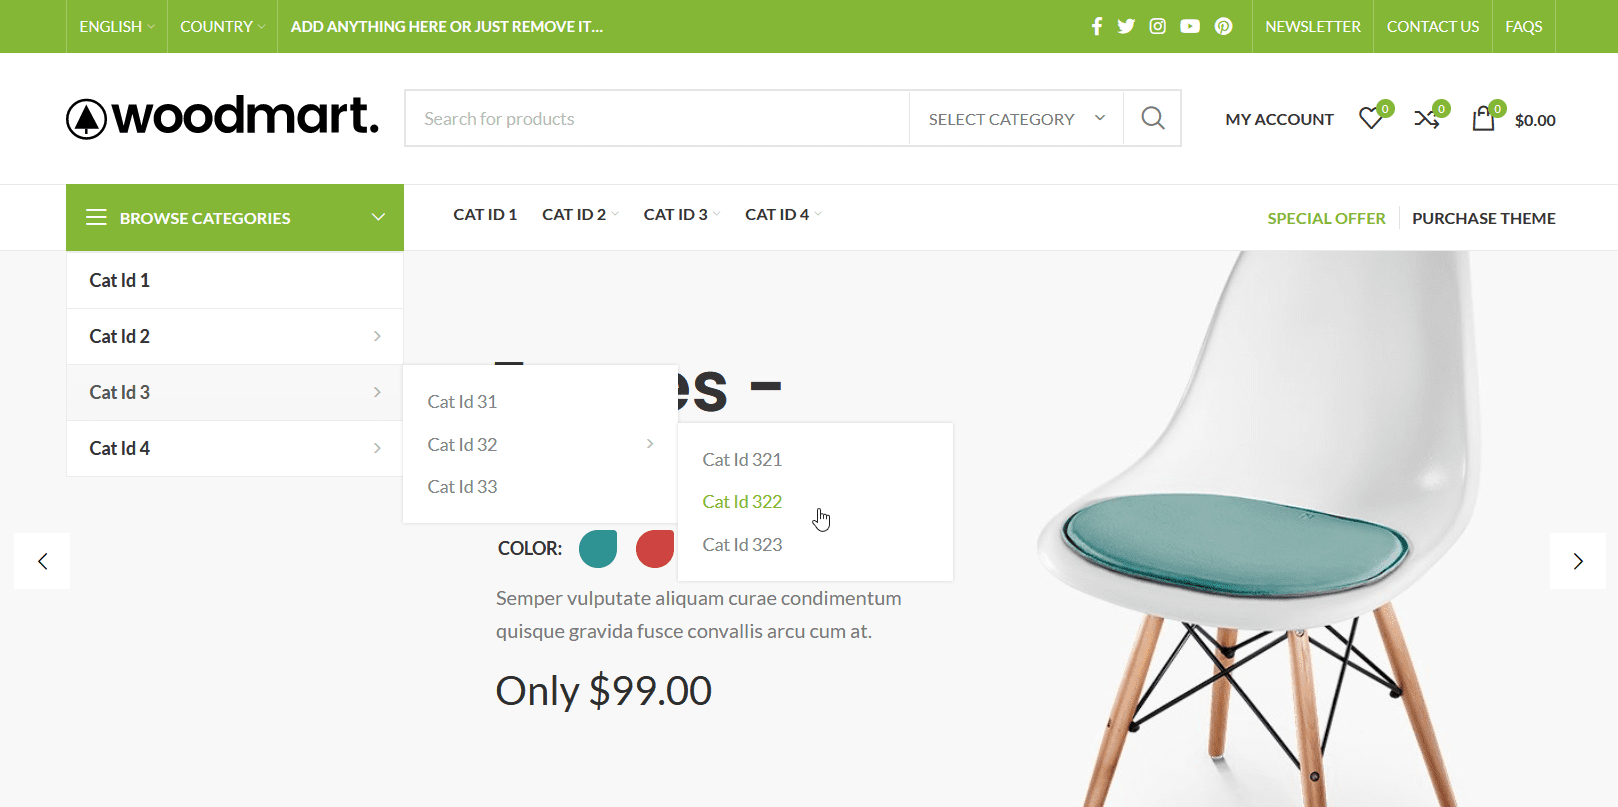
WoodMart Theme desktop main navigation auto menu:
⭐[autocategorymenu level="4" prnt_ca1="wd-dropdown" chld_cls="menu-item menu-simple-dropdown wd-event-hover" a_cls="woodmart-nav-link" prnt_cls="sub-menu wd-sub-menu" cntnr_1e="</div></div>" cntnr_1s="<div class='color-scheme-dark wd-design-default wd-dropdown-menu wd-dropdown'><div class='container'>"]
Setup: WoodMart > Header Builder > Header Base (Edit) > Desktop > Header bottom > Main menu (Edit) > Choose menu > [Menu Name] |
┌───● Cat Id 1
├───■ Cat Id 2
│   ├───● Cat Id 21
│   └───● Cat Id 22
├───■ Cat Id 3
│   ├───● Cat Id 31
│   ├───■ Cat Id 32
│   │   ├───● Cat Id 321
│   │   ├───● Cat Id 322
│   │   └───● Cat Id 323
│   └───● Cat Id 33
└───■ Cat Id 4
    └───■ Cat Id 41
        └───■ Cat Id 411
            └───● Cat Id 4111
|
 |
WoodMart Theme desktop left categories navigation:
⭐[autocategorymenu level="4" prnt_ca1="wd-dropdown" chld_cls="menu-item menu-simple-dropdown wd-event-hover" a_cls="woodmart-nav-link" prnt_cls="sub-menu wd-sub-menu" cntnr_1e="</div></div>" cntnr_1s="<div class='color-scheme-dark wd-design-default wd-dropdown-menu wd-dropdown'><div class='container'>"]
Setup: WoodMart > Header Builder > Header Base (Edit) > Desktop > Header bottom > Categories (Edit) > Choose menu > [Menu Name] |
┌───● Cat Id 1
├───■ Cat Id 2
│   ├───● Cat Id 21
│   └───● Cat Id 22
├───■ Cat Id 3
│   ├───● Cat Id 31
│   ├───■ Cat Id 32
│   │   ├───● Cat Id 321
│   │   ├───● Cat Id 322
│   │   └───● Cat Id 323
│   └───● Cat Id 33
└───■ Cat Id 4
    └───■ Cat Id 41
        └───■ Cat Id 411
            └───● Cat Id 4111
|
 |
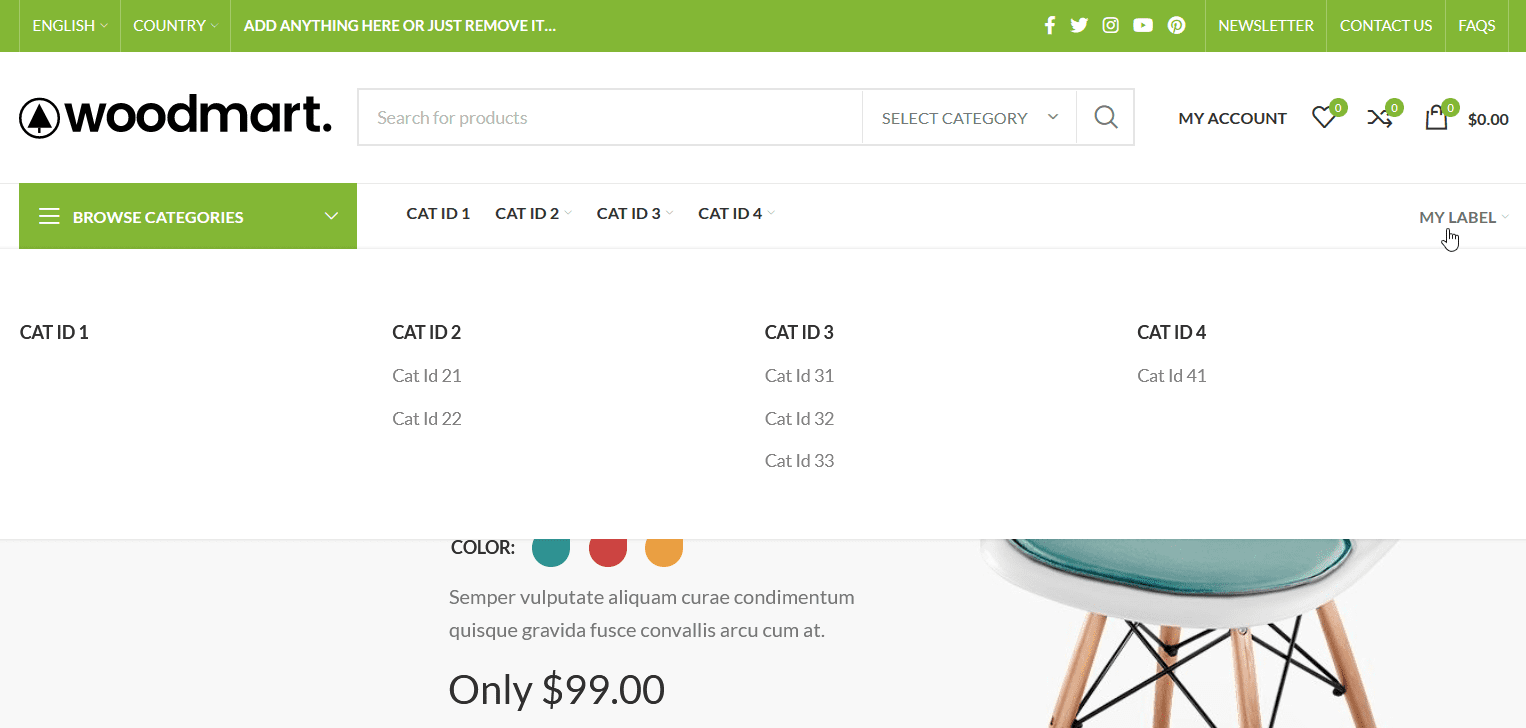
WoodMart Theme desktop full-width dropdown grid - columns menu:
⭐[autocategorymenu lng_label="My Label" fn_custom="woodmart01"]
Setup: WoodMart > Header Builder > Header Base (Edit) > Desktop > Header bottom > Menu (Edit) > Choose menu > [Menu Name] Appearance > Menus > Edit Menus > [Menu Name] > Extra options > CSS Classes (optional) : menu-item-has-children |
┌───● Cat Id 1
├───■ Cat Id 2
│   ├───● Cat Id 21
│   └───● Cat Id 22
├───■ Cat Id 3
│   ├───● Cat Id 31
│   ├───● Cat Id 32
│   └───● Cat Id 33
└───■ Cat Id 4
    └───● Cat Id 41
|
 |
Flatsome Theme desktop Main Menu: Please donate
|
┌───● Cat Id 1
├───■ Cat Id 2
│   ├───● Cat Id 21
│   └───● Cat Id 22
├───■ Cat Id 3
│   ├───● Cat Id 31
│   ├───● Cat Id 32
│   └───● Cat Id 33
└───■ Cat Id 4
    └───● Cat Id 41
|
 |
Flatsome Theme mobile Main Menu: Please donate
|
┌───● Cat Id 1
├───■ Cat Id 2
│   ├───● Cat Id 21
│   └───● Cat Id 22
├───■ Cat Id 3
│   ├───● Cat Id 31
│   ├───■ Cat Id 32
│   │   ├───● Cat Id 321
│   │   ├───● Cat Id 322
│   │   └───● Cat Id 323
│   └───● Cat Id 33
└───■ Cat Id 4
    └───■ Cat Id 41
        └───■ Cat Id 411
            └───● Cat Id 4111
|
 |
Add thumbnail image before the text of the menu item with minimal parameters:
⭐[autocategorymenu thumb_put="before_text" thumb_clss="img thumb"]
|
Output: <img src="/wp-content/uploads/2025/05/hoodie-100x100.jpg" width="100" height="100" class="img thumb" alt="Hoodies" />
|
 |
Add full size image before the text of the menu item with minimal parameters:
⭐[autocategorymenu thumb_put="before_text" thumb_clss="img thumb" thumb_size="full"]
|
Output: <img src="/wp-content/uploads/2025/05/hoodie.jpg" width="800" height="600" class="img thumb" alt="Hoodies" />
|
|
Add thumbnail image before the text of the menu item with minimal HTML output:
⭐[autocategorymenu thumb_put="before_text" thumb_frmt='<img src="%1$s" width="%2$d" height="%3$d" />']
|
Output: <img src="/wp-content/uploads/2025/05/hoodie-100x100.jpg" width="100" height="100" />
|
|
Add thumbnail image before the text of the menu item with fixed Width/Height:
⭐[autocategorymenu thumb_put="before_text" thumb_frmt='<img src="%1$s" width="16px" height="16px" class="%4$s" alt="%5$s" />' thumb_clss="img thumb"]
|
Output: <img src="/wp-content/uploads/2025/05/hoodie-100x100.jpg" width="16px" height="16px" class="img thumb" alt="Hoodies" />
|
|
Add thumbnail image before the text of the menu item using lazy loading with placeholder:
⭐[autocategorymenu thumb_put="before_text" thumb_frmt='<img src="/wp-content/uploads/2025/05/loading.svg" data-src="%1$s" width="%2$d" height="%3$d" class="%4$s lazy" alt="%5$s" loading="lazy" />' thumb_clss="img thumb lazy"]
|
Output: <img src="/wp-content/uploads/2025/05/loading.svg" data-src="/wp-content/uploads/2025/05/hoodie-100x100.jpg" width="16" height="16" class="img thumb lazy" alt="Hoodies" loading="lazy" />
|
|
Add thumbnail image before the text of the menu item with custom attributes:
⭐[autocategorymenu thumb_put="before_text" thumb_frmt='<img src="%1$s" width="%2$d" height="%3$d" class="%4$s" alt="%5$s" title="%5$s" />' thumb_clss="img thumb custom-img"]
|
Output: <img src="/wp-content/uploads/2025/05/hoodie-100x100.jpg" width="16" height="16" class="img thumb custom-img" alt="Hoodies" title="Hoodies" />
|
|
Flatsome Demo - test environment: Imported "Classic Shop" prebuilt website on theme version 3.15.6, WordPress version 6.3.1, PHP version 7.4 / 8.2, WooCommerce Version 8.1.1
Shortcode Helper
Your shortcode:[autocategorymenu]
Reset
| Menu items: | |
| Exclude item id(s): | |
| Maximum hierarchy level: | |
| Extra get parameter after link: |
[autocategorymenu]
This plugin works with most of WordPress themes. Sometimes you have to use some extra parameters. Here are examples for the free version.
<ul id="primary-menu-list" class="menu-wrapper">
  <li id="menu-item-16006" class="menu-item menu-item-type-custom menu-item-object-custom menu-item-16006"><a href="#">Lost password</a></li>
  <li id="menu-item-16004" class="menu-item menu-item-type-custom menu-item-object-custom menu-item-has-children menu-item-16004"><a href="#">Account</a>
    <button class="sub-menu-toggle" aria-expanded="false" onClick="twentytwentyoneExpandSubMenu(this)"><span class="icon-plus"><svg class="svg-icon" width="18" height="18" aria-hidden="true" role="img" focusable="false" viewBox="0 0 24 24" fill="none" xmlns="http://www.w3.org/2000/svg"><path fill-rule="evenodd" clip-rule="evenodd" d="M18 11.2h-5.2V6h-1.6v5.2H6v1.6h5.2V18h1.6v-5.2H18z" fill="currentColor"/></svg></span><span class="icon-minus"><svg class="svg-icon" width="18" height="18" aria-hidden="true" role="img" focusable="false" viewBox="0 0 24 24" fill="none" xmlns="http://www.w3.org/2000/svg"><path fill-rule="evenodd" clip-rule="evenodd" d="M6 11h12v2H6z" fill="currentColor"/></svg></span><span class="screen-reader-text">Open menu</span></button>
    <ul class="sub-menu">
      <li id="menu-item-16003" class="menu-item menu-item-type-custom menu-item-object-custom menu-item-16003"><a href="#">Address</a></li>
      <li id="menu-item-16001" class="menu-item menu-item-type-custom menu-item-object-custom menu-item-has-children menu-item-16001"><a href="#">Orders</a>
        <ul class="sub-menu">
          <li id="menu-item-16002" class="menu-item menu-item-type-custom menu-item-object-custom menu-item-16002"><a href="#">Downloads</a></li>
        </ul>
      </li>
      <li id="menu-item-16005" class="menu-item menu-item-type-custom menu-item-object-custom menu-item-16005"><a href="#">Logout</a></li>
    </ul>
  </li>
</ul>
level : 2
chld_cls : menu-item menu-item menu-item-type-custom menu-item-object-custom menu-item-has-children
chld_chc : menu-item-has-children
subi_aft : <button class="sub-menu-toggle" aria-expanded="false" onClick="twentytwentyoneExpandSubMenu(this)"><span class="icon-plus"><svg class="svg-icon" width="18" height="18" aria-hidden="true" role="img" focusable="false" viewBox="0 0 24 24" fill="none" xmlns="http://www.w3.org/2000/svg"><path fill-rule="evenodd" clip-rule="evenodd" d="M18 11.2h-5.2V6h-1.6v5.2H6v1.6h5.2V18h1.6v-5.2H18z" fill="currentColor"/></svg></span><span class="icon-minus"><svg class="svg-icon" width="18" height="18" aria-hidden="true" role="img" focusable="false" viewBox="0 0 24 24" fill="none" xmlns="http://www.w3.org/2000/svg"><path fill-rule="evenodd" clip-rule="evenodd" d="M6 11h12v2H6z" fill="currentColor"/></svg></span><span class="screen-reader-text">Open menu</span></button>
Shortcode :
[autocategorymenu hide_empty="0" level="2" chld_cls="menu-item menu-item menu-item-type-custom menu-item-object-custom menu-item-has-children" chld_chc="menu-item-has-children" subi_aft='<button class="sub-menu-toggle" aria-expanded="false" onClick="twentytwentyoneExpandSubMenu(this)"><span class="icon-plus"><svg class="svg-icon" width="18" height="18" aria-hidden="true" role="img" focusable="false" viewBox="0 0 24 24" fill="none" xmlns="http://www.w3.org/2000/svg"><path fill-rule="evenodd" clip-rule="evenodd" d="M18 11.2h-5.2V6h-1.6v5.2H6v1.6h5.2V18h1.6v-5.2H18z" fill="currentColor"/></svg></span><span class="icon-minus"><svg class="svg-icon" width="18" height="18" aria-hidden="true" role="img" focusable="false" viewBox="0 0 24 24" fill="none" xmlns="http://www.w3.org/2000/svg"><path fill-rule="evenodd" clip-rule="evenodd" d="M6 11h12v2H6z" fill="currentColor"/></svg></span><span class="screen-reader-text">Open menu</span></button>']
<ul class="primary-menu reset-list-style">
  <li id="menu-item-6" class="menu-item menu-item-type-custom menu-item-object-custom menu-item-6"><a href="#">Bulk 0</a></li>
  <li id="menu-item-8" class="menu-item menu-item-type-custom menu-item-object-custom menu-item-has-children menu-item-8">
    <a href="#">Bulk 1</a>
    <span class="icon"></span>
    <ul class="sub-menu">
      <li id="menu-item-9" class="menu-item menu-item-type-custom menu-item-object-custom menu-item-9"><a href="#">Bulk 1 . 1</a></li>
      <li id="menu-item-10" class="menu-item menu-item-type-custom menu-item-object-custom menu-item-10"><a href="#">Bulk 1 . 2</a></li>
    </ul>
  </li>
</ul>
subi_aft : <span class="icon"></span>
Shortcode :
[autocategorymenu hide_empty="0" level="3" subi_aft='<span class="icon"></span>']
<div class="menu-main-menu-auto-container">
  <ul id="menu-main-menu-auto" class="main-menu" tabindex="0">
    <li id="menu-item-6" class="menu-item menu-item-type-custom menu-item-object-custom menu-item-6"><a href="#">Bulk 0</a></li>
    <li id="menu-item-8" class="menu-item menu-item-type-custom menu-item-object-custom menu-item-has-children menu-item-8">
      <a href="#" aria-haspopup="true" aria-expanded="false">Bulk 1</a>
      <span class="submenu-expand" tabindex="-1">
        <svg class="svg-icon" width="24" height="24" aria-hidden="true" role="img" focusable="false" xmlns="http://www.w3.org/2000/svg" viewBox="0 0 24 24"><path d="M7.41 8.59L12 13.17l4.59-4.58L18 10l-6 6-6-6 1.41-1.41z"></path><path fill="none" d="M0 0h24v24H0V0z"></path></svg>
      </span>
      <ul class="sub-menu">
        <li id="menu-item--1" class="mobile-parent-nav-menu-item menu-item--1"><span class="menu-item-link-return" tabindex="-1"><svg class="svg-icon" width="24" height="24" aria-hidden="true" role="img" focusable="false" viewBox="0 0 24 24" version="1.1" xmlns="http://www.w3.org/2000/svg" xmlns:xlink="http://www.w3.org/1999/xlink"><path d="M15.41 7.41L14 6l-6 6 6 6 1.41-1.41L10.83 12z"></path><path d="M0 0h24v24H0z" fill="none"></path></svg>Bulk 1</span></li>
        <li id="menu-item-9" class="menu-item menu-item-type-custom menu-item-object-custom menu-item-9"><a href="#">Bulk 1 . 1</a></li>
        <li id="menu-item-10" class="menu-item menu-item-type-custom menu-item-object-custom menu-item-10"><a href="#">Bulk 1 . 2</a></li>
      </ul>
    </li>
  </ul>
</div>
subi_aft : <span class="submenu-expand" tabindex="-1"><svg class="svg-icon" width="24" height="24" aria-hidden="true" role="img" focusable="false" xmlns="http://www.w3.org/2000/svg" viewBox="0 0 24 24"><path d="M7.41 8.59L12 13.17l4.59-4.58L18 10l-6 6-6-6 1.41-1.41z"></path><path fill="none" d="M0 0h24v24H0V0z"></path></svg></span>
Shortcode :
[autocategorymenu hide_empty="0" subi_aft='<span class="submenu-expand" tabindex="-1"><svg class="svg-icon" width="24" height="24" aria-hidden="true" role="img" focusable="false" xmlns="http://www.w3.org/2000/svg" viewBox="0 0 24 24"><path d="M7.41 8.59L12 13.17l4.59-4.58L18 10l-6 6-6-6 1.41-1.41z"></path><path fill="none" d="M0 0h24v24H0V0z"></path></svg></span>']
<ul id="ast-hf-menu-1" class="main-header-menu ast-nav-menu ast-flex  submenu-with-border astra-menu-animation-fade  stack-on-mobile">
  <li id="menu-item-6" class="menu-item menu-item-type-custom menu-item-object-custom menu-item-6"><a href="#" class="menu-link">Bulk 0</a></li>
  <li id="menu-item-8" class="menu-item menu-item-type-custom menu-item-object-custom menu-item-has-children menu-item-8"><a href="#" class="menu-link">Bulk 1</a><button class="ast-menu-toggle" aria-expanded="false"><span class="screen-reader-text">Menu Toggle</span></button>
    <ul class="sub-menu">
      <li id="menu-item-9" class="menu-item menu-item-type-custom menu-item-object-custom menu-item-9"><a href="#" class="menu-link">Bulk 1 . 1</a></li>
      <li id="menu-item-10" class="menu-item menu-item-type-custom menu-item-object-custom menu-item-has-children menu-item-10"><a href="#" class="menu-link">Bulk 1 . 2</a><button class="ast-menu-toggle" aria-expanded="false"><span class="screen-reader-text">Menu Toggle</span></button>
        <ul class="sub-menu">
          <li id="menu-item-14" class="menu-item menu-item-type-custom menu-item-object-custom menu-item-14"><a href="#" class="menu-link">xx</a></li>
        </ul>
      </li>
    </ul>
  </li>
</ul>
a_cls : menu-link
level : 3
Shortcode :
[autocategorymenu hide_empty="0" level="3" a_cls="menu-link"]
<ul id="primary-menu" class="menu">
  <li id="menu-item-6" class="menu-item menu-item-type-custom menu-item-object-custom menu-item-6"><a href="#">Bulk 0</a></li>
  <li id="menu-item-8" class="menu-item menu-item-type-custom menu-item-object-custom menu-item-has-children menu-item-8"><a href="#">Bulk 1</a>
    <ul class="sub-menu">
      <li id="menu-item-9" class="menu-item menu-item-type-custom menu-item-object-custom menu-item-9"><a href="#">Bulk 1 . 1</a></li>
      <li id="menu-item-10" class="menu-item menu-item-type-custom menu-item-object-custom menu-item-has-children menu-item-10"><a href="#">Bulk 1 . 2</a>
        <ul class="sub-menu">
          <li id="menu-item-14" class="menu-item menu-item-type-custom menu-item-object-custom menu-item-14"><a href="#">xx</a></li>
        </ul>
      </li>
    </ul>
  </li>
</ul>
level : 3
Shortcode :
[autocategorymenu hide_empty="0" level="3"]
Shortcode : <nav class="is-horizontal is-content-justification-right is-layout-flex wp-container-2 is-responsive items-justified-right wp-block-navigation" aria-label="Header navigation">
<button aria-haspopup="true" aria-label="Open menu" class="wp-block-navigation__responsive-container-open " data-micromodal-trigger="modal-atakanau-1">
<svg width="24" height="24" xmlns="http://www.w3.org/2000/svg" viewBox="0 0 24 24" aria-hidden="true" focusable="false">
<rect x="4" y="7.5" width="16" height="1.5"></rect>
<rect x="4" y="15" width="16" height="1.5"></rect>
</svg>
</button>
<div class="wp-block-navigation__responsive-container " style="" id="modal-atakanau-1">
<div class="wp-block-navigation__responsive-close" tabindex="-1" data-micromodal-close="">
<div class="wp-block-navigation__responsive-dialog" aria-label="Menu">
<button aria-label="Close menu" data-micromodal-close="" class="wp-block-navigation__responsive-container-close">
<svg xmlns="http://www.w3.org/2000/svg" viewBox="0 0 24 24" width="24" height="24" aria-hidden="true" focusable="false">
<path d="M13 11.8l6.1-6.3-1-1-6.1 6.2-6.1-6.2-1 1 6.1 6.3-6.5 6.7 1 1 6.5-6.6 6.5 6.6 1-1z"></path>
</svg>
</button>
<div class="wp-block-navigation__responsive-container-content" id="modal-atakanau-1-content">
<ul class="wp-block-navigation__container">
[autocategorymenu taxonomy0="product_cat" hide_empty="0" prnt_cls="wp-block-navigation__submenu-container" chld_cls="wp-block-navigation-item" chld_chc="has-child open-on-hover-click wp-block-navigation-submenu" a_cls="wp-block-navigation-item__content" subi_aft="<button aria-label='Bulk 1 submenu' class='wp-block-navigation__submenu-icon wp-block-navigation-submenu__toggle' aria-expanded='false'><svg xmlns='http://www.w3.org/2000/svg' width='12' height='12' viewBox='0 0 12 12' fill='none' aria-hidden='true' focusable='false'><path d='M1.50002 4L6.00002 8L10.5 4' stroke-width='1.5'></path></svg></button>"]
</ul>
</div>
</div>
</div>
</div>
</nav>
== Changelog ==
= Version 2.0.7 =
* Security: XSS JavaScript inject
* Extended: PRO version compatibility
* Bumped up "Tested up to: 6.6.x"
= Version 2.0.5 =
* Simplified: Code comments
* Bumped up "Tested up to: 6.5"
= Version 2.0.4 =
* Modified: Info links
* Bumped up "Tested up to: 6.4.2"
= Version 2.0.3 =
* Modification: (Minor) Interface
* Bumped up "Tested up to: 6.3.1"
= Version 2.0.2 =
* Fixed: Pro version compatibility
* Bumped up "Tested up to: 6.3"
= Version 2.0.1 =
* Edited: Info text
* Bumped up "Tested up to: 6.2"
= Version 2.0.0 =
* Added: New option, add item id to menu item class
* Added: Taxonomy list on admin panel
* Added: Expandable with paid Pro version
* Dropped: Custom taxonomy support
* Bumped up "Tested up to: 6.1.1"
= Version 1.02 =
* Added: Null array item handler for base category path in PHP
* Fixed: Broken support link
* Bumped up "Tested up to: 6.0.1"
= Version 1.01 =
* Bumped up "Tested up to: 5.9"
= Version 1.00 =
* Initial version released
woodmart category menu, woodmart mobile menu categories, flatsome mobile menu, wordpress create menu programatically, Astra, Avada, Divi, Hello, OceanWP, Sydney, Betheme, GeneratePress, The7, Porto, Phlox, Enfold, X, Uncode, WoodMart, Flatsome, Bridge, Jupiter, Salient, Newspaper, Hestia, OnePress, Neve, Impreza, Go, Kadence WP, TheGem, uDesign, Kallyas, Total, Brooklyn, Kalium, Soledad, Monstroid2, Shopkeeper, Eduma, Oshine, Visualmodo