Turkey win bronze medal in CEV EuroVolley 2021 Women

Turkey Women EuroVolley 2021 team
Turkey completed the EuroVolley 2021 podium. It was their third bronze in the history of the competition, in addition to two silvers. Turkey claimed a 3-0 (25-20, 25-19, 25-23) victory over the Netherlands in the bronze medal match.
Turkey Women EuroVolley 2021 team

Thats the Turkey Women's EuroVolley 2021 team members:
Photo of Simge Şebnem Aköz

Simge Şebnem Aköz

2 - Libero
Birth Date: 1991-04-23
Birth Place: Samsun
Height: 168 cm
Weight: 55 kg
Team: Eczacıbaşı VitrA
Current team: Turkey
Sponsor: Mizuno
Simge Şebnem Aköz instagram /
Simge Şebnem Aköz twitter / Volleyball PlayerTurkey
Photo of Cansu Özbay

Cansu Özbay

3 - Setter
Birth Date: 1996-10-17
Birth Place: İzmir
Height: 182 cm
Weight: 75 kg
Team: VakıfBank S.K.
Current team: Turkey
Sponsor: Adidas
Cansu Özbay instagram /
Cansu Özbay twitter / Volleyball PlayerTurkey
Photo of Tuğba Şenoğlu

Tuğba Şenoğlu

4 - Outside spiker
Birth Date: 1998-02-02
Birth Place: Mersin - Tarsus
Height: 184 cm
Weight: 64 kg
Team: VakıfBank S.K.
Current team: Turkey
Sponsor: Mizuno
Tuğba Şenoğlu instagram /
Tuğba Şenoğlu twitter / Volleyball PlayerTurkey
Photo of Hande Baladın

Hande Baladın

7 - Outside spiker
Birth Date: 1997-09-01
Birth Place: Kütahya
Height: 189 cm
Weight: 81 kg
Team: Eczacıbaşı VitrA
Current team: Turkey
Sponsor: Under Armour
Hande Baladın instagram /
Hande Baladın twitter / Volleyball PlayerTurkey
Photo of Yasemin Güveli

Yasemin Güveli

8 - Middle blocker
Birth Date: 1999-01-05
Birth Place:
Height: 187 cm
Weight: 71 kg
Team: Eczacıbaşı VitrA
Current team: Turkey
Sponsor: None
Yasemin Güveli instagram /
Yasemin Güveli twitter / Volleyball PlayerTurkey
Photo of Meliha İsmailoğlu

Meliha İsmailoğlu

9 - Outside spiker
Birth Date: 1993-09-17
Birth Place: Gradačac, Bosnia and Herzegovina
Height: 187 cm
Weight: 73 kg
Team: Fenerbahçe Women's Volleyball
Current team: Turkey
Sponsor: Adidas
Meliha İsmailoğlu instagram /
Meliha İsmailoğlu twitter / Volleyball PlayerTurkey
Photo of Ayça Aykaç

Ayça Aykaç

10 - Libero
Birth Date: 1996-02-27
Birth Place: İzmir
Height: 175 cm
Weight: 55 kg
Team: VakıfBank S.K.
Current team: Turkey
Sponsor: Mizuno
Ayça Aykaç instagram /
Ayça Aykaç twitter / Volleyball PlayerTurkey
Photo of Buse Ünal

Buse Ünal

12 - Setter
Birth Date: 1997-07-29
Birth Place: Ankara
Height: 188 cm
Weight: 74 kg
Team: Fenerbahçe Women's Volleyball
Current team: Turkey
Sponsor: None
Buse Ünal instagram /
Buse Ünal twitter / Volleyball PlayerTurkey
Photo of Meryem Boz

Meryem Boz

13 - Outside spiker
Birth Date: 1988-02-03
Birth Place: Eskişehir
Height: 194 cm
Weight: 68 kg
Team: VakıfBank S.K.
Current team: Turkey
Sponsor: Adidas
Meryem Boz instagram /
Meryem Boz twitter / Volleyball PlayerTurkey
Photo of Eda Erdem Dündar

Eda Erdem Dündar

14 - Middle blocker
Birth Date: 1987-06-22
Birth Place: İstanbul
Height: 188 cm
Weight: 75 kg
Team: Fenerbahçe Women's Volleyball
Current team: Turkey
Sponsor: Adidas
Eda Erdem Dündar instagram /
Eda Erdem Dündar twitter / Volleyball PlayerTurkey
Photo of Zehra Güneş

Zehra Güneş

18 - Middle blocker
Birth Date: 1999-07-07
Birth Place: İstanbul
Height: 196 cm
Weight: 82 kg
Team: VakıfBank S.K.
Current team: Turkey
Sponsor: Nike
Zehra Güneş instagram /
Zehra Güneş twitter / Volleyball PlayerTurkey
Photo of İlkin Aydın

İlkin Aydın

22 - Outside spiker
Birth Date: 2000-01-05
Birth Place: Ankara
Height: 183 cm
Weight: 68 kg
Team: Galatasaray S.K.
Current team: Turkey
Sponsor: None
İlkin Aydın instagram /
İlkin Aydın twitter / Volleyball PlayerTurkey
Photo of Beliz Başkır

Beliz Başkır

95 - Middle blocker
Birth Date: 1998-12-26
Birth Place: İzmir
Height: 195 cm
Weight: 70 kg
Team: Fenerbahçe Women's Volleyball
Current team: Turkey
Sponsor: None
Beliz Başkır instagram /
Beliz Başkır twitter / Volleyball PlayerTurkey
Photo of Ebrar Karakurt

Ebrar Karakurt

99 - Outside spiker
Birth Date: 2000-01-17
Birth Place: Balıkesir
Height: 195 cm
Weight: 72 kg
Team: Igor Gorgonzola Novara
Current team: Italy
Sponsor: Nike
Ebrar Karakurt instagram /
Ebrar Karakurt twitter / Volleyball PlayerTurkey
Share:

WordPress User Password Reset

You’ve lost access to your site and you don’t know how to get in again. Normally you can reset your WordPress password in the dashboard or request a new one via email. WordPress stores user passwords in hashed form in the database. You can not find out what saved passwords are. In this post, we’ll walk you through a few quick and easy steps on how to change or reset WordPress password. There are several ways to reset a WordPress dashboard password.

WordPress User Password Reset

If you don't have access to your email or your WordPress site isn't sending emails correctly, then changing the WordPress admin password directly from the database via phpMyAdmin might be the only solution you have.

How to change WordPress password from PhpMyAdmin?

How to Reset WordPress Passwords from cPanel?
1
  1. Login to the cPanel dashboard of your WordPress hosting account.
  2. Click on the phpMyAdmin icon under the database section.
  3. On the left-hand side, click on the database WordPress is associated with.
  4. Click "wp_users" table located on the left. You can have a table prefix added. In this case, it may be named slightly differently, such as "wp_pre_users".
  5. You will now see the rows in your WordPress users table. Click on the "Edit" button next to the username where you want to change the password.
  6. Select MD5 in the "Function" column, type in your new strong password into the "user_pass" box and click "Go".
1

How to change WordPress user password via PHP?

How to change WordPress user password with PHP?
1 If you don't have access to your server's database or don't want to write and run a query, you have another solution. If you can access your server via FTP, you can simply change WordPress user passwords.
  1. Download the PHP file to your computer.
    WordPress User Password Reset
  2. Upload the PHP file via FTP to the root directory on your server where WordPress is running.
  3. Open the address by typing the path of the PHP file into the browser. Example: https://example.com/wordpress-user-password-reset-tool.php
  4. You will see the database name where WordPress is installed, the database user, the database password, the table prefix, and the table listing all WordPress users.
  5. Click the "Reset" button for the user whose password you want to change. When the page is opened after clicking, the user's password will be reset directly. A new password with random numbers like "AtakanAu_01234567" will be determined.
  6. If you want, press the "Back" button to return to the listing page for another password reset, or press the "Login" button to log in to the WordPress administration panel with the username and new password in the tab that will open.
1

Create an admin user in WordPress Database via PHP

As a developer, you may need to create a new administrative user in the database to access the site. For example, this is required when exporting a WordPress database, but you are not provided with login credentials for the admin user.

Of course, you can access it through the database. However, many developers are not very comfortable with MySQL and the process is rather slow compared to what I'm going to show you. Here is the easy way to create a new WordPress admin account:

  1. Upload the above PHP file to your server and open it in your browser.
  2. Enter a value for the required "Login" field. You can optionally write "Nicename", "email" and "Display name" parameters.
  3. After clicking the "Create" button, a new administrator account will be created with the username you specified in the "Login" field. A new password with random numbers like "AtakanAu_01234567" will be determined.
WordPress User Password Reset
Share:

Yandex Disk API PHP example

Yandex.Disk is a service for storing files on remote Yandex servers and sharing them with others. Data can be accessed by logging in from any device connected to the internet.

Yandex.Disk API allows software developers to access personal files and upload data to the cloud from any device. REST API uses HTTP requests to synchronize data in Yandex.Disk between different devices and platforms.

You can download and upload files to your cloud storage space on Yandex.Disk via the REST API commands. First you need to start by getting an OAuth access token for your App. You can evaluate the Yandex.Disk API using the convenient interface to send requests via Sandbox

Yandex Disk API PHP example


How to get an Yandex OAuth token?

1) Add a new application to the Yandex OAuth server.

2) Give your app a name. For example: "My web appliction"

3) In order for your application to be used with PHP, check the "Web services" box.

4) Click "Set URL for development" for "Callback URI #1:"
Yandex Disk API PHP example

5) Check the boxes under "Yandex.Disk REST API" for the permissions required by your application.
Yandex Disk API PHP example

6) Click the "Create App" button.
Yandex Disk API PHP example

7) Replace "c0XXXXXXXXXXXXXXXXXXXXXXXXXXXX00" with your "ID" number in the link address below. Open this link address with the browser in which you are logged in to Yandex.

https://oauth.yandex.com/authorize?response_type=token&client_id=c0XXXXXXXXXXXXXXXXXXXXXXXXXXXX00


Done! Here is your token string:

Yandex Disk API PHP example


Use my Github code:

GitHub Yandex.Disk PHP
Share:

ASCII flowchart shapes

≤≥≠≈∏∑
Subscript ₍₀₁₂₃₄₅₆₇₈₉₊₋₌ₐₑₒₓₔ₎
Superscript ⁽⁰¹²³⁴⁵⁶⁷⁸⁹⁺⁻⁼ⁿⁱ⁾
Process
    -----------------------
    |                     |
    |                     |
    |                     |
    -----------------------

Terminator
      .-"""""""""""""""-.
     /                   \
    :                     :
     \                   /
      '-...............-'

      .-"""""""""""""""-.
     (                   )
      '-...............-'

Delay
    """""""""""""""""""-.
    |                    \
    |                     :
    |                    /
    ...................-'

    |"""""""""""""""""-.
    |                   )
    |.................-'

Sub process
    -----------------------
    ||                   ||
    ||                   ||
    ||                   ||
    -----------------------

Data I/O
        -------------------
       /                 /
      /                 /
     /                 /
    -------------------

Print
    -----------------------
    |                     |
    |                     |
    |                     |
    |                ...  |
     '-..   ..---''''   '''
         '''

Preparation
      -------------------
     /                   \
    <                     >
     \                   /
      -------------------

Decision
             .-'-.
          .-'     '-.
       .-'           '-.  
    .-'                 '-.
  -:                       :-
    '-.                 .-'
       '-.           .-'
          '-.     .-'
             '-.-'
  
             .-'-.
          .-'     '-.
       .-'           '-.
     -:                 :-
       '-.           .-'
          '-.     .-'
             '-.-'
  
             .-'-.
          .-'     '-.
        -:           :-
          '-.     .-'
             '-.-'

Connector
             .-.
            (   )
             '-'

Database
          .--'''--.
          |--...--|
          |       |
          |       |
          '--...--'

Arrows
| ▲
| |
▼ |

◄------

------►

|
|
----► 

----► 
|
|

|
|◄---
|

    |
---►|
    |
Example
      .-"""""""""""""""-.
     (       Start       )
      '-...............-'
               |
               |
               ▼
        -------------------
       /   "Your age?"   /
      /                 /
     /       AGE       /
    -------------------
               |
               |◄--------------------
               |                    |
               ▼                    |
        -------------------         |   
       /                 /          |  
      /       "i"       /           | 
     /                 /            |
    -------------------             |
               |                    |
               |                    |
               ▼                    |
    -----------------------         |
    |                     |         |
    |    AGE = AGE - 1    |         |
    |                     |         |
    -----------------------         |
               |                    |
               |                    |
               ▼                    |
             .-'-.                  |
          .-'     '-.               |
       .-'           '-.   NO       |
     -:     AGE = 0     :------------
       '-.           .-'
          '-.     .-'
             '-.-'
        YES    |
               |
               ▼
        -------------------
       /                 /
      /    "Puff..."    /
     /                 /
    -------------------
               |
               |
               ▼
      .-"""""""""""""""-.
     (        End        )
      '-...............-'
Computer science flowchart symbols, Algorithm symbols.
Share:

WooCommerce csv dosya ile toplu ürün güncelleme

Aşağıda adım adım anlatımı yapılan kılavuzda ürünlerin sadece fiyatlarının nasıl güncelleneceği açıklanmıştır. Ürünlerin "Etiket", "İsim", "Açıklama" ve "Stok" gibi diğer bilgilerini de aynı şekilde toplu olarak güncelleyebilirsiniz.

1) Sol dolaşım menüsünden "Ürünler" » "Tüm ürünler" bağlantısını tıklayın. 

WooCommerce csv dosya ile toplu ürün güncelleme


2) "Dışa aktar" düğmesini tıklayın. 

WooCommerce csv dosya ile toplu ürün güncelleme

3) "Hangi sütunlar dışarı aktarılmalı?" satırının sağındaki giriş kutusunu tıklayın. Şunları seçin ve ekleyin:
Kimlik, Stok kodu (SKU), Normal fiyat, İndirimli satış fiyatı, İsim

"CSV oluştur" düğmesini tıklayın.

WooCommerce csv dosya ile toplu ürün güncelleme


4) Dosyanın hazırlanmasını bekleyin. Ürün sayısına bağlı olarak bekleme süreniz değişebilir. 

WooCommerce csv dosya ile toplu ürün güncelleme


5) İndirdiğiniz csv dosyasını OpenOffice Calc yazılımı ile açın.

WooCommerce csv dosya ile toplu ürün güncelleme


6) Ekran görüntüsünde görülen ayarlarla dosyayı açın. Kolonların virgillerle ayrılması ve yazı alanlarının çift tırnak içinde olduğunun belirtilmesi önemlidir.

WooCommerce csv dosya ile toplu ürün güncelleme

7) Fiyatları aynı kalacak olan ürünlerin olduğu satırları silmemiz yararlıdır.

Bir satırı silmek için satır numarasını sağ tıklayıp "Delete Rows" seçeneğini tıklayın.

Art arda satırları seçmek için klavyenin "Ctrl" tuşu basılı iken satır numaralarını tıklayarak seçin. Sonra seçili satırlardan birini sağ tıklayıp "Delete Rows" seçeneğini tıklayın.

Alt alta bulunan satırları silmek için bir satır numarasını tıklayıp fareyi sürükleyin. Sonra seçili satırlardan birini sağ tıklayıp "Delete Rows" seçeneğini tıklayın.

WooCommerce csv dosya ile toplu ürün güncelleme

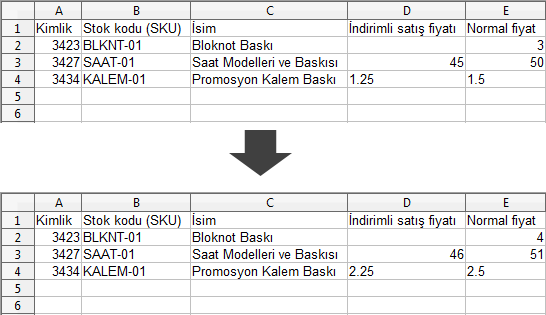
8) Örnek olarak üç ürünün fiyatında değişiklik yapacağız. Hem Normal fiyatı, hem de İndirimli satış fiyatı bir arttıralım. Kesirli sayıları nokta ile ayırmaya dikkat edin. Satır sayınız çok fazla ise "Stok kodu (SKU)" ve "İsim" gibi değişiklik olmayacak sütunları silerseniz içe aktarma işleminiz daha hızlı olacaktır. Satır silme işlemindeki gibi, bir sütunu silmek için sütun ismini sağ tıklayıp "Delete Columns" seçeneğini tıklayın.

WooCommerce csv dosya ile toplu ürün güncelleme


9) OpenOffice Calc menüsünden "File" » "Save As" seçeneğini tıklayın.

WooCommerce csv dosya ile toplu ürün güncelleme

10) "Edit filter settings" seçeneğini tıklayarak seçin ve "Save" düğmesini tıklayın.

WooCommerce csv dosya ile toplu ürün güncelleme


11) Ekran görüntüsündeki ayarları yapın. Karakter setini "Unicode (UTF-8)" yapın. "Quote all text cells" seçeneğini tıklayarak seçin. "Ok" düğmesini tıklayarak dosyayı kaydetme işlemini tamamlayın.

WooCommerce csv dosya ile toplu ürün güncelleme


12) İsterseniz kaydettiğiniz dosyayı bir yazı düzenleyici yazılım ile açarak denetleyin. Kolon değerleri virgüllerle ayrılmış ve ondalık ayraçları için nokta kullanılmış olmalıdır.

"Stok kodu (SKU)" ve "İsim" sütunlarını silip silmediğinize göre dosya içeriği şuna benzer olacaktır:


"Kimlik","Stok kodu (SKU)","İsim","İndirimli satış fiyatı","Normal fiyat"
3423,"BLKNT-01","Bloknot Baskı",,4
3427,"SAAT-01","Saat Modelleri ve Baskısı",46,51
3434,"KALEM-01","Promosyon Kalem Baskı","2.25","2.5"

"Kimlik","İndirimli satış fiyatı","Normal fiyat"
3423,,4
3427,46,51
3434,"2.25","2.5"

WooCommerce csv dosya ile toplu ürün güncelleme


13) Sol dolaşım menüsünden "Ürünler" » "Tüm ürünler" bağlantısını tıklayın. Açılan sayfadaki "İçe aktar" düğmesini tıklayın.

WooCommerce csv dosya ile toplu ürün güncelleme


14) "Bilgisayarınızdan bir CSV dosyası seçiniz:" yazısını veya yanındaki dosya giriş kutusunu tıklayıp kaydettiğiniz csv dosyasını seçin.

"Mevcut ürünleri güncelle" seçeneğini tıklayarak seçili hale getirin. Sadece mevcut ürünlerin verileri güncellenecektir.

"Devam et" düğmesini tıklayın.

WooCommerce csv dosya ile toplu ürün güncelleme


15) "Kimlik","İndirimli satış fiyatı","Normal fiyat" kolonlarının eşleştiğini denetledikten sonra "Aktarıcıyı çalıştır" düğmesini tıklayın.

WooCommerce csv dosya ile toplu ürün güncelleme


16) İşlemin tamamlanmasını bekleyin. Ürün sayısına bağlı olarak bekleme süreniz değişebilir. Güncelleme tamamlanınca aşağıda gösterildiği gibi güncellenen ürünlerin bilgisini göreceksiniz.

WooCommerce csv dosya ile toplu ürün güncelleme

Share:

Automatically Hierarchic Categories in Menu - WP Plugin

Automatically Hierarchic Categories in Menu - WordPress Plugin
It allows you to automatically add hierarchical categories to WordPress navigation menus using shortcodes. All sub-categories, if any, are also dynamically created in sub-branches. If you have a long list of categories and subcategories, it takes a lot of time to select items one by one in the WordPress menu section. When there is a change in the categories, it is necessary to add / remove / change the order again in the menu. This WordPress plugin makes it programmatic. Creates auto populated menu with categories.

Automatically Hierarchic Categories in Menu Pro

You can see what the plugin does and how it works with the free version. Pro version works together with the free version, and extends it. More parameters become available with the Pro version.

To get the Pro version by donating or to make the plugin compatible with your theme, you can contact me by filling out the form or write to me on Telegram. Each deal is for one domain. There is no time limit, it can be used for lifetime. You can send your donation to my crypto wallet very quickly. Also, you can transfer money using Binance Pay with zero commissions - fees - charges. If you are not a member, you can create an account by following this link (with reference).

Pro features:
⭐ Custom taxonomy compatibility (tag, custom post category)
⭐ Add sub item at the beginning / end of the link text
⭐ Trailing slash on url link
⭐ Removed credits link
⭐ Show the number of posts in a category
⭐ Selecting root items to be included in the menu by ID
⭐ Sorting menu items (Alphabetical ascending - descending)

To-do list:
☐ Add active CSS class to current element
☐ Using the category's image in the menu item (icon, flag etc.)

Customization is required for themes that use a complex menu structure. I can offer you a professional solution for this. Set up a staging site that is an exact copy of your production website on a temporary domain or subdomain for customization and development. Create your goal menu with manually added items. I can ask you to give me access as an administrator. This will help me to check the structure of the menu and find the solution.

How to automatically add hierarchic categories in WordPress Navigation Menus ?

You can use this WordPress plugin:
Automatically Hierarchic Categories in Menu - WordPress Plugin Download

If you like the plugin, please give 5 stars. Your positive feedback is important for me.

This plugin works well with many themes. If you are using a theme that uses a standard menu structure, the plugin generates the menu with zero configuration. However, some themes produce menus with a different structure. HTML elements and/or their CSS class names may differ. In this case the menu will not appear correctly on your website according to your theme. This is because of your theme, not the plugin. HTML and CSS knowledge may be required depending on the theme. If you have HTML and CSS knowledge, there is the possibility to adapt it to your theme using parameters. For themes that use complex menus, getting Pro version and customization would be the solution for you.

Usage

You can make some customizations for your theme by using parameters and values in the shortcode.

Parameters

Parameter	Default			Description
taxonomy	category		taxonomy type
exclude		false			exclude taxonomy id(s)
level		2			hierarchy max level
prnt_tag	ul			parent tag, dom name
prnt_cls	sub-menu		parent tag, class
chld_tag	li			child tag, dom name
chld_cls	menu-item		child tag, class
chld_chc	menu-item-has-children	child tag, has children class
chld_cid	false			add id to class
a_cls		false			default link class
subi_bfr	false			sub item, before for has children item
subi_aft	false			sub item, after has children item
nline		"\n"			new line
linkget		false			extra get parameter after link
hide_empty	1			hide categories with empty items

taxonomy:
Type of 'taxonomy'. Do not ignore this parameter for post categories. To use WooCommerce product categories as menu items, give the value 'product_cat'. Example: [autocategorymenu taxonomy="product_cat"]
exclude:
Use this parameter for the categories that you want to exclude in the menu. Specify the category IDs that you want to exclude. Combine ID numbers with commas without spaces. Example: exclude="123,124"
level:
Maximum level limit value. If you give the value '1', only the items at the top root level are included in the menu. No subcategories are added to the menu. if you set the value '2', the root categories and the subcategories of these categories are added to the menu.
prnt_tag:
Parent tag's dom name. The HTML element that will enclose the menu items.
prnt_cls:
Parent tag's class. The class value of the HTML element that will contain the menu items.
chld_tag:
The HTML element in which the menu items are sorted.
chld_cls:
The class value of the HTML element that is a menu item.
chld_chc:
The class value of the menu item that has a subcategory.
chld_cid:
To add the ID of the menu item to the class of the menu HTML element, give the value '1'.
a_cls:
To assign the class value of the HTML address link element (a), set a value.
subi_bfr:
The content before the element (a) of the menu item, which is a subcategory.
subi_aft:
The content after the element (a) of the menu item, which is a subcategory.
nline:
Adds new lines after each HTML element. It ensures the readability of the source code. Give a null value to minimize the HTML code. Example: nline=""
linkget:
Get extra parameter after link. The link address domain.com/category instead of domain.com/category?reg=val to replace it with, give the value reg=val.
hide_empty:
By default, categories that do not have any posts in them are not added to the menu. To add categories that do not contain posts to the menu, give the value '0'.

Paid PRO version parameters

Parameter	Default
subi_atb	false
subi_ate	false
t_slash		true
txtcount	false
cntnr_1s	false
cntnr_1e	false
prnt_co1	false
prnt_ca1	false
startids	false
sortname	false
fn_custom	false

subi_atb
Content before the name of the menu item that has the subcategory.
subi_ate
Content after the name of the menu item that has the subcategory.
t_slash
Add trailing slash end of the link.
txtcount
Add total post count to category name. Sample value: " (%s)", Sample result: "Travel (5)"
cntnr_1s
Content before the HTML element enclosing (default ul) the subcategory list.
cntnr_1e
Content after the HTML element enclosing (default ul) the subcategory list.
prnt_co1
CSS selector value to overwrite after level 1 of the class of the HTML element (default ul) containing the subcategory list.
prnt_ca1
CSS selector value to be added after level 1 to the class of the HTML element (default ul) containing the subcategory list.
startids
Selection of root items to be included in the menu by ID. Type the ID(s) of the categories. To exclude the category itself and include all its subcategories, type the negative of the ID value. Combine multiple IDs with commas without spaces. For example: "101,102,-103"
sortname
Sort the category items alphabetically. Available values: "ASC", "DESC"
fn_custom
It is used for special functions written for a fee for theme menus whose structure is not standard.

Sample shortcode (⭐= Pro ) Menu tree Sample screen
Show all categories, even if there is no post in them:
[autocategorymenu level="4" hide_empty="0"]
┌───● Cat Id 1
├───■ Cat Id 2
│   ├───● Cat Id 21
│   └───● Cat Id 22
├───■ Cat Id 3
│   ├───● Cat Id 31
│   ├───■ Cat Id 32
│   │   ├───● Cat Id 321
│   │   ├───● Cat Id 322
│   │   └───● Cat Id 323
│   └───● Cat Id 33
└───■ Cat Id 4
    └───■ Cat Id 41
        └───■ Cat Id 411
            └───● Cat Id 4111
Show all categories, even if there is no post in them: [autocategorymenu level='4' hide_empty='0']
Include only the category with ID number 2 and all categories in its sub-hierarchy:
⭐[autocategorymenu startids="2"]
────■ Cat Id 2
    ├───● Cat Id 21
    └───● Cat Id 22
Include only the category with ID number 2 and all categories in its sub-hierarchy: [autocategorymenu startids='2']
Include only the category with ID number 32 and all categories in its sub-hierarchy, move 2rd level target category to root level:
⭐[autocategorymenu startids="32"]
────■ Cat Id 32
    ├───● Cat Id 321
    ├───● Cat Id 322
    └───● Cat Id 323
Include only the category with ID number 32 and all categories in its sub-hierarchy, move 3rd level target category to root level: [autocategorymenu startids='32']
Include all subcategories of the category with ID number 3 without including itself:
⭐[autocategorymenu startids="-3"]
┌───● Cat Id 31
├───■ Cat Id 32
│   ├───● Cat Id 321
│   ├───● Cat Id 322
│   └───● Cat Id 323
└───● Cat Id 33
Include all subcategories of the category with ID number 3 without including itself: [autocategorymenu startids='-3']
Include multiple items at once:
⭐[autocategorymenu startids="1,2,-411"]
┌───● Cat Id 1
├───■ Cat Id 2
│   ├───● Cat Id 21
│   └───● Cat Id 22
└───● Cat Id 4111
Include multiple items at once: [autocategorymenu startids='1,2,-411']
Sort the menu items in descending order:
⭐[autocategorymenu level="4" sortname="DESC"]
┌───■ Cat Id 4
│   └───■ Cat Id 41
│       └───■ Cat Id 411
│           └───● Cat Id 4111
├───■ Cat Id 3
│   ├───● Cat Id 33
│   ├───■ Cat Id 32
│   │   ├───● Cat Id 323
│   │   ├───● Cat Id 322
│   │   └───● Cat Id 321
│   └───● Cat Id 31
├───■ Cat Id 2
│   ├───● Cat Id 22
│   └───● Cat Id 21
└───● Cat Id 1
			
Sort the menu items in descending order. [autocategorymenu level='4' sortname='DESC']
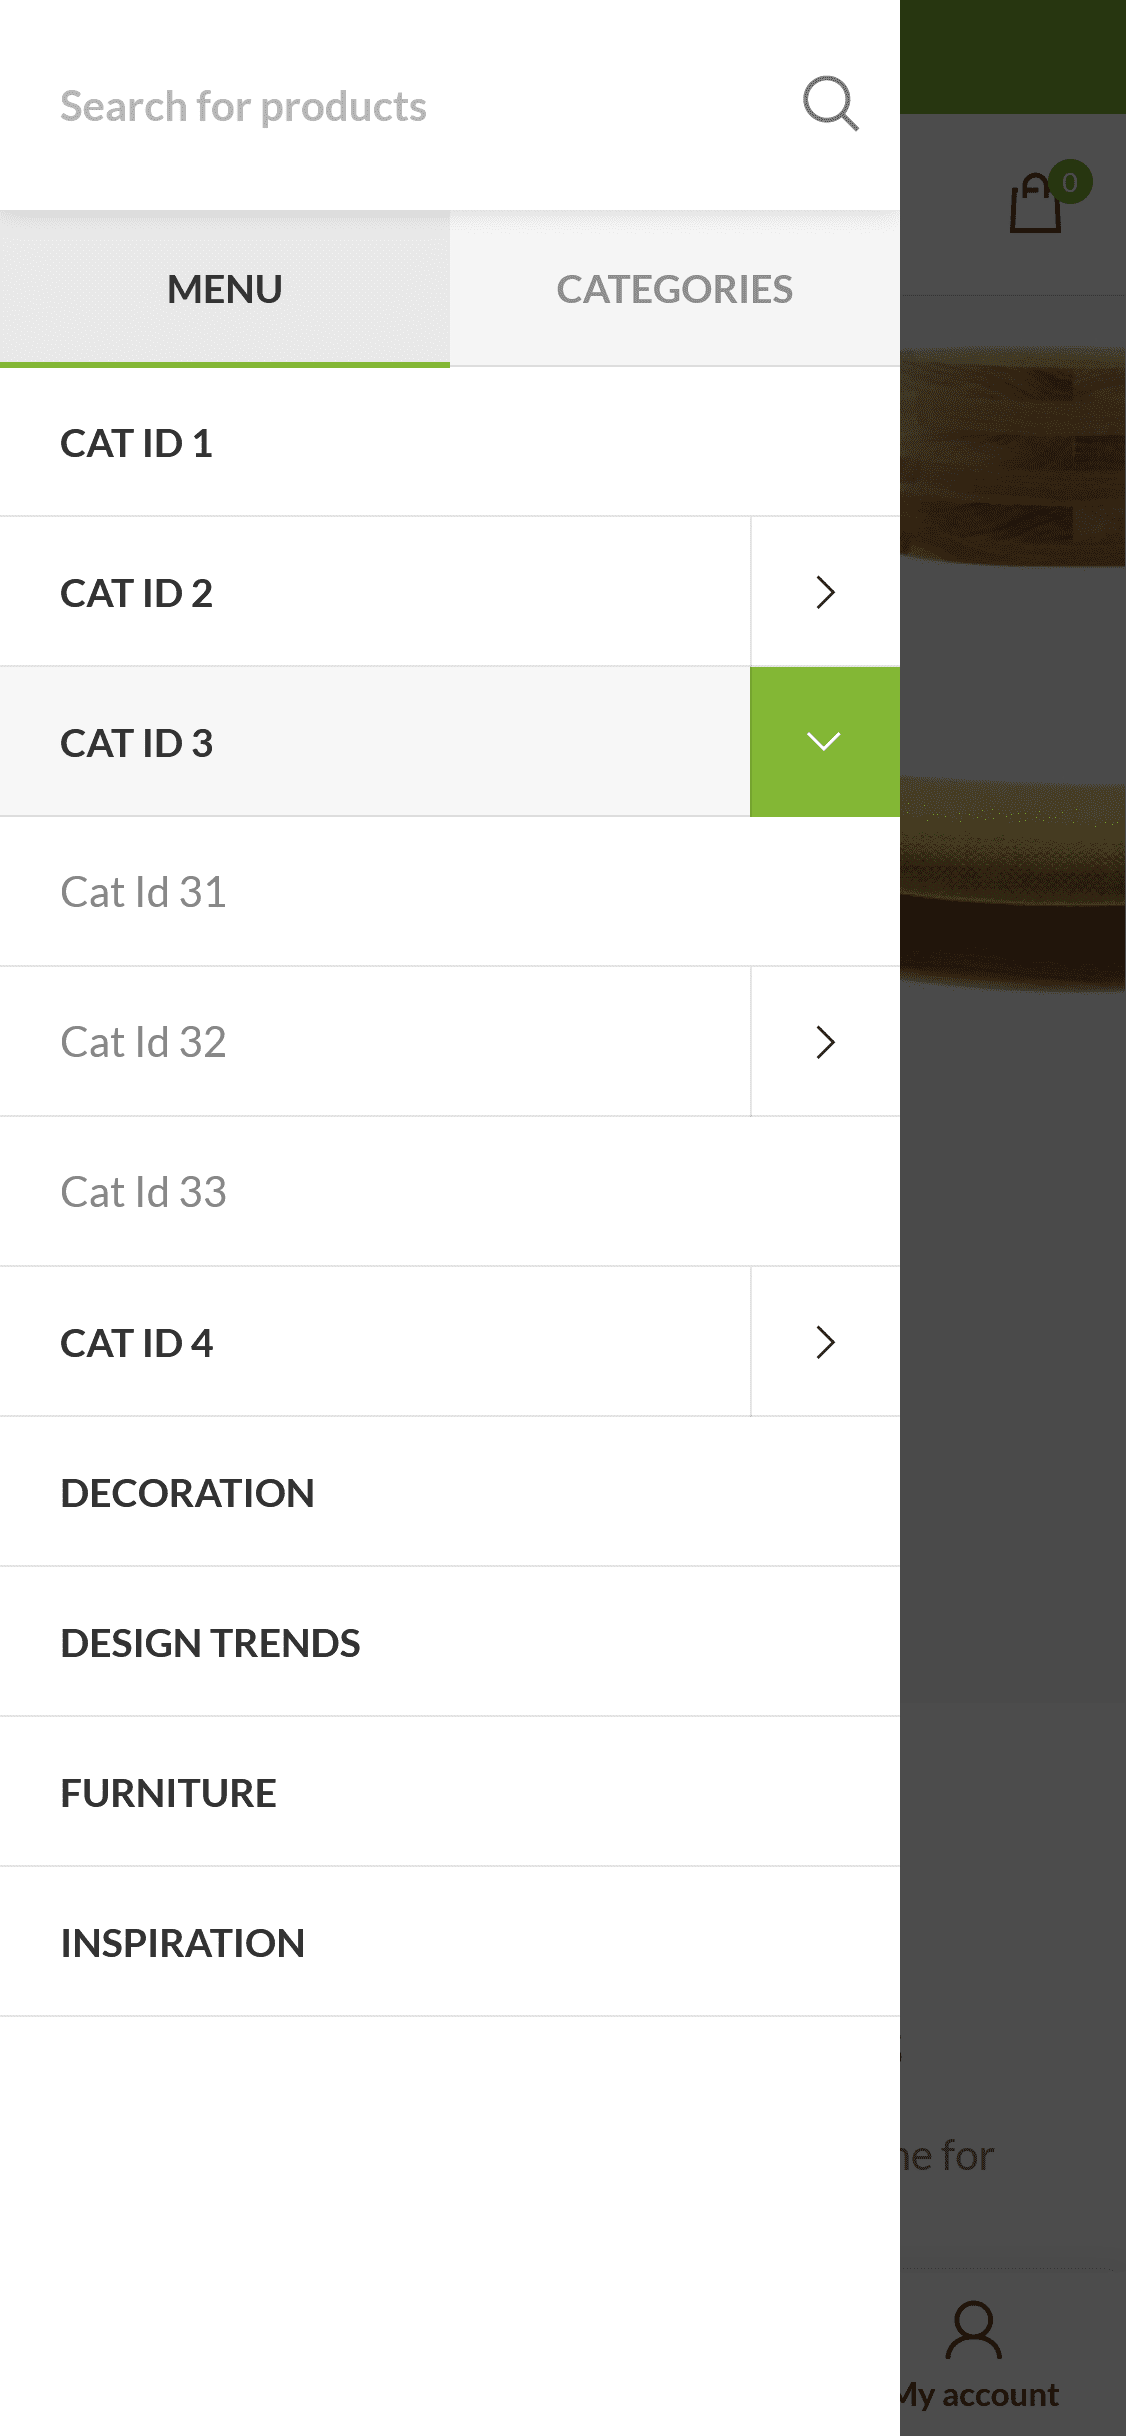
WoodMart Theme Mobile navigation auto menu:
⭐[autocategorymenu level="4" chld_cls="menu-item menu-simple-dropdown wd-event-hover" a_cls="woodmart-nav-link" prnt_cls="wd-sub-menu" prnt_co1="sub-sub-menu"]

Setup: Appearance > Menus > Manage Locations > Main Menu > [Menu Name]
┌───● Cat Id 1
├───■ Cat Id 2
│   ├───● Cat Id 21
│   └───● Cat Id 22
├───■ Cat Id 3
│   ├───● Cat Id 31
│   ├───■ Cat Id 32
│   │   ├───● Cat Id 321
│   │   ├───● Cat Id 322
│   │   └───● Cat Id 323
│   └───● Cat Id 33
└───■ Cat Id 4
    └───■ Cat Id 41
        └───■ Cat Id 411
            └───● Cat Id 4111
WoodMart Theme Mobile navigation auto menu
WoodMart Theme desktop main navigation auto menu:
⭐[autocategorymenu level="4" prnt_ca1="wd-dropdown" chld_cls="menu-item menu-simple-dropdown wd-event-hover" a_cls="woodmart-nav-link" prnt_cls="sub-menu wd-sub-menu" cntnr_1e="</div></div>" cntnr_1s="<div class='color-scheme-dark wd-design-default wd-dropdown-menu wd-dropdown'><div class='container'>"]

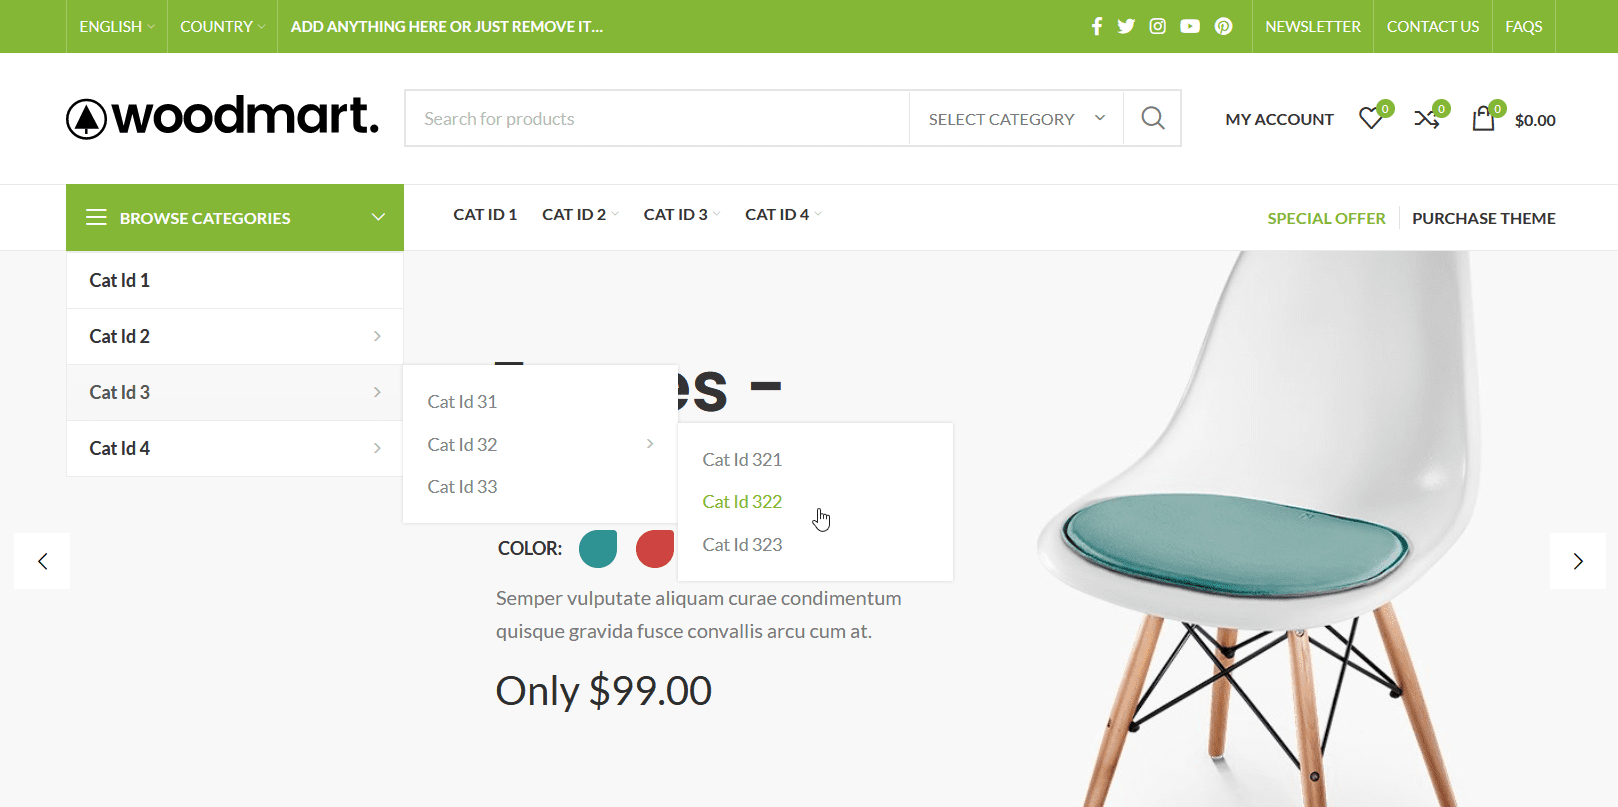
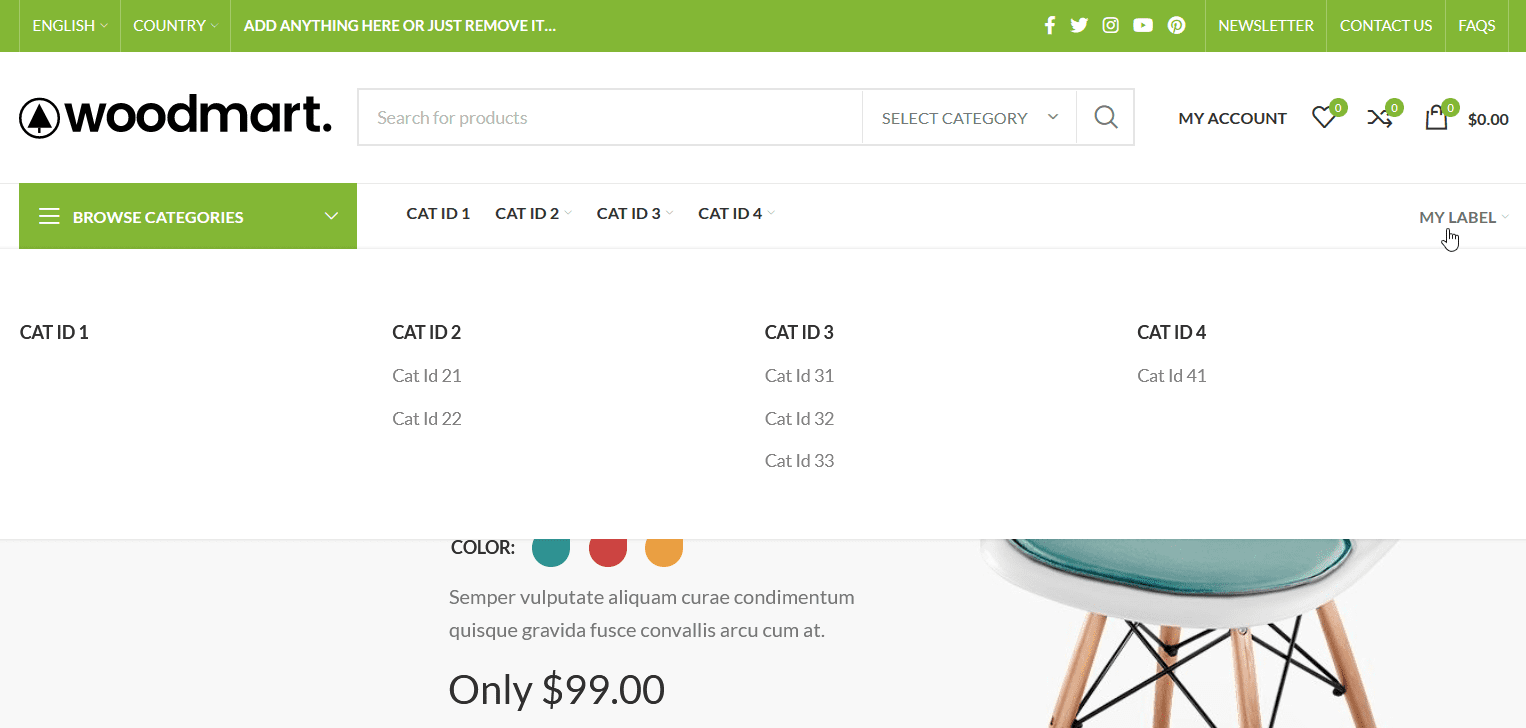
Setup: WoodMart > Header Builder > Header Base (Edit) > Desktop > Header bottom > Main menu (Edit) > Choose menu > [Menu Name]
┌───● Cat Id 1
├───■ Cat Id 2
│   ├───● Cat Id 21
│   └───● Cat Id 22
├───■ Cat Id 3
│   ├───● Cat Id 31
│   ├───■ Cat Id 32
│   │   ├───● Cat Id 321
│   │   ├───● Cat Id 322
│   │   └───● Cat Id 323
│   └───● Cat Id 33
└───■ Cat Id 4
    └───■ Cat Id 41
        └───■ Cat Id 411
            └───● Cat Id 4111
WoodMart Theme desktop main navigation auto menu
WoodMart Theme desktop left categories navigation:
⭐[autocategorymenu level="4" prnt_ca1="wd-dropdown" chld_cls="menu-item menu-simple-dropdown wd-event-hover" a_cls="woodmart-nav-link" prnt_cls="sub-menu wd-sub-menu" cntnr_1e="</div></div>" cntnr_1s="<div class='color-scheme-dark wd-design-default wd-dropdown-menu wd-dropdown'><div class='container'>"]

Setup: WoodMart > Header Builder > Header Base (Edit) > Desktop > Header bottom > Categories (Edit) > Choose menu > [Menu Name]
┌───● Cat Id 1
├───■ Cat Id 2
│   ├───● Cat Id 21
│   └───● Cat Id 22
├───■ Cat Id 3
│   ├───● Cat Id 31
│   ├───■ Cat Id 32
│   │   ├───● Cat Id 321
│   │   ├───● Cat Id 322
│   │   └───● Cat Id 323
│   └───● Cat Id 33
└───■ Cat Id 4
    └───■ Cat Id 41
        └───■ Cat Id 411
            └───● Cat Id 4111
WoodMart Theme desktop left categories navigation auto menu
WoodMart Theme desktop full-width dropdown grid - columns menu:
⭐[autocategorymenu lng_label="My Label" fn_custom="woodmart01"]

Setup: WoodMart > Header Builder > Header Base (Edit) > Desktop > Header bottom > Menu (Edit) > Choose menu > [Menu Name]
Appearance > Menus > Edit Menus > [Menu Name] > Extra options > CSS Classes (optional) : menu-item-has-children
┌───● Cat Id 1
├───■ Cat Id 2
│   ├───● Cat Id 21
│   └───● Cat Id 22
├───■ Cat Id 3
│   ├───● Cat Id 31
│   ├───● Cat Id 32
│   └───● Cat Id 33
└───■ Cat Id 4
    └───● Cat Id 41
WoodMart Theme desktop full-width dropdown grid - columns menu
Flatsome Theme desktop Main Menu: Please donate
┌───● Cat Id 1
├───■ Cat Id 2
│   ├───● Cat Id 21
│   └───● Cat Id 22
├───■ Cat Id 3
│   ├───● Cat Id 31
│   ├───● Cat Id 32
│   └───● Cat Id 33
└───■ Cat Id 4
    └───● Cat Id 41
WoodMart Theme desktop left categories navigation auto menu
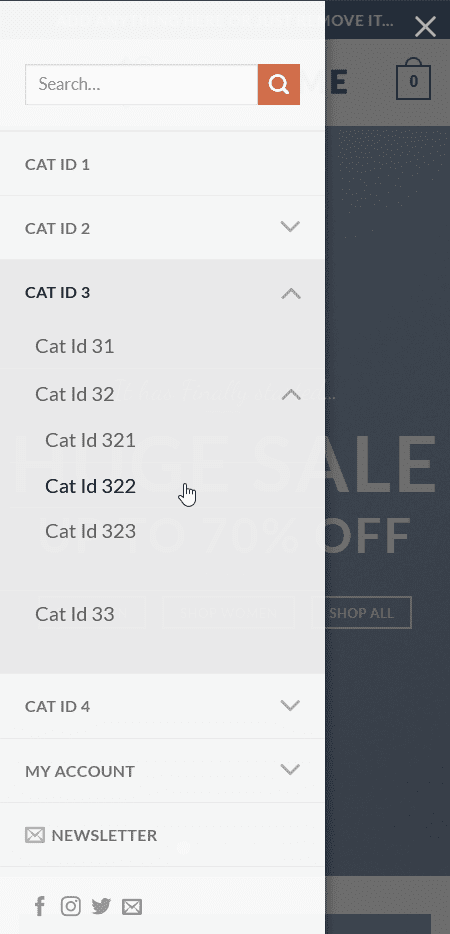
Flatsome Theme mobile Main Menu: Please donate
┌───● Cat Id 1
├───■ Cat Id 2
│   ├───● Cat Id 21
│   └───● Cat Id 22
├───■ Cat Id 3
│   ├───● Cat Id 31
│   ├───■ Cat Id 32
│   │   ├───● Cat Id 321
│   │   ├───● Cat Id 322
│   │   └───● Cat Id 323
│   └───● Cat Id 33
└───■ Cat Id 4
    └───■ Cat Id 41
        └───■ Cat Id 411
            └───● Cat Id 4111
WoodMart Theme desktop left categories navigation auto menu
Woodmart Demo - test environment: Imported "Woodmart Main" prebuilt website on theme version 7.1.4, WordPress version 6.3.1, PHP version 7.4 / 8.2, WooCommerce Version 8.1.1
Flatsome Demo - test environment: Imported "Classic Shop" prebuilt website on theme version 3.15.6, WordPress version 6.3.1, PHP version 7.4 / 8.2, WooCommerce Version 8.1.1


Shortcode Helper

Your shortcode:
[autocategorymenu]
Reset
Menu items:
Exclude item id(s):
Maximum hierarchy level:
Extra get parameter after link:
<ul id="primary-menu" class="menu-container"> < class=""> ¦ <a href="#" class="">Level 1, Item 1</a> </li> <li class="menu-item"> ¦ <a href="#">Level 1, Item 2</a> </li> <li class="menu-item "> ¦ ¦ <a href="#">Level 1, Item 3</a> ¦ ¦ < class=""> ¦ ¦ <li class="menu-item"> ¦ ¦ ¦ <a href="#">Level 2, Item 3.1</a> ¦ ¦ </li> ¦ </ul> </li> <li class="menu-item menu-item-has-children"> ¦ ¦ <a href="#">Level 1, Item 4</a> ¦ ¦ <ul class="sub-menu"> ¦ ¦ <li class="menu-item"> ¦ ¦ ¦ <a href="#">Level 2, Item 4.1</a> ¦ ¦ </li> ¦ ¦ <li class="menu-item"> ¦ ¦ ¦ <a href="#">Level 2, Item 4.2</a> ¦ ¦ </li> ¦ </ul> </li>
Your shortcode:
[autocategorymenu]


This plugin works with most of WordPress themes. Sometimes you have to use some extra parameters. Here are examples for the free version.

<ul id="primary-menu-list" class="menu-wrapper">
  <li id="menu-item-16006" class="menu-item menu-item-type-custom menu-item-object-custom menu-item-16006"><a href="#">Lost password</a></li>
  <li id="menu-item-16004" class="menu-item menu-item-type-custom menu-item-object-custom menu-item-has-children menu-item-16004"><a href="#">Account</a>
    <button class="sub-menu-toggle" aria-expanded="false" onClick="twentytwentyoneExpandSubMenu(this)"><span class="icon-plus"><svg class="svg-icon" width="18" height="18" aria-hidden="true" role="img" focusable="false" viewBox="0 0 24 24" fill="none" xmlns="http://www.w3.org/2000/svg"><path fill-rule="evenodd" clip-rule="evenodd" d="M18 11.2h-5.2V6h-1.6v5.2H6v1.6h5.2V18h1.6v-5.2H18z" fill="currentColor"/></svg></span><span class="icon-minus"><svg class="svg-icon" width="18" height="18" aria-hidden="true" role="img" focusable="false" viewBox="0 0 24 24" fill="none" xmlns="http://www.w3.org/2000/svg"><path fill-rule="evenodd" clip-rule="evenodd" d="M6 11h12v2H6z" fill="currentColor"/></svg></span><span class="screen-reader-text">Open menu</span></button>
    <ul class="sub-menu">
      <li id="menu-item-16003" class="menu-item menu-item-type-custom menu-item-object-custom menu-item-16003"><a href="#">Address</a></li>
      <li id="menu-item-16001" class="menu-item menu-item-type-custom menu-item-object-custom menu-item-has-children menu-item-16001"><a href="#">Orders</a>
        <ul class="sub-menu">
          <li id="menu-item-16002" class="menu-item menu-item-type-custom menu-item-object-custom menu-item-16002"><a href="#">Downloads</a></li>
        </ul>
      </li>
      <li id="menu-item-16005" class="menu-item menu-item-type-custom menu-item-object-custom menu-item-16005"><a href="#">Logout</a></li>
    </ul>
  </li>
</ul>

level : 2
chld_cls : menu-item menu-item menu-item-type-custom menu-item-object-custom menu-item-has-children
chld_chc : menu-item-has-children
subi_aft : <button class="sub-menu-toggle" aria-expanded="false" onClick="twentytwentyoneExpandSubMenu(this)"><span class="icon-plus"><svg class="svg-icon" width="18" height="18" aria-hidden="true" role="img" focusable="false" viewBox="0 0 24 24" fill="none" xmlns="http://www.w3.org/2000/svg"><path fill-rule="evenodd" clip-rule="evenodd" d="M18 11.2h-5.2V6h-1.6v5.2H6v1.6h5.2V18h1.6v-5.2H18z" fill="currentColor"/></svg></span><span class="icon-minus"><svg class="svg-icon" width="18" height="18" aria-hidden="true" role="img" focusable="false" viewBox="0 0 24 24" fill="none" xmlns="http://www.w3.org/2000/svg"><path fill-rule="evenodd" clip-rule="evenodd" d="M6 11h12v2H6z" fill="currentColor"/></svg></span><span class="screen-reader-text">Open menu</span></button>

Shortcode : [autocategorymenu hide_empty="0" level="2" chld_cls="menu-item menu-item menu-item-type-custom menu-item-object-custom menu-item-has-children" chld_chc="menu-item-has-children" subi_aft='<button class="sub-menu-toggle" aria-expanded="false" onClick="twentytwentyoneExpandSubMenu(this)"><span class="icon-plus"><svg class="svg-icon" width="18" height="18" aria-hidden="true" role="img" focusable="false" viewBox="0 0 24 24" fill="none" xmlns="http://www.w3.org/2000/svg"><path fill-rule="evenodd" clip-rule="evenodd" d="M18 11.2h-5.2V6h-1.6v5.2H6v1.6h5.2V18h1.6v-5.2H18z" fill="currentColor"/></svg></span><span class="icon-minus"><svg class="svg-icon" width="18" height="18" aria-hidden="true" role="img" focusable="false" viewBox="0 0 24 24" fill="none" xmlns="http://www.w3.org/2000/svg"><path fill-rule="evenodd" clip-rule="evenodd" d="M6 11h12v2H6z" fill="currentColor"/></svg></span><span class="screen-reader-text">Open menu</span></button>']

<ul class="primary-menu reset-list-style">
  <li id="menu-item-6" class="menu-item menu-item-type-custom menu-item-object-custom menu-item-6"><a href="#">Bulk 0</a></li>
  <li id="menu-item-8" class="menu-item menu-item-type-custom menu-item-object-custom menu-item-has-children menu-item-8">
    <a href="#">Bulk 1</a>
    <span class="icon"></span>
    <ul class="sub-menu">
      <li id="menu-item-9" class="menu-item menu-item-type-custom menu-item-object-custom menu-item-9"><a href="#">Bulk 1 . 1</a></li>
      <li id="menu-item-10" class="menu-item menu-item-type-custom menu-item-object-custom menu-item-10"><a href="#">Bulk 1 . 2</a></li>
    </ul>
  </li>
</ul>

subi_aft : <span class="icon"></span>

Shortcode : [autocategorymenu hide_empty="0" level="3" subi_aft='<span class="icon"></span>']

<div class="menu-main-menu-auto-container">
  <ul id="menu-main-menu-auto" class="main-menu" tabindex="0">
    <li id="menu-item-6" class="menu-item menu-item-type-custom menu-item-object-custom menu-item-6"><a href="#">Bulk 0</a></li>
    <li id="menu-item-8" class="menu-item menu-item-type-custom menu-item-object-custom menu-item-has-children menu-item-8">
      <a href="#" aria-haspopup="true" aria-expanded="false">Bulk 1</a>
      <span class="submenu-expand" tabindex="-1">
        <svg class="svg-icon" width="24" height="24" aria-hidden="true" role="img" focusable="false" xmlns="http://www.w3.org/2000/svg" viewBox="0 0 24 24"><path d="M7.41 8.59L12 13.17l4.59-4.58L18 10l-6 6-6-6 1.41-1.41z"></path><path fill="none" d="M0 0h24v24H0V0z"></path></svg>
      </span>
      <ul class="sub-menu">
        <li id="menu-item--1" class="mobile-parent-nav-menu-item menu-item--1"><span class="menu-item-link-return" tabindex="-1"><svg class="svg-icon" width="24" height="24" aria-hidden="true" role="img" focusable="false" viewBox="0 0 24 24" version="1.1" xmlns="http://www.w3.org/2000/svg" xmlns:xlink="http://www.w3.org/1999/xlink"><path d="M15.41 7.41L14 6l-6 6 6 6 1.41-1.41L10.83 12z"></path><path d="M0 0h24v24H0z" fill="none"></path></svg>Bulk 1</span></li>
        <li id="menu-item-9" class="menu-item menu-item-type-custom menu-item-object-custom menu-item-9"><a href="#">Bulk 1 . 1</a></li>
        <li id="menu-item-10" class="menu-item menu-item-type-custom menu-item-object-custom menu-item-10"><a href="#">Bulk 1 . 2</a></li>
      </ul>
    </li>
  </ul>
</div>

subi_aft : <span class="submenu-expand" tabindex="-1"><svg class="svg-icon" width="24" height="24" aria-hidden="true" role="img" focusable="false" xmlns="http://www.w3.org/2000/svg" viewBox="0 0 24 24"><path d="M7.41 8.59L12 13.17l4.59-4.58L18 10l-6 6-6-6 1.41-1.41z"></path><path fill="none" d="M0 0h24v24H0V0z"></path></svg></span>

Shortcode : [autocategorymenu hide_empty="0" subi_aft='<span class="submenu-expand" tabindex="-1"><svg class="svg-icon" width="24" height="24" aria-hidden="true" role="img" focusable="false" xmlns="http://www.w3.org/2000/svg" viewBox="0 0 24 24"><path d="M7.41 8.59L12 13.17l4.59-4.58L18 10l-6 6-6-6 1.41-1.41z"></path><path fill="none" d="M0 0h24v24H0V0z"></path></svg></span>']

<ul id="ast-hf-menu-1" class="main-header-menu ast-nav-menu ast-flex  submenu-with-border astra-menu-animation-fade  stack-on-mobile">
  <li id="menu-item-6" class="menu-item menu-item-type-custom menu-item-object-custom menu-item-6"><a href="#" class="menu-link">Bulk 0</a></li>
  <li id="menu-item-8" class="menu-item menu-item-type-custom menu-item-object-custom menu-item-has-children menu-item-8"><a href="#" class="menu-link">Bulk 1</a><button class="ast-menu-toggle" aria-expanded="false"><span class="screen-reader-text">Menu Toggle</span></button>
    <ul class="sub-menu">
      <li id="menu-item-9" class="menu-item menu-item-type-custom menu-item-object-custom menu-item-9"><a href="#" class="menu-link">Bulk 1 . 1</a></li>
      <li id="menu-item-10" class="menu-item menu-item-type-custom menu-item-object-custom menu-item-has-children menu-item-10"><a href="#" class="menu-link">Bulk 1 . 2</a><button class="ast-menu-toggle" aria-expanded="false"><span class="screen-reader-text">Menu Toggle</span></button>
        <ul class="sub-menu">
          <li id="menu-item-14" class="menu-item menu-item-type-custom menu-item-object-custom menu-item-14"><a href="#" class="menu-link">xx</a></li>
        </ul>
      </li>
    </ul>
  </li>
</ul>

a_cls : menu-link
level : 3

Shortcode : [autocategorymenu hide_empty="0" level="3" a_cls="menu-link"]

<ul id="primary-menu" class="menu">
  <li id="menu-item-6" class="menu-item menu-item-type-custom menu-item-object-custom menu-item-6"><a href="#">Bulk 0</a></li>
  <li id="menu-item-8" class="menu-item menu-item-type-custom menu-item-object-custom menu-item-has-children menu-item-8"><a href="#">Bulk 1</a>
    <ul class="sub-menu">
      <li id="menu-item-9" class="menu-item menu-item-type-custom menu-item-object-custom menu-item-9"><a href="#">Bulk 1 . 1</a></li>
      <li id="menu-item-10" class="menu-item menu-item-type-custom menu-item-object-custom menu-item-has-children menu-item-10"><a href="#">Bulk 1 . 2</a>
        <ul class="sub-menu">
          <li id="menu-item-14" class="menu-item menu-item-type-custom menu-item-object-custom menu-item-14"><a href="#">xx</a></li>
        </ul>
      </li>
    </ul>
  </li>
</ul>

level : 3

Shortcode : [autocategorymenu hide_empty="0" level="3"]

Shortcode : <nav class="is-horizontal is-content-justification-right is-layout-flex wp-container-2 is-responsive items-justified-right wp-block-navigation" aria-label="Header navigation"> <button aria-haspopup="true" aria-label="Open menu" class="wp-block-navigation__responsive-container-open " data-micromodal-trigger="modal-atakanau-1"> <svg width="24" height="24" xmlns="http://www.w3.org/2000/svg" viewBox="0 0 24 24" aria-hidden="true" focusable="false"> <rect x="4" y="7.5" width="16" height="1.5"></rect> <rect x="4" y="15" width="16" height="1.5"></rect> </svg> </button> <div class="wp-block-navigation__responsive-container " style="" id="modal-atakanau-1"> <div class="wp-block-navigation__responsive-close" tabindex="-1" data-micromodal-close=""> <div class="wp-block-navigation__responsive-dialog" aria-label="Menu"> <button aria-label="Close menu" data-micromodal-close="" class="wp-block-navigation__responsive-container-close"> <svg xmlns="http://www.w3.org/2000/svg" viewBox="0 0 24 24" width="24" height="24" aria-hidden="true" focusable="false"> <path d="M13 11.8l6.1-6.3-1-1-6.1 6.2-6.1-6.2-1 1 6.1 6.3-6.5 6.7 1 1 6.5-6.6 6.5 6.6 1-1z"></path> </svg> </button> <div class="wp-block-navigation__responsive-container-content" id="modal-atakanau-1-content"> <ul class="wp-block-navigation__container"> [autocategorymenu taxonomy0="product_cat" hide_empty="0" prnt_cls="wp-block-navigation__submenu-container" chld_cls="wp-block-navigation-item" chld_chc="has-child open-on-hover-click wp-block-navigation-submenu" a_cls="wp-block-navigation-item__content" subi_aft="<button aria-label='Bulk 1 submenu' class='wp-block-navigation__submenu-icon wp-block-navigation-submenu__toggle' aria-expanded='false'><svg xmlns='http://www.w3.org/2000/svg' width='12' height='12' viewBox='0 0 12 12' fill='none' aria-hidden='true' focusable='false'><path d='M1.50002 4L6.00002 8L10.5 4' stroke-width='1.5'></path></svg></button>"] </ul> </div> </div> </div> </div> </nav>


== Changelog ==

= Version 2.0.5 =
* Simplified: Code comments
* Bumped up "Tested up to: 6.5"

= Version 2.0.4 =
* Modified: Info links
* Bumped up "Tested up to: 6.4.2"

= Version 2.0.3 =
* Modification: (Minor) Interface
* Bumped up "Tested up to: 6.3.1"

= Version 2.0.2 =
* Fixed: Pro version compatibility
* Bumped up "Tested up to: 6.3"

= Version 2.0.1 =
* Edited: Info text
* Bumped up "Tested up to: 6.2"

= Version 2.0.0 =
* Added: New option, add item id to menu item class
* Added: Taxonomy list on admin panel
* Added: Expandable with paid Pro version
* Dropped: Custom taxonomy support
* Bumped up "Tested up to: 6.1.1"

= Version 1.02 =
* Added: Null array item handler for base category path in PHP
* Fixed: Broken support link
* Bumped up "Tested up to: 6.0.1"

= Version 1.01 =
* Bumped up "Tested up to: 5.9"

= Version 1.00 =
* Initial version released


Recommended Wordpress Plugin
Free WhatsApp plugin for WordPress. Add the clickable WhatsApp button to your site. Compact, Simple, Speedy: CSS chat button. Lightweight and fast loading for best SEO.

woodmart category menu, woodmart mobile menu categories, flatsome mobile menu, wordpress create menu programatically, Astra, Avada, Divi, Hello, OceanWP, Sydney, Betheme, GeneratePress, The7, Porto, Phlox, Enfold, X, Uncode, WoodMart, Flatsome, Bridge, Jupiter, Salient, Newspaper, Hestia, OnePress, Neve, Impreza, Go, Kadence WP, TheGem, uDesign, Kallyas, Total, Brooklyn, Kalium, Soledad, Monstroid2, Shopkeeper, Eduma, Oshine, Visualmodo
Share:
Subscribe to: Posts (Atom)