Showing posts with label WordPress. Show all posts

WordPress Çekirdek Sürümünü Elle Yükseltme

Neden WordPress güncellenir?

WordPress neden güncellenir? Neden WordPress güncellemesi çıkıyor?
1

WordPress PHP ile yazılmış bir içerik yönetim sistemidir. Temel olarak PHP komutlarında değişiklikler yapılması ile birlikte, jQuery, Bootstrap gibi kullanılan diğer bileşenler de yenilenir. Bu sebepten, yazılımcılar geliştirdikleri kaynak kodlarında değişiklikler yaparlar. Başta WordPress'in çekirdek kodları olmak üzere tema şablonlarının ve eklentilerin yeni sürümleri yayınlanır. Sonuçta, WordPress kullanılarak hazırlanan siteler için zaman zaman yazılım güncelleştirmeleri yapılması gerekir.

1

WordPress'i güncellemek gerekir mi?

WordPress neden yeni sürüme güncellenir? WordPress'i son sürüme güncellemek gerekir mi?
1

Sitenizin daha iyi performans ile çalışması ve güvenlik açıklarının kapatılması için güncelleştirmelerin yapılması gerekir.

1
Bazı durumlarda sunucunuzdaki kısıtlamalar yüzünden sitenizi otomatik olarak güncelleme yapamayabilirsiniz. Otomatik güncelleme WordPress'in en son sürümüne yükseltme yapar. Bazen de WordPress'i son sürümü yerine sizin belirleyeceğiniz veya ihtiyacınız olan sürüme yükseltme yapmanız gerekebilir. Bu gibi durumlarda WordPress'i elle yükseltmeniz gerekir.
WordPress Çekirdek Sürümünü Elle Yükseltme

WordPress sürümü elle nasıl yükseltilir?

WordPress sürümü manuel nasıl güncellenir? WordPress çekirdeği elle nasıl yükseltilir?
1

  1. Her şeyden önce, sitenizin tüm yedeğini alın. Sunucunuzdaki dosyaların ve veritabanınızın bir kopyasını oluşturun.
  2. WordPress.org adresinden yükseltmek istediğiniz sürüme ait sıkıştırılmış WordPress dosyasını indirin.
  3. İndirdiğiniz dosyayı kullanılmayan bir dizine çıkarın.
  4. WordPress sitenizdeki tüm eklentileri devre dışı bırakın.
  5. Web sitenizin çalıştığı kök dizininin altındaki ‘wp-includes’ ve ‘wp-admin’ dizinlerini silin.
  6. Sıkıştırılmış dosyadan dışarı çıkardığınız, yeni sürüne ait olan ‘wp-includes’ ve ‘wp-admin’ dizinlerini, sitenizin çalıştığı kök dizininine kopyalayın ( veya taşıyın). Bir önceki adımda sildiğiniz ‘wp-includes’ ve ‘wp-admin’ dizinlerini yenisi ile değiştirmiş olacaksınız.
  7. ‘wp-content’ dizininin kendisini veya içindeki hiçbir dosyayı silmeyin. Yeni sürümün ‘wp-content’ dizinini, çalışan ve varolan sitenin ‘wp-content’ dizininin üzerine koplayalayın. Aynı isimle varolan tüm dosyaları yeni sürüme ait olanlarıyla üzerine yazın ve değiştirin.
  8. Sıkıştırılmış dosyadan dışarı çıkardığınız kök (‘/‘) dizininin altındaki tüm dosyaları, sitenizin çalıştığı kök dizininine kopyalayın. Böylece, varolan dosyaları yeni sürümleri ile değiştirin ve ( varsa ) yeni sürüm ile gelen yeni dosyaları site dizinine koplayamış olacaksınız. Bu aşamada, sitenizin kullandığı ‘wp-config.php’ dosyası etkilenmez çünkü WordPress kurulum dosyası içinde bu dosya bulunmaz.
  9. Yeni sürüme ait ‘wp-config-sample.php’ dosyasını inceleyin. Eğer yeni bir ayar parametresi kullanılıyorsa gerekli olan uyum düzenlemelerini kendi ‘wp-config.php’ dosyanıza ekleyin veya değiştirin.
  10. Eğer daha önce başarısız olan veya yarım kalmış bir güncelleme olduysa, kök dizinin içinde yaratılmış olan ‘.maintenance’ dosyasını silin.
  11. Adres satırına sitenizin devamına ‘/wp-admin/’ yazıp, kullanıcı adınız ve şifrenizi kullanarak sitenizin yönetim paneline giriş yapın.
  12. Gerekli ise, WordPress sizden veritabanınızı güncellemek isteyecektir.
  13. Daha önce devre dışı bıraktığınız eklentilerinizi etkinleştirin.
  14. Tarayıcınızın geçici belleğini temizleyin. Eğer kullanıyorsanız, sunucu tarafındaki tüm sayfa belleklerini silin.
  15. Şimdi WordPress sitenizi güncellemeyi tamamlamış ve WordPress'in yeni sürümüyle kullanıyor olacaksınız. Tebrikler.

1

EtiketWordpress manuel güncelleme,WordPress PHP güncelleme
Share:

Import CDN-Remote Images — WP Plugin

Add external images to the media library without importing, i.e. uploading them to your WordPress site.

Import CDN-Remote Images — WordPress Plugin

Description


By default, adding an image to the WordPress media library requires you to import or upload the image to the WordPress site, which means there must be a copy of the image file stored in the site. This plugin enables you to add an image stored in an external site to the media library by just reading list of remote images using CDN service's (Cloudinary) API. In this way you can host the images in a dedicated server other than the WordPress site, and still be able to show them by various gallery plugins which only take images from the media library.

The plugin provides a dedicated 'Media' -> 'Import images' submenu page.

Supported import options:
* Bulk custom URL import ( Manual )
* Cloudinary API ( Automatic )
(others coming soon)

Installation


1. Upload the plugin files to the `/wp-content/plugins/import-cdn-remote-images` directory, or install the plugin through the WordPress plugins screen directly.
2. Activate the plugin through the 'Plugins' screen in WordPress.

Usage


After installation you can use the plugin to add external media without import:

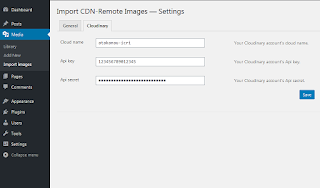
1. Go to setting page of plugin and save required CDN service parameters such as Cloud name, API key, API secret.
2. Click the 'Media' -> 'Import images' submenu in the side bar.
3. Click 'Update' button and automatically fill in the URLs of the images you want to add.
4. Click the 'Add' button, the remote images will be added.

Changelog


= Version 2.00 =
* Added: Bulk custom URL import
* Improved: User interface
* Fixed: Not showing submenu link for WooCommerce Shop Manager users

= Version 1.0.0 =
* Initial version released

Adding media from the WordPress external media library is as easy as using the built-in library. It is possible to create a WordPress cdn media library. You can use this remote upload WordPress plugin for that. This is a very easy to use WordPress image cdn plugin. Simple wp cdn plugin. WordPress cdn images make the page load faster. In wp, media import is not normally provided. How to connect a CDN for images WordPress? The answer to your question is this import external images plugin. Even if this is not an official cloudinary plugin, it supports cdn cloudinary, just like cloudinary WordPress plugin. cloudinary cdn images can be imported in bulk. Free external media plugin. Serve images using a CDN on WordPress. Use CDN for images to improve website content.
Share:

WordPress fast setup initialize

Preparation for WordPress installation


In order for WordPress to be installed on a server computer, MySQL data definition and codes written in php programming language are required. The first step to starting WordPress installation is to install WordPress files on the server computer. Compressed file size of WordPress files is around 14 MB. These files are over 1900 files in javascript, css, images, php and other formats. There are different options available for uploading files to the server.

• Using FTP only: It is the simplest. But you need to wait more for the process to complete.
»Extract the compressed WordPress file to your computer.
»Upload a large number of files to individual server via FTP.

• Using cPanel: Faster. But you need to have cPanel interface.
»Upload the single compressed file to your server.
»Extract the compressed file in the server with the file manager.

-

Alternative and fast WordPress setup


You can copy WordPress files to your server faster using an alternative method. Install the small php-coded program snippet on the bottom and run it. That's all. You are ready to start WordPress installation with one click.

  1
  2
  3
  4
  5
  6
  7
  8
  9
 10
 11
 12
 13
 14
 15
 16
 17
 18
 19
 20
 21
 22
 23
 24
 25
 26
 27
 28
 29
 30
 31
 32
 33
 34
 35
 36
 37
 38
 39
 40
 41
 42
 43
 44
 45
 46
 47
 48
 49
 50
 51
 52
 53
 54
 55
 56
 57
 58
 59
 60
 61
 62
 63
 64
 65
 66
 67
 68
 69
 70
 71
 72
 73
 74
 75
 76
 77
 78
 79
 80
 81
 82
 83
 84
 85
 86
 87
 88
 89
 90
 91
 92
 93
 94
 95
 96
 97
 98
 99
100
101
102
103
104
105
106
107
108
109
110
111
112
113
114
115
116
117
118
119
120
121
122
123
124
125
126
127
128
129
130
131
132
133
134
135
136
137
138
139
140
141
142
143
144
145
146
147
148
149
150
151
152
153
154
155
156
157
158
159
160
161
162
163
164
165
166
167
168
<?php 

echo download_wordpress_zip();
// echo download_wordpress_zip('tr_TR');

function download_wordpress_zip( $language = false ){
/**
 * Initialize wordpress for installation with one click.
 *
 * @param string $language		( Optional ) Wordpress setup language. 
 *								false	: (Default) English - en_US
 *								tr_TR	: Turkish
 *								pt_PT	: Portuguese
 *								ja		: Japanese
 *								… See full list of languages: 
 *								 https://make.wordpress.org/polyglots/teams/
 *
 * @return string					Returns process messages.
 *
 * usage
 *		download_wordpress_zip();
 *		download_wordpress_zip('tr_TR');
 *
 * https://atakanau.blogspot.com
 */
	
	$logs = '';
	
	// Generate download link
	// https://wordpress.org/latest.zip
	// https://tr.wordpress.org/latest-tr_TR.zip
	$sub_dir = $language ? explode('_',$language)[0].'.' : '';
	$url = 'https://'.$sub_dir.'wordpress.org/';
	$file_name = 'latest' . ( $language ? '-'.$language : '' ) . '.zip';
	$file_name_local = 'wordpress' . ( $language ? '-'.$language : '' ) . '.zip';
	$logs .= "<pre>Download started: $url.$file_name </pre>";
	// Download zip file from wordpress.org to our server
	file_put_contents($file_name_local, fopen($url.$file_name, 'r'));
	$fileSizeMB = number_format((filesize($file_name_local) / 1024 / 1024), 2);
	$logs .= "<pre>Zip file saved as $file_name_local ($fileSizeMB MB) </pre>";
	// Unzip downloaded file
	if( class_exists('ZipArchive') ){
		$path = pathinfo(realpath($file_name_local), PATHINFO_DIRNAME);
		$zip = new ZipArchive;
		$res = $zip->open($file_name_local);
		if ($res === TRUE) {
			// extract it to the path we determined above
			$zip->extractTo($path);
			$zip->close();
			$logs .= "<pre>$file_name_local extracted to $path</pre>";
		} else {
			$logs .= "<pre>Error, file can not open: $file_name_local</pre>";
		}
	}elseif( function_exists('unzip') ){
		$dir = getcwd();
		unzip($dir,$file_name_local);
		$logs .= "<pre>$file_name_local extracted to $path</pre>";
	}else{
		$logs .= "<pre>Error, file can not unzip: $file_name_local</pre>";
	}
	// Move all files and directories from extracted folder to current directory
	$sourceDir = __DIR__ . DIRECTORY_SEPARATOR . 'wordpress';
	$targetDir = __DIR__ . DIRECTORY_SEPARATOR . '.';
	rmove($sourceDir , $targetDir);
	return $logs;
}

/**
 * A Recursive directory move that allows exclusions. The excluded items in the src will be deleted
 * rather than moved.
 * https://gist.github.com/bubba-h57/5117694
 *
 * @param string $sourceDir			The fully qualified source directory to copy
 * @param string $targetDir			The fully qualified destination directory to copy to
 * @param array $exclusions			An array of preg_match patterns to ignore in the copy process
 * @throws InvalidArgumentException
 * @throws ErrorException
 * @return boolean					Returns TRUE on success, throws an error otherwise.
 */
function rmove($src, $dest, $exclusions = array()){

	// If source is not a directory stop processing
	if(!is_dir($src)) throw new InvalidArgumentException('The source passed in does not appear to be a valid directory: ['.$src.']', 1);

	// If the destination directory does not exist create it
	if(!is_dir($dest)) {
		if(!mkdir($dest, 0, true)){
			throw new InvalidArgumentException('The destination does not exist, and I can not create it: ['.$dest.']', 2);
		}
	}

	// Ensure enclusions parameter is an array.
	if (! is_array($exclusions)) throw new InvalidArgumentException('The exclustion parameter is not an array, it MUST be an array.', 3);

	$emptiedDirs = array();

	// Open the source directory to read in files
	foreach(new RecursiveIteratorIterator(new RecursiveDirectoryIterator($src, FilesystemIterator::SKIP_DOTS), RecursiveIteratorIterator::CHILD_FIRST) as $f) {

		// Check to see if we should ignore this file or directory
		foreach ($exclusions as $pattern){
			if (preg_match($pattern, $f->getRealPath())){
				if ($f->isFile()){
					if (! unlink($f->getRealPath())) throw new ErrorException("Failed to delete file [{$f->getRealPath()}] ", 4);
				}elseif($f->isDir()){
					// we will attempt deleting these after we have moved all the files.
					array_push($emptiedDirs, $f->getRealPath());
				}

				// Because we have to jump up two foreach levels
				continue 2;
			}
		}
		// We need to get a path relative to where we are copying from
		$relativePath = str_replace($src, '', $f->getRealPath());

		// And we can create a destination now.
		$destination = $dest . $relativePath;

		// if it is a file, lets just move that sucker over
		if($f->isFile()) {
			$path_parts = pathinfo($destination);

			// If we don't have a directory for this yet
			if (! is_dir($path_parts['dirname'])){
				// Lets create one!
				if (! mkdir($path_parts['dirname'], 0, true)) throw new ErrorException("Failed to create the destination directory: [{$path_parts['dirname']}]", 5);
			}

			if (! rename($f->getRealPath(), $destination)) throw new ErrorException("Failed to rename file [{$f->getRealPath()}] to [$destination]", 6);

		// if it is a directory, lets handle it
		}elseif($f->isDir()){
			// Check to see if the destination directory already exists
			if (! is_dir($destination)){
				if (! mkdir($destination, 0, true)) throw new ErrorException("Failed to create the destination directory: [$destination]", 7);
			}

			// we will attempt deleting these after we have moved all the files.
			array_push($emptiedDirs, $f->getRealPath());

		// if it is something else, throw a fit. Symlinks can potentially end up here. I haven't tested them yet, but I think isFile() will typically
		// just pick them up and work
		}else{
			throw new ErrorException("I found [{$f->getRealPath()}] yet it appears to be neither a directory nor a file. [{$f->isDot()}] I don't know what to do with that!", 8);
		}
	}

	foreach ($emptiedDirs as $emptyDir){
		// print "Deleting $emptyDir\n";
		if (realpath($emptyDir) == realpath($src)){
			continue;
		}
		if (!is_readable($emptyDir)) throw new ErrorException("The source directory: [$emptyDir] is not Readable", 9);

		// Delete the old directory
		if (! rmdir($emptyDir)){
			// The directory is empty, we should have successfully deleted it.
			if ((count(scandir($emptyDir)) == 2)){
				throw new ErrorException("Failed to delete the source directory: [$emptyDir]", 10);
			}
		}
	}

	// Finally, delete the base of the source directory we just recursed through
	if (! rmdir($src)) throw new ErrorException("Failed to delete the base source directory: [$src]", 11);
	return true;
}


-

How does it works?


This php script downloads the WordPress zip file directly to the server. and extracts (extracts) inside the server with php command.


-

About WordPress


WordPress is the most preferred of the frameworks that can be used to create a website. You can use it without any programming language knowledge. It is an easy to use and simple content management system (C.M.S.). It is suitable for creating a blog site. You can also make use of add-ons, portfolio, service promotion, web sites where you can sell products.


Share:

WooCommerce Sample CSV

Adding WooCommerce Bulk Products

Your store may appear blank right after WooCommerce is installed. There is no product, order or review. This is deliberate so you can start building your own products and tuning the WooCommerce product exactly the way you want it.
But if you want to see what a store full of products looks like, you can batch upload a product using an xml or csv file with a list of products.

WooCommerce Products Import

Download the WooCommerce demo products csv file to your computer:
Download sample CSV file
Then it's time to load!
From the WordPress Dashboard:
1) In the menu: Select Tools > Import .
2) Click Run importer under WooCommerce products (CSV).
3) Choose Choose file and then select the woocommerce-sample-products.csv file you downloaded.
4) A Column Mapping screen appears. Go ahead and finish the process.

Keywords:WooCommerce sample product csv file download, CSV WooCommerce example, woocommerce sample products, woocommerce sample products csv download, sample product csv file download, sample csv file download, sample product csv file woocommerce, woocommerce sample product data, woocommerce csv example, woocommerce csv import sample file, woocommerce import demo products, sample woocommerce products csv, woocommerce demo products import, woocommerce demo products csv, woocommerce product csv file download, woocommerce demo csv file download, woocommerce dummy data csv file download, woocommerce dummy product csv download, bulk product upload in woocommerce, woocommerce dummy products csv
Share:

WooCommerce Örnek CSV

WooCommerce Toplu Ürün Ekleme

WooCommerce yüklendikten hemen sonra mağazanız boş görünebilir. Ürün, sipariş, inceleme yoktur. Bu kasıtlıdır, böylece kendi ürünlerinizi oluşturmaya ve WooCommerce ürününü tam olarak istediğiniz gibi ayarlamaya başlayabilirsiniz.
Fakat ürünlerle dolu bir mağazanın neye benzediğini görmek isterseniz, ürün listesi içeren bir xml veya csv dosyası kullanarak toplu ürün yükleme yapabilirsiniz.

WooCommerce Ürünleri İçe Aktarma

Dosyayı bilgisayarınıza indirin:
Örnek CSV dosyası indir
Daha sonra yükleme zamanı!
WordPress Panosundan:
1) Menüde: Araçlar > İçe aktar'ı seçin.
2) WooCommerce ürünleri (CSV) altındaki İçe aktarıcıyı çalıştır'ı tıklayın.
3) Dosya seç öğesini seçin ve ardından indirdiğiniz woocommerce-ornek-urun-turkce.csv dosyasını seçin.
4) Bir Sütun Eşleme ekranı belirir. Devam edip işlemi bitirin.

Share:

Subscribe to: Posts (Atom)